
Owner's Manual
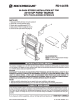

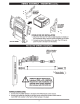
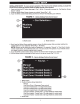
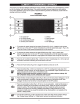

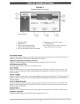
Table Of Contents

FACTORY
STEREO
REMOVAL
201
0-UP
FORD
TAURUS
1.
With
Panel Removal
Tool
(PRl), unclip shifters
leather
boot pushing down on the chrome ring then
extract
(2)
T-20
Torx screws
revealed
and remove shifter.
2. With
PRT,
unclip
upper sides
of
the center
console panels, unplug
and remove.
3.
Extract
(4)
7mm screws securing the far rear paneVcup
holder on the center
console, unplug
and remove.
4.
Extract
(4)
7mm screws securing shifter/cup holder panel, unplug
and remove.
5.
Extract
(4)
7mm screws securing 12V
panel
under radio/AC panel, unplug and remove.
6. With
PAT,
unclip
top
portion
of
the
panel
underneath the steering
wheel column.
7.
Extract
(1)
7mm screw securing
panel
to
the
left
of
the steering
wheel,
then with panel removal tool,
unclip, unplug
and remove.
8.
With
PAT,
unclip panel
to
the right
of
the steering
wheel, unplug
and remove.
9.
With
PAT,
unclip gauge
panel and remove.
1
0.
With
PAT,
unclip
panel above
glove compartment.
11. Extract
(1
0)
7mm screws securing radio/AC panel, with panel
removal tool,
unclip,
unplug
and remove.
12. Extract
(4)
7mm screws securing radio
display, unplug and remove.
13. Extract
(4)
7mm screws securing radio,
unplug
and remove.
14. With PAT
or
pick
tool, carefully unclip
and remove the left
and right center vents from the factory dash
panel.
15. Re-attach the factory vents
to
the back
of
the Scosche dash panel along
with the factory chrome vent
trim rings.
16. With
PRT,
carefully unclip both sets
of
dash switches located
at the top
of
the factory
panel,
and snap
them into the Scosche
panel as
well.
STEREO
ASSEMBLY
I
MOUNTING
SINGLE DIN ISO INSTALLATION
1.
Attach
71
04
pocket
to
7072 &
7071
left
and right brackets using supplied
screws.
2. Attach
7072
and
7071
left
and
rig
_ht.braqkets
to
the
sid~s
pf
the aftermarket stereo
using the screws supplied
with the stereo.
3. Connect and mount the stereo
in
the dash. The main kit
panel
mounts
to
the dash over the stereo.
7070
KIT
PANEL
,;
'17
:/
7072
LEFT
MOUNTING
BRACKET
2
7104
POCKET