
Owner's Manual


INSTALLATION
GUIDE
Disassembly
Continued
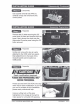
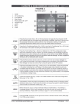
Step
6
Disassembly
Use
a panel removal tool (PRT) to
carefully unclip and remove the
A/C
control panel.
INSTALLATION
GUIDE
Assembly
Preparation
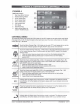
Step
1
Preparation
Remove the (3) bolts securing the
OE
panel clock in place and remove from the
panel. Next, secure the clock onto the
aftermarket Scosche panel using the OE
bolts removed.
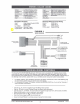
Step
2
Preparation
Unclip and remove the two
air
vents
attached to the OEM radio face panel,
then attatch them
to
the back
of
the
Scosche panel (same location as
OEM panel).
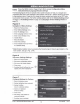
Step
3
Preparation
///l}f!\11
i
t•l
~
Jt///
Dash modification required.
PLEASE
SEEK
PROFESSIONAL
HELP
BEFORE
PROCEEDING.
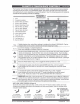
Please proceed with CAUTION, this step
does require dash modification.
If
you feel
you are not suitable for this installation
please seek professional help.
Using a cutting tool cut the area
highlighted
in
the image
at
the right to
make space for a Double DIN opening.
© 2017 SCOSCHE INDUSTRIES, INC
3
ITCCR01B 07/17