
Owner's Manual
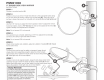

BASE-CLAMPS
HOW
IT
WORKS:
STEP
1
Select the right size cl
amp
(Vario
us
sizes
sold
separately)
ST
E
P2
Select
the
base & ring
clamp
that
coincides with
what
you need
to
mount
2A. Use protective film to
pr
eve
nt
any paint
damage
28
.
STEP3
Lock
it in place
The self locking clamp design
a
ll
ows
for easy one person
installation. Simply s
li
p the clamp
over tube and lock
in
your base,
secure using the stainless
mounting hardware and you are
ready
to
Mount Up and Move Out.
NOTE:
Ring clamps
2"
& over in size
may
require pre
-s
tretching
to
help spread the
clamp
over the tube. (Use Protective film
when mounting)
For
complete
warranty
details,
please
visit
us
at
www.scosche.com
or
call
(800)
363-4490
Register
your
product
online
at
www.scosche.com/register
PSM21008
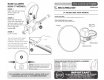
5"
ROUND
SIDE
VIEW
MIRROR
PARTS
INCLUDED
(2)
5"
Side View Mirror
w/
Mounting Base & Adjustment
Knob
TOOLS REQUIRED
(Not
Included)
3/16"
Hex (Allen)
Key,
Except where
no
ted
• R
ing
Clamps
NOT
Incl
u
de
d
Mo
un
ting
Base
VARIOUS
RING
CLAMP
SIZES
SOLD
SEPARATELY
w/
HARDWARE
*
PS
C21006 - BaseCiamp 1.5" Ring Clamp
PSC21
00
7 - BaseCiamp 1.625" Ring Clamp
PSC21009 - BaseCiamp 1.75" Ring Clamp
PSC210010-
BaseCiamp 1.85" Ring Clamp
PSC21
00
11-
BaseCiamp 1.875" Ring Clamp
PSC21012 - BaseCiamp
2"
Ring Cl
amp
IMPORTANT!
DO
NOT
RETURN
PRODUCT
TO
THE
RETAILER
IF
YOU NEED ASSISTANCE
OR
REPLACEMENT PARTS
CALL
US TOLL FREE: 1-
800
-
621-3695
X1
HOURS
MON
-F
RI
BAM-
5
:30P
M (PST) SATURDAY 8AM -
2PM
(PST)