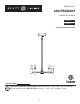
ITEM #1341891 LED PENDANT MODEL #CPSL5MBK Français p. 11 Español p. 21 ATTACH YOUR RECEIPT HERE For Damp Location Purchase Date Questions, problems, missing parts? Before returning to your retailer, call our customer service department at 1-800-527-1292, 8:30 a.m. - 5 p.m., CST, Monday - Friday.
TABLE OF CONTENTS Package Contents ............................................................................................................... 2 Hardware Contents .......................................................................................................................... 3 Safety Information ............................................................................................................... 3 Preparation ...........................................................................
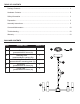
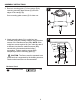
HARDWARE CONTENTS (shown actual size) BB AA Wire Connector Machine Screw Qty. 3 Qty. 2 SAFETY INFORMATION READ AND SAVE THESE INSTRUCTIONS. DANGER • For your protection and safety, carefully read and understand the information provided in this manual completely before attempting to assemble, install or operate this product. Failure to do so could lead to fire, electrical shock or other injuries that could be hazardous or even fatal.
SAFETY INFORMATION • DO NOT suspend any fixture by the house wires. A fixture must always be mounted directly to an outlet box that is supported by the building structure or to a mounting strap that is first attached to the outlet box. Wire connectors will not support the weight of a fixture. Suspending a fixture by the house wires and wire connectors could result in the fixture falling, with the possibility of personal injury and the danger of electrical shock or fire.
PREPARATION Before beginning assembly of product, make sure all parts are present. Compare parts with package contents list and hardware contents list. If any part is missing or damaged, do not attempt to install, operate or assemble the product.
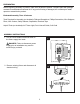
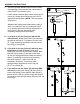
ASSEMBLY INSTRUCTIONS 3. Remove mounting plate (C) from canopy (B) by removing mounting plate screws (D) from the edges of the canopy (B). 3 C Save mounting plate screws (D) for later use. D D B 4. Attach mounting plate (C) to outlet box (not included) using the existing washers and outlet box screws or the machine screws (BB). NOTE: If the outlet box screws required for your outlet box are of a different size than the machine screws (BB), consult with a licensed electrician before proceeding.
ASSEMBLY INSTRUCTIONS 5. There are several different ways to use the fixture (A) depending on the number and combination of rods (E and F) you decide to use: Locate swivel connector piece under canopy (B) on fixture (A). Rotate swivel connector piece until it aligns with canopy base. [NOTE: This may require some force.
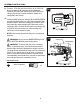
ASSEMBLY INSTRUCTIONS 6a. Connect YELLOW wire from fixture (A) to YELLOW wire from canopy (B) using the molex connector. Connect RED wire from fixture (A) to RED wire from canopy (B) using the molex connector. Make sure connections are secure. 6a RED 6b. Connect BARE wire from canopy (B) to BARE/GREEN ground wire from outlet box using wire connector (AA). Connect WHITE wire from canopy (B) to WHITE wire from outlet box using existing wire connector or wire connector (AA).
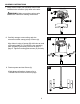
ASSEMBLY INSTRUCTIONS 7. Wrap electrical tape (not included) around each individual wire connector (AA) down to the wire. Outlet Box 7 AA WARNING: Make sure no bare wire or wire strands are visible after making connections. AA 8. Carefully arrange excess wiring and wire connectors within canopy at top of fixture (A). AA 8 Outlet Box Align holes in edge of canopy (B) with holes at ends of mounting plate (C). Re-insert the two mounting plate screws (D) previously removed on Step 3, page 5.
CARE AND MAINTENANCE • Shut off main power supply. Wipe fixture with soft, damp cloth. Use window cleaner to clean glass. Do not use an abrasive cleaner on glass or fixture. TROUBLESHOOTING WARNING: Before beginning work, shut off the power supply to avoid electrical shock. PROBLEM POSSIBLE CAUSE CORRECTIVE ACTION Light does not come on initially or no longer comes on. 1. Power is OFF. 2. Faulty connection. 3. LED component is not working properly. 1. Make sure power supply is ON. 2.