
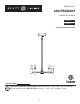
Installation Guide


7
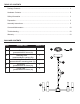
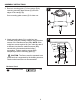
ASSEMBLY INSTRUCTIONS
Swivel
Connector
Piece
F
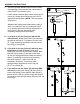
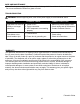
5a
5
B
B
E
F
E
B
A
5c
B
5b
Base
Base
5.
5a.
5b.
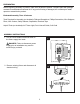
There are several different ways to use the fixture
(A) depending on the number and combination of
rods (E and F) you decide to use:
Locate swivel connector piece under canopy (B) on
fixture (A). Rotate swivel connector piece until it
aligns with canopy base. [NOTE: This may require
some force.]
Whatever the number and combination of rods (E
and F) you choose to use, the lowermost rod (E
or F) must be screwed into the top of the body of
the fixture (A). Be sure lowermost rod is
completely secure before proceeding.
If you wish to use the fixture (A) with all SIX
rods (E and F), attach rods (E and F) by screwing
the ends of the rods (E, F) together. Be sure rods
(E, F) are completely connected, and then secure
top rod (E) to canopy (B).
If you wish to use the fixture (A) with any other
combination of rods (E and F), gently slide
canopy (B) over wires to remove the canopy. Next,
slide the rods (E and/or F) that will not be used
up over the wiring and discard. Attach the rods (E
and/or F) remaining on the fixture by screwing
their ends together -- make sure rods are
completely connected. Thread wires back
through canopy (B) and then secure top rod
(E or F) to canopy (B).
If you wish to use the fixture (A) with only ONE
rod (E or F), gently slide canopy (B) over wires to
remove the canopy. Next, slide the rods (E and F)
that will not be used up over the wiring and discard.
Thread wires back through canopy (B) and screw rod
into canopy.
5c.