Wireless Network Extender Model # WCB6200Q User Guide 0535-00 -000
Table of Contents Table of Contents 1 Introduction 3 Features 4 Getting to Know the Extender 5 Front Panel 5 Back Panel 6 Installing the Extender 7 Syncing Wi-Fi 7 Connecting the Extender 8 Accessing the Extender’s GUI 10 Status 13 Wireless Setup 14 MoCA Setup 20 1
WCB6200Q Wireless Network Extender Advanced Setup 21 Specifications 24 Notices 26 Warranty 26 Important Safety Instructions 27 FCC Class B Equipment 28 Important Note on Wi-Fi 29 Contact Information 30 Technical Support 31 2
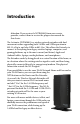
Introduction Attention: If you received a WCB6200Q from your service provider, contact them to receive the proper user manual for this device. The Actiontec WCB6200Q is a wireless network extender with dual concurrent radios supporting both 2.4GHz and 5GHz operation in 802.11 a/b/g/n, and also 5GHz in 802.11ac.
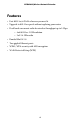
WCB6200Q Wireless Network Extender Features • Fast 802.11ac/n Wi-Fi wherever you need it • Upgrade to 802.11ac speeds without replacing your router • Dual band concurrent radio for wireless throughput up to 2 Gbps • 4x4 802.11ac 5 GHz solution • 2x2 2.4 GHz radio • Bonded MoCA 2.
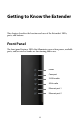
Getting to Know the Extender This chapter describes the location and uses of the Extender’s LEDs, ports, and buttons. Front Panel The front panel features LEDs that illuminate green when power, available ports, and/or wireless bands are functioning and in use. Power Coax port 2.
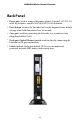
WCB6200Q Wireless Network Extender Back Panel • Power port: used to connect the power adapter (external, 12V DC, 2A, made by Actiontec, model #WA-24Q12FU) to the Extender. • Reset button: restores the Extender back to the original factory default settings when held down for at least 10 seconds. • Coax port: used for connecting the Extender to a coaxial network, using Bonded MoCA 2.0. • Dual-port Gigabit Ethernet switch: used for directly connecting the Extender to the gateway/modem.
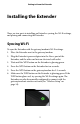
Getting to Know the Extender Installing the Extender There are two parts to installing an Extender: syncing the Wi-Fi settings, and placing and connecting the Extender. Syncing Wi-Fi To sync the Extender with the gateway/modem’s Wi-Fi settings: 1. Place the Extender next to the gateway/modem. 2. Plug the Extender’s power adapter into the Power port of the Extender, and the other end into an electrical wall outlet. 3. Wait until the WPS button on the Extender is glowing green. 4.
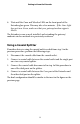
WCB6200Q Wireless Network Extender The Extender is now synced with the gateway/modem’s Wi-Fi settings. Unplug the Extender and its power cable and continue on to the next section of this chapter, “Connecting the Extender.” Connecting the Extender Now that the Extender is synced with the gateway/modem’s wireless network, it can be connected to the gateway/modem’s MoCA network and placed in another area or room of the home/office. To do this: 1.
Getting to Know the Extender 6. Wait until the Coax and Wireless LEDs on the front panel of the Extender glow green. This may take a few minutes. If the Coax Light does not turn Green, make sure that your gateway/modem supports MoCA. The Extender is now synced, installed, and extending the gateway/ modem’s wireless network in a previously weak area. Using a Coaxial Splitter If another device is using the coaxial outlet needed from step 3 in the previous procedure, perform the following steps: 1.
Accessing the Extender’s GUI The Extender features an onboard graphical user interface (GUI) that includes user-configurable settings. Some of these settings should be accessed by experienced network technicians only. To configure the network settings of the Extender: 1. Ensure that the Extender is connected to a gateway/modem’s MoCA coaxial network, and that both devices are powered on. 2. On a computer connected to the same network as the gateway/ modem and Extender, log in to the gateway/modem’s GUI.
Accessing the Extender’s GUI 5. Enter the IP address written down in step 4 in the address box of the web browser. 6. The Extender’s Status screen appears. Enter the Extender’s Username and Password (found on the label located on the back panel of the Extender; see second figure, below), in the User Name and Password text boxes in the upper right corner of the Status screen.
WCB6200Q Wireless Network Extender The Extender’s GUI’s Status screen appears, as shown below.
Accessing the Extender’s GUI Status The first GUI screen that appears is the Status screen, which can also be generated by clicking the Status icon in the menu bar. This screen contains basic information about the Extender’s wireless status, network stations, and product information about the Extender. There are no configurable settings available in this screen.
WCB6200Q Wireless Network Extender Wireless Setup Clicking the Wireless Setup icon from the menu bar of any of the Extender’s GUI screens generates the Wireless Network List screen. Additional wireless settings can be accessed from the menu on the left side. These settings configure various aspects of the Extender’s wireless network, and the majority of them should be adjusted by an experienced network technician only. The exceptions are the settings contained in the Basic Setup screen.
Accessing the Extender’s GUI Basic Setup The Basic Setup wireless network screen contains various settings regarding the Extender’s wireless network. When finished adjusting the settings in this screen, click Apply. Multiple SSID This option allows the user to setup different SSIDs (wireless networks) with different parameters. Select the option desired from the Multiple SSID drop-down menu. Wireless Radio This option turns the Extender’s wireless radio on and off.
WCB6200Q Wireless Network Extender SSID Enable This option makes the Extender’s wireless network name visible or not. SSID Broadcast This option controls whether or not the name of the network is broadcast to other wireless devices (usually, in the device’s available wireless network list). Select Enable or Disable by clicking in the appropriate radio button. Transmit Power This option controls the power of the Extender’s wireless radio. We recommend leaving this setting at 100%.
Accessing the Extender’s GUI Wireless Security Type This option allows the user to select the type of security applied to the Extender’s wireless network. Password Phrase This option allows the user to enter a custom password phrase or value. Wireless Security The Wireless Security screen allows the user to apply wireless security to the Extender’s wireless network. This screen should be accessed by experienced network technicians only.
WCB6200Q Wireless Network Extender WPS The WPS screen allows the Extender to accept wireless clients via Wi-Fi Protected Setup (WPS), an automatic wireless network connection protocol. Only experienced network technicians should configure the settings in this screen. Advanced Wireless Setup The Advanced Wireless Setup screen allows the Extender to be configured with multiple SSIDs.
Accessing the Extender’s GUI Wireless Access Control The Wireless Access Control screen contains a number of advanced settings regarding the Extender’s wireless network. Only experienced network technicians should configure these settings.
WCB6200Q Wireless Network Extender MoCA Setup Clicking the MoCA Setup icon from any of the Extender’s GUI screens generates the MoCA Coax Setup screen. The settings in this screen allow the user to configure various options for the Extender’s coaxial connection. They should be adjusted by an experienced network technicians only.
Accessing the Extender’s GUI Advanced Setup Clicking the Advanced Setup icon from any of the Extender’s GUI screens generates the Management screen, along with other advanced settings accessed through the menu on the left side. These settings configure various administrative aspects of the Extender and its GUI. They should be adjusted by an experienced network technicians only. Management The Management screen (above) allows the Extender’s IP address settings to be modified.
WCB6200Q Wireless Network Extender Factory Default The Factory Default advanced setup screen allows the Extender’s factory default settings to be reapplied, erasing all current settings. Click Restore Default Settings to restore the Extender to its factory default state. Firmware Restore The Firmware Restore screen lists the active and backup firmware versions available on the Extender. Click Swap Firmware to switch the active firmware to the backup firmware, and vice versa.
Accessing the Extender’s GUI Firmware Auto Upgrade The Firmware Auto Upgrade screen allows the user to designate a web link that the Extender checks periodically for firmware upgrades. To use, click on the Enable button to activate, enter the appropriate web address in the Check URL text box, then click Apply. Firmware Upgrade Actiontec periodically posts firmware upgrades that may include enhancements and/or bug fixes for the Extender. To upgrade the Extender’s firmware: 1. Go to http://www.actiontec.
WCB6200Q Wireless Network Extender Specifications Model Number WCB6200Q Protocol/Standards/Support Wireless IEEE 802.11ac Ethernet IEEE 802.3/802.3u/802.3ab 10/100/1000 Base-T MoCA 1.0/1.1/2.0 LAN Interfaces Two 10/100/1000 Ethernet One MoCA 2.0 bonded Coaxial Jack LED Indicators Power, Coax, Wi-Fi 2.4 GHz, Wi-Fi 5 GHz, LAN Ethernet 1, LAN Ethernet 2 Antennas 2x2: internal 2.
Accessing the Extender’s GUI Power Adapter Input 90-240VAC @ 0.5A Output 12Vdc @ 2A Made by Actiontec, model #WA-24Q12FU Regulatory FCC 15B, 15C Canada ICES UL, K.21 Wi-Fi, WPS MoCA RoHS Environmental Operating temperature - 0ºC to 40ºC (32ºF to 104ºF) Storage temperature - 0ºC to 70ºC (32ºF to 158ºF) Operating humidity - 10% to 85% non-condensing Storage humidity - 5% to 95% non-condensing Altitude: -197 ft. to 7000 ft. Note: Specifications are subject to change without notice.
Notices Warranty This product has a one-year Limited Hardware Warranty and 90-day free software updates from date of purchase. Local Law This Limited Warranty Statement gives the customer specific legal rights. The customer may also have other rights which vary from state to state in the United States, from province to province in Canada, and from country to country elsewhere in the world.
Notices Important Safety Instructions Basic safety precautions should always be followed to reduce the risk of fire, electrical shock, and personal injury, including the following: • Do not use this product near water – for example, near a bathtub, kitchen sink, laundry tub, or swimming pool, or in a wet basement; only clean with dry cloth. • Do not block any ventilation openings. Install in accordance with the manufacturer's instructions.
WCB6200Q Wireless Network Extender FCC Class B Equipment This equipment has been tested and found to comply with the limits for a Class B digital device, pursuant to Part 15 of the FCC Rules. These limits are designed to provide reasonable protection against harmful interference in a residential installation. This equipment generates, uses and can radiate radio frequency energy and, if not installed and used in accordance with the instructions, may cause harmful interference to radio communications.
Notices Declaration of Conformity for Products Marked with the FCC logo or Industry Canada (IC)– North America Only This device complies with Part 15 of the FCC Rules and with Industry Canada license-exempt RSS standard(s). Operation is subject to the following two conditions: 1. This device may not cause harmful interference; 2. This device must accept any interference received, including interference that may cause undesired operation of the device.
WCB6200Q Wireless Network Extender The maximum antenna gain permitted for devices in the band 5725-5825 MHz shall comp with the e.i.r.p. limits specified for point-to-point and non point-to-point operation as appropriate. The transmitter must not be co-located or operating in conjunction with any other antenna or transmitter.
Notices Technical Support Go to www.actiontec.