
Installation Guide


Addendum Instructions for
1
Fixtures Weighing 25-50 LBS
1
WARNING: Be sure the outlet box is secured to the
building structure, so it is able to safely support the
weight of the fixture.
1A
1.0
A-765L
A-765L
Install a hex nut, flat washer, the safety cable, flat washer,
hex nut, and lock washer onto one end of(in that order)
the threaded nipple,then screw it to the mounting plate.
Install another hex nut and lock washer onto the other end
of the threaded nipple.
Install the screw collar onto the threaded nipple.If
necessary, adjust the screw collar height so that half of the
threads are exposed when the canopy is flush with the
ceiling.
Through the safety screw, insert washer and safety cable.
Secure safety screw (supplied) to the wood building
structure. If your building structure is made of other
material (i.e.metal, concrete, etc) select an appropriate
method for your application (not supplied).
Complete the fixture installation by following the
instructions provided with your fixture.
4
5
3
2
1
6
CAUTION RISK OF FIRE-
This product must be installed in accordance with the applicable
installation code by a person familiar with the construction and
operation of the product and the hazards involved.
Use minimum 90°c supply conductors.
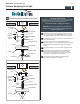
INSTALLATION EXAMPLE FOR CAP NUT LOCK UP FIXTURES
FIXTURE CORD
HEX NUT
LOCK WASHER
THREADED NIPPLE
SAFETY
CABLE
MOUNTING
PLATE
HEX NUT
HEX NUT
LOCK WASHER
FLAT WASHER
SAFETY
SCREW
SAFETY
WASHER
SCREW COLLAR
CANOPY
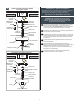
HEX NUT
LOCK WASHER
THREADED NIPPLE
SAFETY
CABLE
HEX NUT
HEX NUT
FLAT WASHER
SAFETY
SCREW
SAFETY
WASHER
CAP NUTS
CANOPY
MOUNTING
PLATE
INSTALLATION EXAMPLE FOR CENTER LOCK UP FIXTURES
COLLAR NUT