FOR LG CUSTOMER SERVICE: 1-888-LGCANADA Or visit us on the Web at: http://www.lg.ca EL SERVICIO DE ATENCIÒN AL CLIENTE DE LG: 1-888-LGCANADA Ou visitez notre site Web à l’adresse: http://www.lg.ca POUR SERVICE À LA CLIENTÈLE DE LG: 1-888-LGCANADA O visítenos en la Web en: http://www.lg.ca Please read this guide thoroughly before operating and keep it handy for reference at all times. Lea detenidamente estas instrucciones antes utilizar el frigorífico y guárdelas como referencia para el futuro.
WARRANTY Product Registration Information ............................3 THANK YOU! IMPORTANT SAFETY INFORMATION Basic Safety Precautions ........................................5 CFC Disposal ..........................................................5 Grounding Requirements ........................................6 Congratulations on your purchase PARTS AND FEATURES and welcome to the LG family. Parts And Features ...............................................
LG ELECTRONICS, INC. LG REFRIGERATOR LIMITED WARRANTY - USA Your LG Refrigerator will be repaired or replaced, at LG’s option, if it proves to be defective in material or workmanship under normal use, during the warranty period ("Warranty Period") set forth below, effective from the date ("Date of Purchase") of original consumer purchase of the product. This warranty is good only to the original purchaser of the product and effective only when used in the United States, including Alaska, Hawaii, and U.S.
LG Electronics visit our web site/http://www.lg.ca LIMITED WARRANTY CANADA LG Electronics will repair or at its option replace, without charge, your product which proves to be defective in material or workmanship under normal use during the warranty period listed below from the date of original purchase. This warranty is good only to the original purchaser of the product during the warranty period as long as it is in Canada. WARRANTY PERIOD: REFRIGERATOR/FREEZER LABOR: One Year from the Date of Purchase.
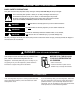
IMPORTANT SAFETY INSTRUCTIONS BASIC SAFETY PRECAUTIONS This guide contains many important safety messages. Always read and obey all safety messages. This is the safety alert symbol. It alerts you to safety messages that inform you of hazards that can kill or hurt you or others, or cause damage to the product. All safety messages will be preceded by the safety alert symbol and the hazard signal word DANGER, WARNING, CAUTION.
GROUNDING REQUIREMENTS Use a receptacle which cannot be turned off with a switch or pull chain. Do not use an extension cord. IMPORTANT: Please read carefully. TO CONNECT ELECTRICITY Where a standard two-prong wall outlet is encountered, it is your personal responsibility and obligation to have it replaced with a properly grounded three-prong wall outlet. WARNING Do not, under any circumstances, cut or remove the third (ground) prong from the power cord.
WARNING To reduce the risk of fire, electric shock, or injury to persons when using your product, basic safety precautions should be followed, including the following. Read all instructions before using this appliance. 1. When connecting the power The dedicated outlet should be used. Do not allow the power plug to face upward or to be squeezed at the back of the refrigerator. • Using several devices at one outlet may cause fire.
IMPORTANT SAFETY INSTRUCTIONS 2. When using the refrigerator Do not place the heavy object or the dangerous object (container with liquid) on the refrigerator. Do not install the refrigerator in the wet place or the place which water or rain splashes. Deterioration of insulation of electric parts may cause electric leakage. It may be dropped to cause injury, fire or electric shock when opening or closing the door.
IMPORTANT SAFETY INSTRUCTIONS 2. When using the refrigerator Do not spray water at the outside or the inside of the refrigerator or do not clean it with benzene or thinner. Thinner Deterioration of insulation of electric parts may cause electric shock or fire. When any strange smell or smoke is detected from the refrigerator, disconnect Service the power plug immediately center and contact to the service center. Service center It may cause fire.
CAUTION Wait for 5 minutes or longer when reconnecting the plug. Supply the automatic ice maker with drinkable water only (only for the model with the dispenser). Drinkable It may cause the operation of the freezer to fail. Otherwise, it may cause any risk. After 5minutes Pull out the power plug not by grasping the cord but the plug of its end. Do not put bottle in the freezer. It may freeze the contents to break the bottle to cause injury. It may cause electric shock or short circuit to fire.
PARTS AND FEATURES A M B N C C D I O J E K F G L H Use this page to become more familiar with the parts and features. Page references are included for your convenience. NOTE: This guide covers several different models. The refrigerator you have purchased may have some or all of the items listed below. The locations of the features shown below may not match your model. A Digital Sensor Control H Ice Bin (p. 25) B Filter (Inside) (p. 27) I Pull out Drawer (p. 26) C Modular Door Bins (p.
REFRIGERATOR INSTALLATION INSTALLATION WARNING 1. To avoid vibration, the unit must be leveled. If required, adjust the leveling legs to compensate for unevenness of the floor. The front should be slightly higher than the rear to aid in door closing. Leveling legs can be turned easily by tipping the cabinet slightly. Turn the leveling legs clockwise ( ) to raise the unit, counterclockwise ( ) to lower it. Excessive Weight Hazard Use two or more people to move and install refrigerator.
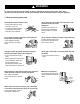
REFRIGERATOR INSTALLATION HOW TO REMOVE DOOR HANDLES To move refrigerator through a house door, it maybe necessary to remove refrigerator and freezer door handles. NOTE: Handle appearance may vary from illustrations on this page. 1. Removing Refrigerator Handle Mounting Fasteners • Loosen the set screws with the 3/32” Allen wrench and remove the handle. NOTE: If the handle mounting fasteners need to be tightened or removed, use a 1/4” Allen wrench. Set Screw Allen Wrench 2.
REFRIGERATOR INSTALLATION HOW TO REPLACE DOOR HANDLES NOTE: Handle appearance may vary from illustrations on this page. 1. Replacing Refrigerator Door Handle • Place the handle on the door by adjusting handle footprints to fit mounting fastners and tighten the set screws with the 3/32” Allen wrench. NOTE: If the handle mounting fasteners need to be tightened or removed use a 1/4” Allen wrench. Mounting Fasteners 2.
REFRIGERATOR INSTALLATION IMPORTANT: When lifting the hinge free of the latch, be careful that the door does not fall forward. • Lift the door from the middle hinge pin and remove the door. • Place the door, inside facing up, on a nonscratching surface. REMOVING AND REPLACING REFRIGERATOR DOORS To remove the left refrigerator door: Pull the water tube out of the fitting while pressing the release ring on the fitting.
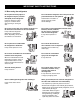
REFRIGERATOR INSTALLATION Replacing Refrigerator Door: ❿ Right Door • Lower the door onto middle hinge pin (9). • Fit top hinge (7) over hinge lever latch (8) and into place. Insert hinge lever (6) under lever latch. Rotate lever counterclockwise to secure hinge. • Install the grounding screw (5) and connect wire harnesses (4). • Hook tab on door switch side of cover under edge of wire opening in cabinet top. Position cover (2) into place. lnsert and tighten cover screw (1).
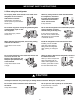
REFRIGERATOR INSTALLATION • With both hands, hold both sides of the door and pull it up to separate it from the rails. HOW TO REMOVE AND INSTALL THE PULLOUT DRAWER IMPORTANT: To avoid possible injury or product or property damage, you will need two people to perform the following instructions. 1. Removing Pullout Drawer • Pull the drawer open to full extension. Remove the lower basket (1) by lifting basket from rail system. (If you tilt the door, it will be easier.
REFRIGERATOR INSTALLATION • Make sure you have a right rail cover for each side. HOW TO REMOVE AND INSTALL THE PULLOUT DRAWER Right Rail Cover IMPORTANT: To avoid possible injury or product or property damage, you will need two people to perform the following instructions. Left Rail Cover 2. Installing Pullout Drawer • With both hands, hold the center bar and push it out to let both rails out to full extension simultaneously.
REFRIGERATOR INSTALLATION LEVELING AND DOOR ALIGNMENT Door Alignment Leveling If the space between your doors is uneven, follow the instructions below to align the doors: After installing, secure the product with the LEG not to move left or right. 1. With one hand, lift up the door you want to raise at middle hinge. Your refrigerator has two front leveling legs—one on the right and one on the left.
USING YOUR REFRIGERATOR ENSURING PROPER AIR CIRCULATION SETTING THE CONTROLS In order to ensure proper temperatures, air must flow between the refrigerator and freezer sections. As shown in the illustration below, air enters at top of the freezer and circulates down. From the bottom of the freezer, air is forced up to the top of the refrigerator. Air enters refrigerator through the top vent, then circulates and exists at the bottom, where it returns to the freezer.
USING YOUR REFRIGERATOR ADJUSTING CONTROL SETTINGS FOOD STORAGE GUIDE Give the refrigerator time to cool down completely before making final adjustments. It is best to wait 24 hours before doing this. The mid-settings indicated in the previous section should be correct for normal household refrigerator usage. The controls are set correctly when milk or juice is as cold as you like and when ice cream is firm.
USING YOUR REFRIGERATOR STORING FROZEN FOOD REFRIGERATOR SECTION NOTE: For further information about preparing food for freezing or food storage times, check a freezer guide or a reliable cookbook. WATER DISPENSER Push the dispenser pad with a glass until you hear a click to get cold water. Packaging Successful freezing depends on correct packaging. When you close and seal the package, it must not allow air or moisture in or out.
USING YOUR REFRIGERATOR CAUTION : Make sure that shelves are level from one side to the other. Failure to do so may result in the shelf falling or spilling food. REFRIGERATOR SHELVES The shelves in your refrigerator are adjustable to meet your individual storage needs. Your model may have glass or wire shelves.
USING YOUR REFRIGERATOR CRISPER HUMIDITY CONTROL GLIDE‘N’SERVE You can control the amount of humidity in the moisturesealed crispers. Store vegetables or fruits requiring more or less humidity in separate crispers. Adjust the control to any setting between HIGH and LOW. The Glide‘N’Serve provides storage space with a variable temperature control that keeps the compartment colder than refrigerator. This drawer can be used for large party trays, deli items, or beverages.
USING YOUR REFRIGERATOR MODULAR DOOR BIN FREEZER SECTION The door bins are removable for easy cleaning and adjusting. TILTING DOOR The tilting door provides easy access for stored foods. 1. To remove the bin, simply lift the bin up and pull straight out. How to use Tilt the door down and pull it out. 2. To replace the bin, slide it in above the desired support button and push down until it stops.
USING YOUR REFRIGERATOR TILT-OUT DOOR BASKET DURABASE DIVIDER To remove basket The Durabase divider allows you to organize the Durabase area into sections. 1. Pull one of the brackets upward. 2. Remove basket from both brackets. To replace basket 1. Insert bracket into one side. Hook end of basket into bracket. 2. Hook other basket end into other bracket. Push bracket down into place. 3. Be sure back of basket goes behind retention tab on each bracket. 1. To remove, pull divider straight up. 2.
USING YOUR REFRIGERATOR 2. Replace with a new cartridge. FILTER Take the new cartridge out of its packaging and remove protective cover from the o-rings. With cartridge knob in the vertical position, push the new filter cartridge into the cover until it stops. It is recommended that you replace the filter when the water filter indicator icon turns on or your water dispenser or ice maker performance decreases noticeably.
CARE AND CLEANING CONDENSER COILS WARNING Remove Back cover. Use a vacuum cleaner with an extended attachment to clean condenser coils. Vacuum coils when dusty or dirty. Coils may need to be cleaned as often as every other month. Explosion Hazard LIGHT BULB REPLACEMENT Use non-flammable cleaner. Failure to do so can result in death, explosion, or fire. WARNING Both the refrigerator and freezer sections defrost automatically. However, clean both sections about once a month to prevent odors.
CARE AND CLEANING To change freezer light WHEN YOU GO ON VACATION 1. Unplug refrigerator power cord form outlet. If you choose to leave the refrigerator on while you are away, follow these steps to prepare your refrigerator before you leave. 2. Using a flat instrument, gently pry the lamp cover loose in the front as shown. Rotate downward to remove the rear tabs. 1. Use up any perishables and freeze other items. 3. Make sure the bulb is cool to the touch. Turn the bulb counterclockwise to remove. 2.
ABOUT THE AUTOMATIC ICEMAKER NOTE: If the cube size is smaller or larger than you expected, you can regulate the size with the cube size button. WARNING Personal Injury Hazard Every time you press the cube size button, the indicator moves up one light. The higher the light position, the larger the cubes will be. Pressing at the highest position returns the indicator to the lowest position. Avoid contact with the moving parts of the ejector mechanism, or with the heating element that releases the cubes.
CONNECTING THE WATER LINE • Two 1/4" outer diameter compression nuts and 2 ferrules (sleeves) to connect the copper tubing to the shutoff valve and the refrigerator water valve. BEFORE YOU BEGIN This water line installation is not warranted by the refrigerator or icemaker manufacturer. Follow these instructions carefully to minimize the risk of expensive water damage. Water hammer (water banging in the pipes) in house plumbing can cause damage to refrigerator parts and lead to water leakage or flooding.
CONNECTING THE WATER LINE 7. CONNECT THE TUBING TO THE VALVE INSTALLATION INSTRUCTIONS (CONTINUED) Place the compression nut and ferrule (sleeve) for copper tubing onto the end of the tubing and connect it to the shutoff valve. Make sure the tubing is fully inserted into the valve. Tighten the compression nut securely. 4. FASTEN THE SHUTOFF VALVE Fasten the shutoff valve to the cold water pipe with the pipe clamp.
CONNECTING THE WATER LINE 9. CONNECT THE TUBING TO THE REFRIGERATOR 10. TURN THE WATER ON AT THE SHUTOFF VALVE Removing and Replacing Valve Cover. Tighten any connections that leak. NOTE: Reattach the compressor compartment access cover. • Before making the connection to the refrigerator, be sure the refrigerator power cord is not plugged into the wall outlet. 1. Remove the plastic flexible cap from the water valve. 2. Place the compression nut and ferrule (sleeve) onto the end of the tubing as shown.
TROUBLESHOOTING GUIDE • The defrost timer will click when the automatic defrost cycle begins and ends. The thermostat control (or refrigerator control, depending on the model) will also click when cycling on and off. UNDERSTANDING SOUNDS YOU MAY HEAR Your new refrigerator may make sounds that your old one didn’t make. Because the sounds are new to you, you might be concerned about them. Most of the new sounds are normal.
TROUBLESHOOTING GUIDE COMPRESSOR MOTOR SEEMS TO RUN TOO MUCH Check if… Then… The refrigerator that was replaced was an older model. The room temperature is hotter than normal. ❿ Modern refrigerators with more storage space require more operating time. ❿ The motor will run longer under warm conditions. At normal room temperatures, expect your motor to run about 40% to 80% of the time. Under warmer conditions, expect it to run even more often. ❿ Adding food and opening the door warms the refrigerator.
TROUBLESHOOTING GUIDE Check if… Then… The icemaker was recently installed. ❿ Discard first few batches of ice to avoid discolored or off-flavored ice. The ice has been stored for too long. ❿ Throw away old ice and make new supply. The food has not been wrapped tightly in either compartment. ❿ Rewrap foods since odors may migrate to the ice if food is not wrapped properly. The water supply contains minerals such as sulfur.
TROUBLESHOOTING GUIDE TEMPERATURE IS TOO WARM OR THERE IS INTERIOR MOISTURE BUILDUP Check if… Then… The air vents are blocked. Cold air circulates from the freezer to the fresh food section and back again through air vents in the wall dividing the two sections. ❿ Locate air vents by using your hand to sense airflow and move all packages that block vents and restrict airflow. Refer to Multi-Flow on page 20 for the location of air vents. The doors are opened often.
P/No.
FOR LG CUSTOMER SERVICE: 1-888-LGCANADA Or visit us on the Web at: http://www.lg.ca EL SERVICIO DE ATENCIÒN AL CLIENTE DE LG: 1-888-LGCANADA Ou visitez notre site Web à l’adresse: http://www.lg.ca POUR SERVICE À LA CLIENTÈLE DE LG: 1-888-LGCANADA O visítenos en la Web en: http://www.lg.ca Please read this guide thoroughly before operating and keep it handy for reference at all times. Lea detenidamente estas instrucciones antes utilizar el frigorífico y guárdelas como referencia para el futuro.
GARANTIE Enregistrement du produit.....................................75 INFORMATION DE SÉCURITÉ IMPORTANTE Mesures de sécurité fondamentales ....................77 Élimination du CFC ..............................................77 Spécifications pour la mise à la terre ...................78 MERCI! Félicitations pour votre achat et COMPOSANTS ET FONCTIONS bienvenue dans la famille LG. Composants et fonctions ......................................
LG ELECTRONICS, INC. GARANTIE LIMITÉE DU RÉFRIGÉRATEUR Votre réfrigérateur LG sera réparé ou remplacé, au choix de LG, s'il s'avère défectueux à cause d'un défaut de matériel ou de main d'oeuvre, lors d'une utilisation normale au cours de la période de garantie ("Période de garantie") établie ci-dessous dorénavant, effective à partir de la date d'achat ("Date d'achat") du produit par le client original.
LG Electronics Visiter notre site internet /http : //www.lg.ca GARANTIE LIMITÉE CANADA LG Electronics réparera ou remplacera à sa convenance, sans charge aucune, votre appareil après constatation d’un défaut de fabrication ou d’un défaut matèriel sous les conditions normales d’usage durant la période de couverture de la garantie mentionnée ci-dessous à partir de la date originale d’achat. Cette garanti ne s’applique qu’au Canada et ne protège que l’acheteur original du produit pour la période spécifiée.
INFORMATION DE SÉCURITÉ IMPORTANTE PRÉCAUTIONS DE SÉCURITÉ DE BASE Ce manuel contient plusieurs messages de sécurité importants. Lissez et obéissez toujours tous les messages de sécurité. Celui-ci est le symbole d'un avis de sécurité. Il vous avertit sur des messages de sécurité vous signalant des risques de mort ou de blessures pour vous ou pour d'autres personnes ou bien sur des risques d'endommager le produit.
SPÉCIFICATIONS POUR LA MISE À LA TERRE câbles. Il est recommandé d'utiliser un circuit séparé pour cet appareil. Utilisez une prise de courant qui ne puisse pas être éteinte par un interrupteur ou une chaînette. N’employez pas de rallonges. Si la prise murale n'a que deux fentes, c'est votre responsabilité et votre obligation personnelles de la faire remplacer par une prise murale à trois encoches correctement reliée à la terre.
ATTENTION Pour réduire les risques de flammes, de décharge électrique, ou de lésion lorsque vous vous utilisez l’appareil, vous devez suivre les instructions concernant la sécurité de même que ce qui suit. Lire toutes les instructions avant d’utiliser l’appareil. 1. Quand vous le branchez Une prise murale doit lui être réservé. Faire attention que le câble ne soit pas ascensionnel ou subisse des pressions à l’arrière du réfrigérateur.
INFORMATION DE SÉCURITÉ IMPORTANTE 2. Quand vous utilisez le réfrigérateur Ne placer aucun objet pesant ou dangereux (récipient avec un liquide) sur le réfrigérateur. Ne pas mettre le réfrigérateur dans un endroit humide ou dans un endroit susceptible d’être éclaboussé. De l’eau pourrait couler et provoquer des lésions, un incendie ou une décharge électrique lors de l’ouverture et de la fermeture de la porte. La détérioration du système d’isolation électrique pourrait provoquer une perte de courant.
INFORMATION DE SÉCURITÉ IMPORTANTE 2. Quand vous utilisez le réfrigérateur Ne pas vaporiser d’eau à l’extérieur ni à l’intérieur du réfrigérateur et ne le nettoyer ni avec du benzène ni un diluant. Thinner La détérioration de l’isolation de certaines parties électriques pourrait provoquer une décharge électrique ou un incendie. Lorsque vous sentez une odeur bizarre ou que de la fumée sort du réfrigérateur, Service débrancher immédiatement center et contacter le service technique. Service technique.
PRÉCAUTION Attendre 5 minutes ou davantage avant de rebrancher. Approvisionner la fabrication automatique de glaçons seulement en eau potable (valable pour les modèles disposant Drinkable water d’un distributeur). Risque de provoquer une défaillance du congélateur. Dans le cas contraire, risque. After 5minutes Ne pas débrancher le câble en tirant dessus, le prendre par l’extrémité. Ne pas mettre de bouteilles dans le congélateur.
COMPOSANTS ET FONCTIONS A M B N C C D I O J E K F G L H Utilisez cette page pour vous familiariser avec les composants et les fonctions de l'unité. REMARQUE: Ce manuel couvre plusieurs modèles différents. Le réfrigérateur que vous avez acheté peut avoir certains ou tous les éléments listés ci-dessous. L'emplacement des fonctions montré ci-dessous pourrait ne pas coïncider avec celui de votre modèle. A Commande du capteur numérique H Bac à glace (p. 97) B Filtre à eau (Intérieur) (p.
INSTALLATION DU RÉFRIGÉRATEUR INSTALLATION AVERTISSEMENT 1. Afin d’éviter des vibrations, l'unité doit être nivelée. Réglez les vis de réglage pour compenser les irrégularités du plancher, si besoin. La façade du réfrigérateur doit être légèrement plus haute que la partie arrière afin de rendre plus facile la fermeture de la porte. Vous pouvez facilement faire tourner les vis de réglage en inclinant légèrement le boîtier.
INSTALLATION DU RÉFRIGÉRATEUR COMMENT ENLEVER LES POIGNÉES DE LA PORTE Pour déplacer le réfrigérateur par la porte d’une maison, il peut être nécessaire de retirer les poignées de portes du réfrigérateur. REMARQUE: L’aspect de la poignée peut varier par rapport aux illustrations dans cette page. Fixations de montage 1. Enlever la poignée du réfrigérateur • Desserrez les vis de l’ensemble à l’aide d’une clé Allen de 3/32 po. et enlevez la poignée.
INSTALLATION DU RÉFRIGÉRATEUR COMMENT RÉINSTALLER LES POIGNÉES DE LA PORTE REMARQUE: L’aspect de la poignée peut varier par rapport aux illustrations dans cette page. 1. Réinstaller la poignée de la porte du réfrigérateur • Fixez la poignée aux fixations de montage de la poignée et resserrez les vis de l’ensemble à l’aide d’une clé Allen de 3/32 po. NOTE: Si vous devez resserrer ou enlever les fixations de montage de la poignée, utilisez la clé Allen de 1/4 po. Fixations de montage 2.
INSTALLATION DU RÉFRIGÉRATEUR • Faire pivoter le loquet de la charnière (6) dans le sens inverse des aiguilles d’une montre et l’enlever. Soulever la charnière supérieure (7) pour la dégager du loquet (8) permettant de l’immobiliser. IMPORTANT : Au moment de soulever la charnière pour la dégager du loquet, veiller à ce que la porte ne tombe pas vers l’avant. • Soulever la porte pour la dégager de la fiche du milieu. Enlever la porte.
INSTALLATION DU RÉFRIGÉRATEUR Réinstallation des portes du réfrigérateur: ❿ Porte droite • Abaissez la porte sur l'axe de la charnière centrale (9). • Encastrez la charnière supérieure (7) sur le verrou du levier de la charnière (8) et à sa place. Insérez le levier de la charnière (6) sur le verrou du levier. Faites tourner le levier dans le sens contraire des aiguilles d'une montre pour fixer la charnière. • Installez la vis de mise à la terre (5) et reliez les faisceaux électriques(4).
INSTALLATION DU RÉFRIGÉRATEUR • Avec les deux mains, maintenez les deux côtés de la porte et tirez pour les séparer. COMMENT ENLEVER ET INSTALLER LE TIROIR DÉTACHABLE IMPORTANT: Afin d'éviter de possibles blessures, des dommages au produit ou d'autres dommages matériels, il faut deux personnes pour suivre les instructions suivantes. 1. Extraction du tiroir détachable • Tirez du tiroir pour l'ouvrir dans toute sa longueur. Enlevez le panier inférieur (1) en le soulevant du système de guidage.
INSTALLATION DU RÉFRIGÉRATEUR • Vérifiez la forme de gauche et droite du rail du couvercle. COMMENT ENLEVER ET INSTALLER LE TIROIR DÉTACHABLE Rail du couvercle droit IMPORTANT: Afin d'éviter de possibles blessures, des dommages au produit ou d'autres dommages matériels, il faut deux personnes pour suivre les instructions suivantes. Rail du couvercle gauche 2.
INSTALLATION DU RÉFRIGÉRATEUR 5. Remplacez le couvercle de la base. NIVELLEMENT ET ALIGNEMENT DE LA PORTE REMARQUE: Votre nouveau réfrigérateur est conçu d'une manière unique avec deux portes pour aliments frais. Chaque porte peut être ouverte ou fermée indépendamment de l'autre. Vous aurez peut-être besoin d’exercer une légère pression sur les portes pour les fermer complètement. Nivellement Une fois installé, sécurisez l’appareil à l’aide de la JAMBE pour éviter qu’il ne bouge.
UTILISATION DE VOTRE RÉFRIGÉRATEUR ASSURER UNE CIRCULATION D'AIR APPROPRIÉE Afin d'assurer des températures appropriées. L'air entre dans la partie supérieure du congélateur et circule vers le bas, comme montré dans l'illustration ci-dessous. L'air entre dans la partie supérieure du congélateur et circule vers le bas. L'air est forcé de la partie inférieure du congélateur vers la partie supérieure du réfrigérateur.
UTILISATION DE VOTRE RÉFRIGÉRATEUR RÉGLAGE DE LA CONFIGURATION DES COMMANDES GUIDE POUR LE STOCKAGE D'ALIMENTS Laissez du temps au réfrigérateur pour qu'il refroidisse complètement l'air avant de faire les réglages finaux. Il vaut mieux d'attendre 24 heures avant d'établir la configuration finale. Les réglages intermédiaires indiqués dans la section précédente doivent être corrigés pour une utilisation ménagère normale du réfrigérateur.
UTILISATION DE VOTRE RÉFRIGÉRATEUR REMARQUE: Laissez les aliments chauds refroidir à la température ambiante pendant 30 minutes, puis emballez-les et congelez-les. Faire refroidir les aliments chauds avant de les congeler économise de l'énergie. STOCKAGE D'ALIMENTS CONGELÉS REMARUQE: Pour tout renseignement supplémentaire concernant la préparation d'aliments pour sa congélation ou les temps de stockage des aliments, vérifiez le mode d'emploi du congélateur ou un livre de cuisine fiable.
UTILISATION DE VOTRE RÉFRIGÉRATEUR ATTENTION : Assurez-vous que les tablettes sont au même niveau des deux côtés. Autrement, la tablette ou les aliments y contenus peuvent tomber. LES TABLETTES DU RÉFRIGÉRATEUR Les tablettes de votre réfrigérateur sont réglables pour s’adapter à vos besoins de stockage. Votre modèle peut avoir de tablettes de verre ou de clayettes métalliques.
UTILISATION DE VOTRE RÉFRIGÉRATEUR CONTRÔLE D’HUMIDITÉ DES BACS À LÉGUMES GLIDE‘N’SERVE (GLISSEZ ET SERVEZ) Le Glide‘N’Serve fournit un espace de stockage avec un contrôle de température variable qui permet de disposer d’un compartiment plus froid que le reste du réfrigérateur. Vous pouvez contrôler le pourcentage d’humidité dans les bacs à légumes fraîcheur. Le stockage des légumes et des fruits exige plus ou moins d’humidité dans chaque bac à légumes. Réglez le contrôle entre HIGH et LOW.
UTILISATION DE VOTRE RÉFRIGÉRATEUR MODULAR DOOR BIN [CASIERS MODULAIRES DE PORTE] COMPARTIMENT CONGÉLATEUR PORTE INCLINABLE Les balconnets de la porte sont démontables pour vous permettre de le nettoyer et de les régler facilement. La porte inclinable permet un accès facile aux aliments. Comment utiliser Incliner la porte et tirer. 1. Pour démonter un bac, simplement tirez-le vers le haut et retirez-le. 2. Pour le replacer, glissez-le dans le support désiré et poussez-le jusqu’au fond.
UTILISATION DE VOTRE RÉFRIGÉRATEUR PANIER MÉTALLIQUE DE LA PORTE DU CONGÉLATEUR CLOISON DU DURABASE La cloison du Durabase vous permet d’organiser l’espace du Durabase dans deux secteurs. Extraction du panier 1. Tirez l’un des supports vers le haut. 2. Retirez le panier des deux supports. Remise en place du panier 1. Insérez le support dans l’un des côtés. Accrochez l’extrémité du panier à l’intérieur du support. 2. Accrochez l’autre extrémité du panier à l’intérieur de l’autre support.
UTILISATION DE VOTRE RÉFRIGÉRATEUR 2. Remplacez la cartouche par une cartouche neuve. FILTRE A EAU Retirez la cartouche neuve de son emballage puis retirez l’enveloppe de protection des joints toriques. En orientant le bouton de la cartouche en position verticale, enfoncez la cartouche du filtre neuf à l’intérieur du couvercle jusqu’à ce qu’elle s’arrête.
ENTRETIEN ET NETTOYAGE PIÈCES EN PLASTIQUE (couvercles et panneaux) AVERTISSEMENT N’utilisez pas de nettoyeurs de fenêtres, d’abrasifs ni de fluides inflammables. Ceux-ci peuvent égratigner ou endommager les matériaux. SERPENTINS DE CONDENSATION Retirez le panneau arrière. Utilisez un aspirateur équipé d’une rallonge pour nettoyer le serpentin réfrigérant. Aspirez le serpentin lorsqu’il est sale ou poussiéreux. Cette opération de nettoyage doit être menée chaque mois.
ENTRETIEN ET NETTOYAGE Pour remplacer l’ampoule du congélateur QUAND VOUS PARTEZ EN VACANCES 1. Débranchez le cordon d’alimentation du réfrigérateur de la prise secteur. Si vous choisissez de laisser le réfrigérateur en fonctionnement pendant votre absence, suivez ces instructions afin de préparer votre réfrigérateur avant de partir. 2. Poussez l’écran de protection vers le bas et retirez-le. 3. Retirez l’ampoule usagée. Remplacez-la par une ampoule de 60 watts pour appareil électroménager. 1.
À PROPOS DE LA MACHINE À GLAÇONS AUTOMATIQUE Il est normal que plusieurs glaçons soient collés. AVERTISSEMENT Si les glaçons ne sont pas utilisés souvent, ils deviennent troubles, avec un goût de moisi et rétrécis. Risque de blessures personnelles REMARQUE: Si la dimension du cube est inférieure ou supérieure à ce que vous vous attendiez, vous pouvez la régler avec le bouton de sélection de dimension des cubes.
RACCORDEMENT DU CONDUIT D’EAU • Deux écrous de serrage d’un diamètre extérieur de 1/4. et viroles (manches) pour raccorder le tuyau de cuivre à la vanne de sectionnement et à la vanne à eau du réfrigérateur. • Si votre conduit d’eau en cuivre a les extrémités évasées, vous aurez besoin d’un adaptateur (disponible dans les magasins d’articles de plomberie) pour raccorder le conduit d’eau au réfrigérateur OU vous pouvez couper le bout évasé avec un coupeur de tuyaux et utiliser un dispositif de serrage.
RACCORDEMENT DU CONDUIT D’EAU 7. RACCORDEZ LA TUYAUTERIE À LA VANNE INSTRUCTIONS D’INSTALLATION (SUITE) Placez l’écrou de serrage et la virole (manche) pour le tuyau de cuivre dans le bout du tuyau et raccordez-le à la vanne de sectionnement. Assurez-vous que la tuyauterie est complètement introduite dans la vanne. Serrez l’écrou de fortement. 4. SERREZ LA VANNE DE SECTIONNEMENT Serrez la vanne de sectionnement au tuyau d’eau froide avec un collier de serrage pour tuyaux.
RACCORDEMENT DU CONDUIT D’EAU 9. RACCORDEMENT DU TUYAU AU REFRIGERATEUR 10. OUVREZ LA VANNE DE SECTIONNEMENT DE L’EAU Retrait et remplacement du couvercle de la vanne Serrez tous les raccordements présentant des fuites. REMARQUE: Replacez le couvercle d’accès au compartiment du compresseur. • Avant de raccorder la conduite d’eau au réfrigérateur, vérifiez que le cordon d’alimentation du réfrigérateur n’est pas banché sur la prise secteur. 1.
GUIDE DE DÉPANNAGE • La minuterie de décongélation émet un déclic lorsque le cycle de décongélation automatique commence et se termine. La commande du thermostat (ou commande du réfrigérateur, selon le modèle) produira aussi un déclic lorsque son cycle démarre et s’arrête. • Des crépitements peuvent provenir du flux du réfrigérant, du conduit d’eau ou des produits placés sur le réfrigérateur.
GUIDE DE DÉPANNAGE LE MOTEUR DU COMPRESSEUR SEMBLE NE PAS FONCTIONNER ASSEZ LONGTEMPS Vérifiez si… Alors… Le réfrigérateur remplacé était un modèle plus ancien. ❿ Les réfrigérateurs modernes, ayant un espace de stockage plus grand, demandent une période de fonctionnement plus longue. ❿ Le moteur fonctionnera plus longtemps dans des conditions plus chaudes. Dans des températures ambiantes normales, le moteur devrait fonctionner environ 40% à 80% du temps.
GUIDE DE DÉPANNAGE Vérifiez si… Alors… La machine à glaçons vient d’être installée. ❿ N’utilisez pas les premiers lots de glaçons pour éviter les glaçons troubles et avec un mauvais goût. La glace a été longtemps stockée. ❿ Jetez les vieux glaçons et remplissait le compartiment avec de l’eau fraîche. Les aliments n’ont pas été bien enveloppés dans leurs compartiments. ❿ Emballez les aliments de nouveau pour éviter que leur odeur se transmette aux glaçons.
GUIDE DE DÉPANNAGE LA TEMPÉRATURE EST TRÈS CHAUDE OU IL Y A DE L’HUMIDITÉ INTÉRIEURE Vérifiez si… Alors… Les conduits de ventilation d’air sont bloqués. L’air circule du congélateur à la section des aliments frais et revienne à travers les conduits de ventilation de la cloison divisant les deux sections. ❿ Sentez le flux d’air des conduits de ventilation avec votre main et déplacez tous les aliments qui bloquent les conduits de ventilation et réduisent le flux d’air.
MEMO 110
MEMO 111
P/No.