I total body workout 8EARS • adjustable resistance USER'S MANUAL Model No. 831.287420 Serial No. Write the serial number in the space above for future reference.
TABLE OF CONTENTS IMPORTANT PRECAUTIONS .............................................................. BEFORE YOU BEGIN ................................................................... ASSEMBLY ........................................................................... ADJUSTMENT AND OPERATION ........................................................... MAINTENANCE AND TROUBLE-SHOOTING . ."................................................ CONDITIONING GUIDELINES ............................................
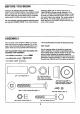
BEFORE YOU BEGIN Thank you for selecting the innovative SEARS LIFESTYLEFP CARDIO FORCE. The CARDIO FORCE offers a unique form of low-impact exercise that uses both the upper body and the lower body for increased cardiovascular benefits and greater toning results. For your benefit, read this manual carefully before you use the CARDIO FORCE. If you have additional questions, please call our toll-free HELPLINE at 1-800-736-6879, Monday through Saturday, 7 a.m. until 7 p.m. Central Time (excluding holidays).
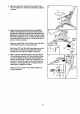
1. Find the Front Stabilizer (36), which has a decal on it. Make sure that there is a Large Round Endcap (8) on each end of the Front Stabilizer. 6 Attach the Front Stabilizer (36) to the Frame (6) with two 3/8" x 2 7/8" Carriage Bolts (35) and 3/8" Nylon Locknuts (33). Make sure that the indented holes in the Front Stabilizer are turned toward the frame. 33 Attach the Rear Stabilizer (32) to the Frame (6) in the same manner. 8 2. Plug the Sensor Wire (15) into the back of the Monitor (1).
. Attach the Seat (3) to the Seat Tube (5) with the two 1/4" x 2" Screws (17). Be sure that the Seat is oriented as shown. 3 6. Apply a small amount of grease to the two indicated shafts of the Pedal Frame (7). Slide a Pedal (12) onto the right shaft. Make sure that the Pedal is turned so the plastic tube is facing the Pedal Frame, as shown. Using the included pedal tool, tap a 1F2"Push Nut (30) onto the end of the shaft. Be sure that the Push Nut is turned as Plastic shown in the inset drawing.
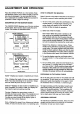
ADJUSTMENT AND OPERATION Place the CARDIO FORCE on a level surface. Keep the electronic monitor out of direct sunlight, or the display may be damaged. It is recommended that the floor underneath the CARDIO FORCE be covered for HOW TO OPERATE THE MONITOR Note: If there is a thin sheet of clear film on the front of the monitor, remove it before operating the monitor. protection in case of slight oil leakage. To turn on the power, press the on/off button or the 1.
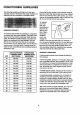
RESISTANCE ADJUSTMENT I/I Resistance Adjustment Collar To vary the intensity of your exercise, the resistance of the CARDIO FORCE can be changed. There are 9 resistance levels: level 1 is the easiest, and level 9 is the most difficult. To change the resistance, turn the resistance adjustment collar on the Resistance Cylinder (9). The arrow on the Resistance Cylinder will show which resistance level you have selected. CAUTION: The Resistance Cylinder becomes very hot during use.
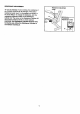
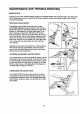
MAINTENANCE AND TROUBLE-SHOOTING MONITOR CARE Tighten all parts of the CARDIO FORCE regulady. The CARDIO FORCE can be cleaned with a soft, damp cloth. Do not allow liquid to come in contact with the monitor. Keep the monitor out of direct sunlight or the LCD display may be damaged. REPLACING THE BA'n'ERIES A If the display of the Monitor (1) becomes dim, the two Ll154 watch batteries should be replaced. See drawing A. Remove the upper #6 x 3/8" Screw (16) from the back of the Monitor (1). See drawing B.
CONDITIONING GUIDELINES The following guidelines will help you to plan your exercise program. Remember that proper nutrition and adequate rest are essential for successful results. EXERCISE INTENSITY To maximize the benefits of exemising, it is important to exemise with the proper intensity. The proper intensity level can be found by using your heart rate as a guide.
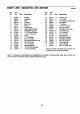
PART LISTAModel Key No. Part No. Qty. 1 2 124883 126512 1 1 3 4 5 6 7 8 9 10 11 12 13 14 15 16 17 18 19 20 126013 126510 127158 NSP 127157 109416 123216 117545 117544 124807 126025 102308 124434 100244 013498 113349 103677 110576 1 2 1 1 1 4 1 2 2 2 2 2 1 2 2 1 4 4 No. 831.287420 R0996A Key No. Part No. Qty.
EXPLODED DRAWINGmModel NO. 831.287420 Ro995A 34 \. 14 3 I 2 \ 16 T 34 29 11 17 9_ 23_ 8 33 6 I > 32 12 11
IMPORTANT ASSEMBLY UPDATE Please replace assembly step 7 on page S of the user's manual with the step below, 7. Before using the CARDIO FORCE, check the Magnet (18) and the Reed Switch (15). Pivot the Pedal Frame (7) until the Magnet is aligned with the Reed Switch (see the inset drawing). Loosen the Indicated #8 x 3/4" Screw (2"/). Adjust the position of the Reed Switch so that there Is a 1/8" gap between the Magnet and the Reed Switch. Retighten the Screw.
i III IMPORTANT ASSEMBLY UPDATE Please refer to assembly steps 3 and 7 on peges 4 and 5 of the USER'S MANUAl. _ mmembly steps $ and 7 with Ule steps ehown below. IMPORTAN_.Beforeas_bling the 1/2" DomeCaps(29),be suremat al! pa_ are positioned _ Mtown inthe dnwvingL The Dome Caps oanbe used only once; if they nmst be removed, it will be necessary to order new Oome Csps. 3. Tap a 1/2" Dome Cap (,_) onto one endofthe6` Pk_t Rod('21).Insert the end of me Rvot Rod _to the inclicetedhole in the Frame (6).
SF_,4RS The model number and serial number of your SEARS LIFESTYLER • CARDIO FORCE are listed on a decal attached to the frame. See the front cover of this manual to find the location of the decal. Model No. 831.287420 All replacement parts are available for immediate pumhase or special order when you visit your nearest SEARS Service Center. To request service or to order parts by telephone, call the toll-free numbers listed at the left.