
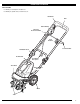
Electric Cultivator Operator's Manual

10
MAINTENANCE AND REPAIR INSTRUCTIONS
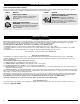
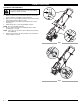
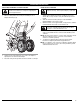
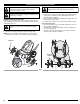
Fig. 9
REMOVING AND REPLACING TINES
Cultivator tines are subject to wear and should be replaced if any
signs of damage are present. Tines should also be removed and
cleaned after each use.
To replace the cultivator's tines:
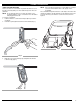
1. Remove the click pin found at the end of each tine shaft.
NOTE: Each tine assembly is stamped either "A" or "B" (Fig. 9).
Note each tine's location on the shaft for easier reassembly.
WARNING: To prevent serious injury, never perform
maintenance or repairs with unit running. Always
service and repair a cool unit.
WARNING: Avoid accidental starting. Stop motor
and disconnect extension cord prior to performing any
maintenance or repairs.
WARNING: Cultivator tines are sharp. Always wear
leather gloves to protect your hands when handling
tines.
WARNING: Do not wash cultivator with a hose. Avoid
getting water on motor and electrical connections.
Bell Side
of Tines
Gearbox
Click Pin
Hubs
2. Carefully remove each tine assembly from the tine shafts.
3. Wipe each tine shaft clean with a damp cloth and apply a light
coat of oil (i.e. 3-N-One) or silicon-based lubricant to each
shaft. Do NOT use WD-40.
4. Rinse each tine assembly with water and thoroughly dry each it
before placing on tine shaft.
5. Re-insert each click pin to secure the tine assemblies in place.
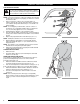
Tips for Replacing Tines
• Each tine shaft holds one tine assembly stamped "A" and one
tine assembly stamped "B".
• The bell sides of both tine assemblies (on each shaft) should
face each other (Fig. 9).
• The hub of each tine assembly (Fig. 9) should face outward
(away from the cultivator's gearbox).