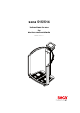
seca 515/514 Instructions for use for doctors and assistants Software version 1.
English CONTENTS 1. Device description . . . . . . . . . . . . . . . . . . . . . . . . . . . . 4 1.1 Intended use . . . . . . . . . . . . . . . . . . . . . . . . . . . . . 1.2 Description of function. . . . . . . . . . . . . . . . . . . . . . Recording weight and height . . . . . . . . . . . . . . . Bioimpedance measurement . . . . . . . . . . . . . . . Management of patient data. . . . . . . . . . . . . . . . Analysis . . . . . . . . . . . . . . . . . . . . . . . . . . . . . . . Management of user data. .
10.1 Information on maintenance and subsequent verification . . . . . . . . . . . . . . . . . . . . . . . . . . . . . . 65 10.2 Checking the contents of the verification counter . . . . . . . . . . . . . . . . . . . . . . . . . . . . . . . . 65 11. Maintenance (unverified model) . . . . . . . . . . . . . . . 66 12. Troubleshooting . . . . . . . . . . . . . . . . . . . . . . . . . . . . 67 12.1 Power supply and display . . . . . . . . . . . . . . . . . 12.2 Height and weight . . . . . . . . . . . . . . . . .
1. DEVICE DESCRIPTION 1.1 Intended use The Medical Body Composition Analyzer seca 515/514 is mainly used in hospitals, medical practices and inpatient care facilities in accordance with national regulations. The seca 515/514 device records weight, height and bioelectric impedance measurements and derivable parameters, e.g. fat-free mass (FFM), for automatic calculation.
English Management of user data Access data for users of the device are managed in the seca 115 PC software supplied. In the course of the creation of user accounts for the seca 115, a user PIN is automatically generated for the seca 515/514. The device can only be configured with administrator rights. An initial administrator PIN for the device is provided. It can only be changed on the device.
1.4 Contraindications Bioimpedance measurements may not be performed on persons exhibiting the following characteristics: • electronic implants, e.g. cardiac pacemakers • active prostheses Bioimpedance measurements may not be performed on persons who are connected to one of the following devices: • electronic life-support systems, e.g. artificial heart, artificial lung • portable electronic medical devices, e.g.
English 2. SAFETY INFORMATION 2.1 Safety rules in the instructions for use DANGER! Identifies an exceptionally hazardous situation. If you fail to take note of this information, serious irreversible or fatal injury will result. WARNING! Identifies an exceptionally hazardous situation. If you fail to take note of this information, serious irreversible or fatal injury may result. CAUTION! Identifies a hazardous situation. If you fail to take note of this information, minor to moderate injury may result.
• Use only original accessories and spare parts from seca, otherwise seca will not grant any warranty. CAUTION! Hazard to patient, malfunction • Keep other medical devices, e.g. high-frequency surgical devices, at a minimum distance of approx. 1 meter to prevent incorrect measurements or faults with wireless transmission. • Keep HF devices such as cellphones at a minimum distance of approx. 1 meter to prevent incorrect measurement or faults with wireless transmission.
English • Do not subject the device to shocks or vibrations. • Do not place the device in direct sunlight and make sure that it is not placed in the direct proximity of a heat source. The excessive temperatures could damage the electronics. • Perform function checks regularly as described in the relevant section in this document. Do not operate the device if it is damaged or not working properly. • Avoid rapid temperature changes.
Dealing with packaging WARNING! Danger of suffocation Packaging made of plastic film (bags) presents a danger of suffocation. ► Store packaging out of the reach of children. ► If the original packaging is no longer available, only use plastic bags with safety holes to reduce the danger of suffocation. NOTE: Store the original packaging for future use (e.g. returning for maintenance).
English 3. OVERVIEW 3.1 Controls 1 2 8 3 4 5 Rear 7 Front 6 Rear of weighing platform 9 No.
No. 12 • Control Function 3 USB interface For connecting a USB memory stick (contained in the scope of delivery) for managing the following data: • creating seca patient files on the device • loading seca patient files from the seca 115 PC software supplied onto the USB memory stick; calling up data on device • saving measured results on the USB memory stick • reading out log files from the device (administrator function) 4 Pair of hand electrodes, right 3 pcs.
English 3.2 Symbols in the start display A B C D E F G H Q P O I N M J K L Symbol Meaning A Header, remains unchanged in all menu levels and tabs. The following data are displayed: • patient data - name - weight - height - BMI • data connections • date/time B Login symbol: shows whether the user is logged in to a seca patient database (user PIN required) C Printer symbol: indicates whether the print function of the seca 115 PC software is available.
Symbol E F Meaning Data connection symbol: shows the current connection type to the seca patient database (in this case: Ethernet connection to PC using seca 115) Additional possible connection types: • seca 360° wireless connection to PC using seca 115 • USB memory stick connected to device Weight display weight/height tab G H Automatically active after device switched on For determining weight and height of patient bia tab For performing a bioimpedance analysis I patient tab For assigning the
English 3.
Control/display Symbol Meaning Selected function Drop-down menu Drop-down menu open Red text: value outside normal range Text color Gray text: value within normal range 3.
English Text/symbol 12 V min. 1,25 A Meaning Operate device only with an original seca power pack use compatible seca adapter only USB interface Do not dispose of device with household waste 3.5 Identification on the packaging Protect from wet Arrows point to top of product Transport and store upright Fragile Do not throw or drop Permitted min. and max. temperature for transport and storage Permitted min. and max.
4. BEFORE YOU REALLY GET STARTED ... 4.1 Scope of delivery c b a seca 115 d e seca 515/514 User Docs h No.
English 4.2 Establishing power supply WARNING! Using the wrong power packs may cause bodily injury or damage to the device Conventional power packs may deliver a higher voltage than is indicated on them. The device may overheat, catch fire, melt or shortcircuit. ► Use only the original seca power pack as contained in the scope of delivery and listed in the section entitled “Spare parts” on page 74. The connection for the power pack is located on the underside of the weighing platform.
4.4 Configuring the device Sections 4.5 to 4.6 show the data transmission options provided by the device. Your administrator or hospital technician will decide which data connection types to set up for your device. Additional configuration options can be found in the administrator manual on the “User Documentation” DVD supplied. If you have any requests for changes, please contact your administrator or hospital technician.
English Printing seca 115 Printer If the device is connected to the seca 115 PC software via Ethernet, you can use the specific printing function of the PC software and print out detailed results reports on a PC printer. You can start printing a results report directly from the Medical Body Composition Analyzer (see “Printing results report” on page 44). The data are transmitted to the seca 115 PC software and automatically passed on to the connected PC printer.
4.6 Operation using a seca 360° length measuring device As an alternative to manual entry, you can also use a seca 360° length measuring device to determine height and transfer this to the device via seca 360° wireless network. Height is taken into account when analyzing the bioimpedance measurement. If the device is connected to the seca 115 PC software, height is recorded in a seca patient file together with the other measured results and transmitted to the seca 115 PC software.
English 5. OPERATION 5.1 Operating concept Swiveling the touchscreen display The touchscreen display of the device can be swiveled. As a result, it can be perfectly positioned for every application. ► Swivel the touchscreen display so that is convenient for you to operate max.180°! max. 180°! and read. NOTICE! Damage to device The swivel mechanism of the touchscreen display has an end stop. Do not attempt to swivel the touchscreen display by more than 180°.
Selecting extended functions Functions commonly used in a certain context are accessible in the primary menu. Additional functions are accessible in the secondary menu. NOTE: The assignment of functions to the primary and secondary menus is specified at the factory and cannot be changed. 1. Press the switch menu button. The secondary menu is displayed. 2. Press the switch menu button again. The functions in the primary menu are shown again.
English Display special characters Special characters can also be displayed with the computer keyboard. 1. Press and hold down any key on the computer keyboard (in this case “u” key) . All special characters are displayed in a context menu that is accessible via the selected key (in this case four special characters available). 2. In the context menu, press the desired special character. The special character appears in the input field. 3. Enter further text as usual.
Measuring procedure The operating concept is based on the typical measuring procedure outlined below. • • • • • Measure weight and height Perform a bioimpedance measurement Assign measurements to a seca patient file Evaluate measured results Save measuring procedure The order of the tabs on the touchscreen display follows this sequence. It is possible to operate in a different order. NOTICE! Loss of data If there is no new entry for approx. 5 minutes, the current measurement is discarded.
English 5.2 Determining weight and height NOTICE! Incorrect measurement due to force shunt All the controls of the device are in the so-called weight-sensitive area. If you touch or lean on the device when measuring a patient, this will affect the measured results. ► During the measuring procedure, ensure that the device is only touched by the patient who is currently being measured. Starting the weighing procedure 1. Ensure that the device has no load. 2. Switch on the device.
Manually determining hold value (hold) The device is equipped with an autohold function. During the measuring procedure, the weight is automatically frozen and the message “HOLD” is displayed in the window. It is possible that you will have to determine the hold value manually, e.g. if the patient removes an item of clothing after the initial weighing without stepping off the scale. In this case, proceed as outlined below. 1. Press the hold button. The display flashes until a stable weight is measured.
English Activating/deactivating pre-tare function If you wish to have a permanently-saved additional weight automatically subtracted from the measurement result during the current weighing procedure, proceed as outlined below. 1. Switch on the device. 2. Ask the patient to position themselves on the device. 3. Press the pre-tare button. The numerical keypad appears. The last additional weight saved is displayed. 4. Press the Enter key on the numerical keypad. The entry is accepted.
Calculating BMI automatically To determine BMI, you have to record the patient's height as well as their weight. ► After weighing, enter the patient's height. – Manually (see “Entering height manually” on page 29) – Via the seca 360° wireless network (see “Transmitting height via seca 360° wireless network” on page 29) The BMI is calculated and displayed automatically. Switching weighing range automatically The scale has 2 weighing ranges.
English 5.3 Performing a bioimpedance measurement Switching on the device 1. Ensure that the device has no load. 2. Press the ON/OFF button. The start screen appears. The weight/height tab is active. Determining weight and height ► Determine weight and height as described in the section entitled “Determining weight and height” from page 27. Checking module selection 1. Activate the bia tab. Bioimpedance analysis is available when the message “Self-test running” is no longer displayed.
3. Deactivate the modules for which you do not require evaluation. 4. Press the continue button. Starting measurement 1. State whether the patient belongs to a group of people for whom a bioimpedance measurement may not be performed. – Yes: the measurement is not performed. The weight/height tab is active again. – No: the procedure continues. The dialog window for positioning the patient appears. WARNING! Hazard to patient Diseases can be transmitted by poor hygiene.
English Test point Characteristics Hands • Hands must be clean • Same pair of hand electrodes on left and right • Select the pair of hand electrodes such that arms are extended but not under strain • Finger spacers of the hand electrodes between the middle finger and ring finger on both sides Feet • Stand on device with bare feet • Feet must be clean • Heels on the rear foot electrodes • Balls of feet on the front foot electrodes Position • Upright position • Knees slightly bent • Do not move during
Remaining measurement time is displayed. As soon as the measurement ends, the message End of measurement appears. Screen still missing. 5. Press the continue button.
English Entering PAL value and waist circumference The Module-specific entries dialog window appears once the bioimpedance measurement is complete. This is where you enter PAL value (PAL = physical activity level) and the patient's waist circumference. The PAL value is required to determine total energy expenditure (Energy evaluation module). Waist circumference is required to determine the proportion of visceral adipose tissue (Health risk evaluation module).
NOTICE! Loss of data If there is no new entry for approx. 5 minutes, the current measurement is discarded. The complete measuring procedure will have to be repeated. Printing partial results You can print out the measured results so far. Proceed as described in the section entitled “Printing results report” on page 44. 5.
English NOTICE! Data access by unauthorized persons If you are logged in to a patient database, unauthorized persons can also access seca patient files as long as the device is switched on. ► Do not leave the device unsupervised if you are logged in to a patient database. ► Log off the patient database if you need to leave the device unsupervised (see “Logging off from a seca patient database” on page 44). ► Switch off the device if you are not using it for an extended period.
All patients who meet the search criterion are displayed. 4. Press the desired entry. The patient details are displayed. 5. Ensure that you have selected the correct patient. NOTE: • If you wish to perform a new patient search, press the new patient button. • If you wish to return to the results list, press the cancel button. If the results list has only one entry, the search screen appears. 6. Press the confirm button. The current measurement is assigned to the selected seca patient file.
English NOTICE! Loss of data The measurement has now been assigned to a seca patient file, but has not yet been saved. If there is no new entry for approx. 5 minutes, the device switches to standby. The seca patient file is no longer available on the device. The current measurement is discarded. The complete process will have to be repeated. ► Save the measurement as described in the section entitled “Closing the measuring procedure” from page 43.
Creating a new seca patient file 1. Press the patient tab. The input screen for the patient search appears. 2. Press the Create button. NOTE: If you are not logged in to a seca patient database, the dialog window for entering your user PIN appears. Enter your user PIN as described in the section entitled “Logging on to a seca patient database” on page 36. The device accesses the seca patient database (in this case: in the seca 115 PC software via Ethernet).
English The second input screen for patient data (optional fields) appears. 5. Enter the following patient data: – First name – Surname – Patient ID NOTE: You only need to enter a patient ID if this has to follow a specific structure in your institution. If you do not enter an ID, then an ID will be assigned automatically when the data are saved. 6. Press the confirm button. A summary of the patient data is shown. 7. Press the confirm button again. The patient data are saved.
5.5 Viewing analyses NOTE: This section describes navigation in the analysis tab. For information about the medical content of the evaluation modules, see the section entitled “Medical basis” from page 45. 1. Press the analysis tab. The Examination results dialog window appears. The results for the first evaluation module (in this case: Function/ rehabilitation) are displayed. 2. For graphical analysis of individual results, press the drop-down triangle ▼ in the corresponding line.
English The drop-down menu opens. 5. Press the evaluation module you wish to view. 5.6 Closing the measuring procedure Saving the measured results 1. Ensure that you can access a seca patient database in one of the following ways: – the PC with the seca 115 PC software is switched on and connected to the device via the seca 360° wireless network or Ethernet. The corresponding data connection symbol is white.
Printing results report If the device is connected to a PC printer via seca 115, you can start printing out a results report directly on the device. If the measurement is not assigned to any seca patient file, an anonymous results report is compiled. 1. Ensure that there is a network connection (seca 360° wireless connection or Ethernet). The corresponding symbol on the touchscreen display is white.
English 6. MEDICAL BASIS This section briefly describes the principles of bioimpedance analysis, as well as the content and medical objectives of the evaluation modules pre-set in this device. For additional information, we refer you to the appropriate professional literature. 6.
Functional principle of bioimpedance analysis Bioimpedance analysis is a method for rapid, simple and non-invasive assessment of body composition. Only one measuring procedure on a single device is required. In a bioimpedance analysis, the human body is regarded as an electrical conductor in an alternating current circuit and its alternating current resistance (impedance) is measured.
English seca therefore developed its own predictive formulas for determining the following parameters for the arms and legs: • • • • total body water (TBW) extracellular water (ECW) fat-free mass (FFM) skeletal muscle mass (SMM) for arms, legs, torso and whole body In-house reference values were determined for the following parameters in order to be able to show normal ranges: • bioimpedance vector analysis (BIVA) • mass indices (FMI, FFMI) • phase angle (φ) In order to determine the formulas and referen
Evaluation parameter Display Evaluation module Total energy expenditure (TEE) Absolute in MJ/d or kcal/d “Energy” from page 53 Total body water (TBW) Absolute in l “Fluid” from page 56 Weight (W) • Absolute in kg “Development/growth” from page 50 • For children: shown in percentile curves Height (H) • Absolute in m “Development/growth” from page 50 • For children: shown in percentile curves Hydration (HYD) Relative in % “Fluid” from page 56 Energy stored in body (Ebody) Absolute in MJ or kc
English seca specialty: co-ordinate system with tolerance ellipses In addition to the classic display of evaluation parameters in numerical values, bar graphs and percentile curves, the seca 515/514 uses co-ordinate systems with so-called tolerance ellipses for the graphical display of body impedance and fat-mass indices. This form of graphical display, named “bioimpedance vector analysis” (BIVA), was developed by Professor A. Piccoli for the interpretation of body impedance.
6.3 Evaluation modules The evaluation modules described below are pre-set in this device and assist you in assessing your patients' state of health. The evaluation modules offer the option of only viewing those evaluation parameters (see “Evaluation parameters” on page 47) relevant to a specific objective. For information about how to access the evaluation modules and navigate within them, see “Viewing analyses” from page 42.
English Weight percentile curves for children Height percentile curves for children Medical basis • 51
BMI percentile curves for children WHO reference values for adults 52 •
English Energy The aim of this module is to determine a person's energy expenditure and energy reserves. The following parameters are displayed: • • • • • fat mass (FM) fat mass index (FMI) energy stored in the body (Ebody) resting energy expenditure (REE) total energy expenditure (TEE) No bioimpedance measurement is required for the resting energy expenditure (REE) parameter.
Function/rehabilitation This module is for determining a person's level of fitness. This allows the success of a training regime to be assessed. For this module, the parameters height and weight are required, as well as a bioimpedance measurement.
English Body Compostion Chart (mass indices) Skeletal muscle mass Medical basis • 55
Fluid This module allows a person's fluids status to be determined. For this module, the parameters height and weight are required, as well as a bioimpedance measurement.
English Health risk The aim of this module is to provide an overview of body composition and to compare the results with values for healthy people. A body composition which deviates from the normal range is an indicator which can be used to assess the risk to health. For this module, the parameters height and weight are required, as well as a bioimpedance measurement.
Bioimpedance vector analysis Body Compostion Chart (mass indices) 58 •
English Raw data for impedance This module shows detailed raw data for resistance (R), reactance (Xc), impedance (Z) and phase angle (φ) for information purposes. You can also view impedance (Z), reactance (Xc), resistance (R) and phase angle (ö) for the frequencies 50 Hz and 5 Hz. NOTE: In the seca 115 PC software, you can view the raw data for impedance for individual body parts and for additional frequencies.
6.4 References The scientific basis for bioimpedance analyses using the Medical Body Composition Analyzer seca 515/514 is clinical studies. The results of the clinical studies are stored as references in the device software and form the basis for assessing the state of health of your patients. The references used by the device depend on the country in which you are operating. As part of the device configuration, your administrator will enter your country as the setup location.
English 7. CONFIGURING THE DEVICE 7.1 Adapting default module selection for bioimpedance analysis The default module selection determines which evaluation modules are considered during a bioimpedance analysis. The device is factory set, so that when the bia tab is activated, the Default module selection dialog window appears and all evaluation modules are activated. This way, the module selection can be verified before each measurement and, if necessary, adapted to suit the individual measurement.
Creating default module selection In order to create an in-house default module selection, proceed as outlined below. 1. Press the switch menu button. The secondary menu is displayed. 2. Press the settings button. The User menu appears. 3. Press the drop-down menu. The drop-down menu opens. 4. Press the Default module selection menu element. The current module selection is displayed. The Raw data for impedance evaluation module is deactivated at the factory.
English 6. Press the apply button. The module selection is saved and available from the next bioimpedance analysis. NOTE: To exit the dialog window without saving, press the cancel button or the most recently active tab (red, in this case: bia). The most recently active tab is active again. 7.2 Saving settings Applying settings 1. Press the apply button. The Save operation successful dialog window appears. 2. Press the continue button. The settings\User menu appears in the display again.
8. HYGIENE TREATMENT WARNING! Electric shock The device is not de-energized when the on/off button is pressed and the display goes out. Use of fluids on the device may cause electric shock. ► Before each hygiene treatment, ensure that the device is switched off. ► Disconnect the power supply before each hygiene treatment. ► Ensure that no fluids penetrate the device. CAUTION! Damage to device Unsuitable cleaning agents and disinfectants may damage the sensitive surfaces of the device.
English 9. FUNCTION CHECK ► Perform a function check prior to each use.
3. Press the settings button. The User dialog window appears. The verification counter reading (in this case: 1) is displayed. 4. Compare the content of the verification counter output with the number given on the verification counter sticker. Both numbers have to match for the verification to be valid. If the sticker and the verification counter do not match, the scale must be subsequently verified. Please contact your service partner or seca service.
English 12.TROUBLESHOOTING 12.
12.
English 12.4 Data transmission Problem Cause Remedy Data transmission between device and seca 115 cannot be set up Software versions incompatible Administrator: use compatible software version: • device: min. software version 1.1 • PC software: min. software version 1.
12.5 Printing Problem Print function not available Results report not being printed No personal data in results report No bioimpedance parameters in results report Cause Software versions incompatible Administrator: use compatible software version: • device: min. software version 1.1 • PC software: min. software version 1.4 PC printer not switched on Switch on PC printer The PC on which the seca 115 PC software is installed has not been switched on.
English 13.TECHNICAL DATA 13.1 General technical data General technical data Measurements • Depth • Width • Height Net weight 828 mm 976 mm 1251 mm approx.
13.2 Technical data, bioimpedance analysis Technical data, bioimpedance analysis Measuring method 8-point bioimpedance analysis Electrode type Stainless steel, 2 x 3 pairs of hand electrodes, 2 pairs of foot electrodes Measuring frequencies 1; 1.5; 2; 3; 5; 7.
English 13.
13.5 Technical modifications Combination seca 515/514 (SW version 1.1) seca 115 (SW version 1.
English 17.WARRANTY There is a two-year warranty period from delivery for defects attributable to material or fabrication errors. All movable parts, including batteries, cables, power packs, rechargeable batteries etc. are exempt. Defects which come under the warranty will be repaired for the customer free of charge against proof of purchase. Additional claims cannot be considered.
VHFD JPEK FR NJ +DPPHU 6WHLQGDPP भ˼भ +DPEXUJ Յ *HUPDQ\ 7HOHSKRQH )D[ LQIR#VHFD FRP VHFD RSHUDWHV ZRUOGZLGH ZLWK KHDGTXDUWHUV LQ *HUPDQ\ DQG EUDQFKHV LQ VHFD IUDQFH VHFD XQLWHG NLQJGRP VHFD QRUWK DPHULFD VHFD VFKZHL] VHFD ]KRQJ JXR VHFD QLKRQ VHFD PH[LFR VHFD DXVWULD VHFD SROVND VHFD PLGGOH HDVW VHFD EUDVLO VHFD VXRPL VHFD DPpULFD ODWLQD DQG ZLWK H[FOXVLYH SDUWQHUV LQ PRUH WKDQ FRXQWULHV $OO FRQWDFW GDWD XQGHU ZZZ VHFD FRP 17-10-07-626-002a/04-2