
Use and Care Manual


EN-6
06/2015
Copyright © 2015, Fast ČR, a.s.
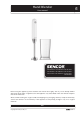
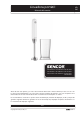
Hand Blender
SHB 30WH-NAA1 / SHB 31GR-NAA1 / SHB 32BL-NAA1 / SHB 33OR-NAA1 / SHB 34RD-NAA1
SHB 35VT-NAA1 / SHB 36YL-NAA1 / SHB 37GG-NAA1 / SHB 38RS-NAA1 / SHB3XXX-NAA1
EN
BEFORE FIRST USE
1. Take the appliance and its accessories out of the packaging.
2. Thoroughly wash the removable blending attachment A4 and the beaker A6 with hot water and
dishwashing detergent. Thoroughly rinse these parts with tap water and dry them thoroughly.
Attention:
Make sure that no water remains in the blending attachment A4. This could enter and damage
the motor unit A3 when the appliance is assembled.
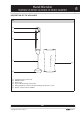
ATTACHING AND REMOVING THE BLENDING ATTACHMENT
1. Place the blending attachment A4 against the motor unit A3 and attach it by turning it toward
the closed padlock symbol marked on the appliance.
2. To take the blender apart, use one hand to hold the motor unit A3 and the other to turn the
blending attachment A4 toward the open padlock symbol marked on the appliance and take it off.
USING THE APPLIANCE
1. This blender is designed for blending spreads, mayonnaises, smoothies, milkshakes, sauces, baby
food, purée, etc.
2. Put the ingredients you want to blend into the beaker A6 or another suitable container.
3. Plug in the power cord. Hold the blender by the motor unit A3 and submerge the blending
attachment A4 into the container with the ingredients.
4. To turn the blender on, press switch A2. The blender will run while switch A2 is pressed. For safety
reasons, the blender will turn off when switch A2 is released.
Attention:
The blender’s maximum operating time is 1 minute. After 1 minute, shut off the appliance for
at least 2 minutes.
If you are using the blender with sticky or hard food, shut off the blender after 20 seconds.
5. The control dial A1 is used to variably control the motor speed.
6. Unplug the blender if you will not be using it.
ADVICE AND TIPS FOR BLENDING
1. Cut food into smaller pieces before blending it. Separate larger amounts of food into several
smaller batches.
2. The volume of some liquids increases when they are blended, so only fill the beaker A6 to ¾ of its
capacity. The 500 ml mark indicates the beaker’s maximum capacity.
Attention:
Do not use the blender for ice cubes or coffee beans. This could damage the mixing blades A5.
3. When blending, hold the blender so that the blending attachment A4 is pointing perpendicular to
the bottom of the beaker. Make sure the mixing blades A5 remain submerged in the ingredients
during the entire blending process. Otherwise, ingredients could splatter out of the beaker.