by SLSPT369 36’’ Kids Trampoline
www.PyleUSA.com SAFETY INSTRUCTIONS 1. Misuse and abuse of this trampoline is dangerous and can cause serious injuries. 2. All purchasers and all persons using the Trampoline must become familiar with the manufacturer's recommendations for proper assembly, use and care of the Fitness Trampoline. 3. The owner and supervisors of the trampoline are responsible to make all users aware of the Safety Instructions. 4. Place the Trampoline on a level surface before use. 5. Inspect your Trampoline before each use.
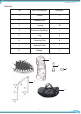
www.PyleUSA.com Parts List Nr.
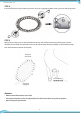
www.PyleUSA.com BEFORE ASSEMBLY Check all springs BEFORE assembly. If any spring is not attached or damaged, pls follow below processes to attach or replace the spring. A. Find the open end of the SPRING (#3) and hook this end into the hole on the Rail. B. Swing the SPRING (#3) to face inside of the trampoline. C. Attach the metal loop on the MAT (#2) to the spring hook. Assembly Instruction WARNING 1. Keep children away from the trampoline during assembly. 2.
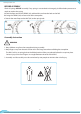
www.PyleUSA.com STEP 1 Lay the folding trampoline on the floor in its still folded position. Push out the ends so the trampoline forms a semi-circle. STEP 2 Remove the bracket pin from both ends of the trampoline, and place them to the side. STEP 3 Both persons press rails C and D, and using steady pressure, with hands open and fingers extended, use palm of hands to push rails A and B down until they touch the ground. Make sure that all joints are locked into place.
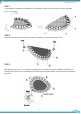
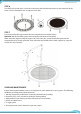
www.PyleUSA.com STEP 4 Insert the PIN back to the bracket to prevent rails from snapping together when you reach the flat position STEP 5 Remove the covering cap on the threaded connector, and slide the protective padding (#4) over the unfolded frame. Make sure the holes on the underside of the protective padding are positioined exactly over the threaded connector for the feet.
www.PyleUSA.com STEP 6 Turn the frame upside down. Screw the six feet on to the threaded connectors on the underside of the frame. Turn the trampoline over and place it on its feet. STEP 7 Insert the two handle support tube (#A) into trampoline base handle brackets. Attention: Bends of handle support face up and toward center of trampoline. Make sure holes aligned. Using the wahser (#C) and screw (#D), secure the handle support to the trampoline base by wrench provided.
www.PyleUSA.com WARNING IMPORTANT – PLEASE READ! WARNING – GENERAL SAFETY ADVICE • Please read the instructions before use and retain for future reference. • Ensure the trampoline has been assembled correctly, as per the instructions in the manual. • It is essential that the intended site for this trampoline is completely flat and level. If the ground is un-level this will cause movement in the frame and could cause stress on the joined sections.