
Instructions / Assembly


www.PyleUSA.com
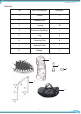
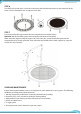
STEP 6
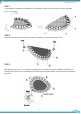
Turn the frame upside down. Screw the six feet on to the threaded connectors on the underside of the
frame. Turn the trampoline over and place it on its feet.
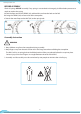
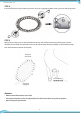
STEP 7
Insert the two handle support tube (#A) into trampoline base handle brackets.
Attention: Bends of handle support face up and toward center of trampoline.
Make sure holes aligned. Using the wahser (#C) and screw (#D), secure the handle support to the
trampoline base by wrench provided. Then secure the top handle to the handle support by using the
washer (#C) and screw(#D)
CARE AND MAINTENANCE
Inspect the trampoline before each use and replace any worn, defective or missing parts. The following
conditions could represent potential hazards:
1. Missing, improperly positioned, or insecurely attached frame padding.
2. Punctures, frays, tears, or holes in the bed, or frame padding.
3. Deterioration in the stitching or fabric of the bed or frame padding.
4. A bent or broken frame.
5. A sagging bed.
6. Sharp protrusions on the frame of suspension system.
7