USER MANUAL Hydra Indoor Waterproof Television 19-INCH AND 27-INCH T VS MODEL NUMBER IWT-19.5 IWT-27.5 W W W. SEUR A .
Thank you for selecting a Séura Indoor Waterproof Television. This product has been inspected and packaged carefully before shipment. Please read this guide before beginning installation. Please keep this manual for future reference. Information in this manual is subject to change without prior notice. FCC Information This equipment has been tested and found to comply with limits for a class B digital device, pursuant to Part 15 of the FCC Rules.
WARNING: READ ALL INSTRUCTIONS AND REVIEW ALL DRAWING SHEETS BEFORE ATTEMPTING TO INSTALL OR SERVICE THIS PRODUCT.
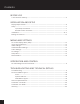
Contents BEFORE USE 2-Part Product Anatomy.................................................................................................................5 INSTALLATION AND SETUP Display Requirements.....................................................................................................................6 Setup.................................................................................................................................................. 7 Input/Output Overview.................
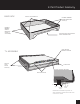
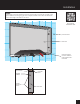
2-Part Product Anatomy BACK BOX GRAVITY LOCK MOUNTS FRAMING MEMBER SCREW-MOUNTING SLOTS (4) FRAMING MEMBER SCREWMOUNTING SLOTS (4, 2 PER SIDE) INPUT/OUTPUT/LOW VOLTAGE PASS-THROUGH PORT LOW VOLTAGE POWER LOCATION TV ASSEMBLY GRAVITY LOCK GUIDE SLOTS (4) GLASS FACE ON-UNIT CONTROL BUTTONS INPUTS/OUTPUTS Volume Menu Channel Up Up Volume Input Down Channel Down Power Note: Buttons are labeled on product. 19" shown. Buttons are located on the side of the unit on the 27" model.
Display Requirements Operation and Storage Requirements The ambient temperature for operating the device is between 41 to 122 degrees Fahrenheit. Do not install the device in the proximity of heat sources, such as heating pipes, heaters, furnaces or other devices that radiate heat. Mount the device in such a way that it is protected against moisture. Trouble free operation is ensured up to 100% air humidity. To prevent fire or electric shock, never allow liquids to enter the unit.
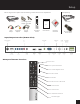
waterproof Setup waterproof Before using the device please check the following contents of the box for completeness: Sold separately: OK MENU MUTE VOL Low-Voltage Power Adapter and Cable TV Assembly EXIT CH USER MANUAL Back Box Hydra Indoor Waterproof Television 19-INCH AND 27-INCH T VS 0 MODEL NUMBER IWT-19.5 IWT-27.5 LAST W W W. SEUR A .
Installation NOTE: All Séura drawing packages indicate generalized nominal residential wood framing construction, and are not indicative of any particular building code. It is the installers responsibility that all electrical, audio/visual, and framing construction are code compliant to the municipality in which the product is being installed. Modifications made to Séura recommendations are at the sole discretion of the installer and release Séura of all liability.
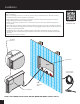
Installation Step 2 While keeping cord ends outside the back box pass-through port, finish the wall tight to the edges of back box, removing any gap. Once complete, the final wall surface should be flush with the front edge of the back box as shown.
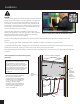
Installation Step 3 Install TV Assembly: A) P lace TV assembly face down on a clean, dry surface near the installed back box. Make all necessary connections and ensure LCD operation is successful. B) B efore applying adhesive, “dry fit” the TV assembly in back box. Notice that the gravity lock mounts engage. Ensure functionality in installed position. C) R emove TV assembly from back box. Do not disconnect any wires. Clean any residue from glass and remove debris.
Installation Step 4 Allow waterproof sealant 24 hours to cure at 72 degrees Fahrenheit before exposing to moisture. (or recommended time designated by sealant instructions) Once fully cured, use a razor blade or utility knife to carefully remove excess sealant.
Making Connections Connecting Video The Television features one Component, one Composite, one VGA, one coaxial Cable/Antenna input, and two HDMI inputs. We recommend using the HDMI inputs for best video and sound quality. Connecting Audio Two passive loudspeakers can be connected to the speaker output socket with speaker cables. Observe the polarity (+ and -) of the connections to avoid phase errors (= incorrect stereo playback). Note: This product is not equipped with builtin speakers.
On Screen Display Menu (OSD) On Screen Display Menu (OSD) In the on screen display menu (OSD) you can adapt the characteristics of your display based on personal preferences. OSD menus include Video, Audio, TV, Setup, and Parental. 1. Press on your remote control to open the OSD menu 2. Navigate within the OSD with the left/right and up/down arrows 3. Change settings with the left/right arrows 4. Go back one step with 5. Confirm selection with the OK button 6. Press to exit the OSD menu.
OSD (cont.) Advanced Video Settings The Advanced Video Settings menu offers further options to refine the image characteristics of your Séura Television. Adjustment options include: DNR MPEG NR Adaptive Luma Control Flesh Tone DI Film Mode Blue Stretch Game Mode Blue Mute Gamma Color Temperature COLOR TEMPERATURE Within the Color Temperature menu you can customize the Color Temperature of the picture according to your preferences.
OSD (cont.) Setup Menu The Setup Menu offers options to determine fundamental settings of your Séura Television based on personal preferences. Adjustment options include: OSD Language Caption Time Setup Reset Default TIME SETUP Options within the Time Setup selection include Time Zone, Time, and Sleep Timer.
OSD (cont.) Parental Menu The Parental Menu offers options to restrict program viewing based on various national rating systems. To access the menu, enter the 4-digit Password using the keypad on the remote. The factory default password is “0000”.
Integration and Control For complete control documentation, please visit www.seura.com/download-center • RS232 Protocol • IR Commands For additional technical support, please contact Séura at 1-800-957-3872 during regular business hours: M-F 8:00 am - 4:30 pm, Central Time.
Ports and Media Support Ports Input Ports Output Ports Video LINE Audio INPUT 1 x mini jack and adapter cable: RCA terminal, white, red, yellow Component Input 1 x mini jack and adapter cable: RCA terminal, red, green, blue HDMI™ Input 2 x HDMI™ terminal USB 1 x USB terminal RS232 1 x mini jack and adapter cable: D-SUB 9pin female IR Input (Infrared) 1 x mini jack 3.5mm S-Video 1 x 4-pin mini DIN PC Audio In 1 x mini jack 3.
Technical Specifications 19 AND 27 INCH CONNECTIONS Power Adapter IR VGA Audio Composite Audio Input Input Input Input Line Out RF Coaxial Antenna Cable Input USB (DC 5V 0.
Schematic: 19” Model Reseller www.seura.com PH. 920.857.9069 FAX 920.857.9490 - Drawing ID Number Item and Description 336.6 GLASS DIMENSION Date Created 30 SEP 2015 Revised Date IWT-19.5 19"(W) x 13-1/4"(H) Recessed Indoor Waterproof TV with 19" TV 19" 482.6 GLASS DIMENSION 1 13 4" - 19" SCREEN LOCATION 3 3 16" 81 TOTAL UNIT DEPTH 7 9 8" 250.8 SCREEN DIMENSION 15 16" 404.
Schematic: 19” Model (1) CREATE ROUGH OPENING MOUNT BACK BOX TIGHT TO THE FINISHED WALL SURFACE (2) INSTALL BACK BOX INTO ROUGH OPENING 19" 482.6 GLASS DIMENSION A 3 16" 4.8 1 13 4" 7 12 8" 336.6 GLASS DIMENSION 327 WALL OPENING 1 4" 6.4 3 16" 4.8 1 18 2" 1 BRING ALL A/V AND ELECTRICAL CONNECTIONS UP INTO THE BOTTOM OF THE BACK BOX'S OPENING FROM INSIDE THE WALL CAVITY PRIOR TO INSTALLING LCD UNIT. 4" 6.4 469.
Schematic: 27” Model 22
Schematic: 27” Model 23
LIMITED PRODUCT WARR ANT Y The standard limited warranty policies of Séura, Inc. (“Séura”) shall apply to all equipment or other goods (“Products”) at the time of sale to any authorized Séura distributor and/or product reseller. These warranty policies may be modified by Séura from time to time. Copies of the standard limited warranties then in effect for a particular Product will be made available upon request and are also available on the Séura website at https://www.seura.com/warranty/.