
Installation Guide
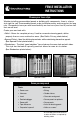

Cement
6" Gravel
10" - 12"
Fig. 2
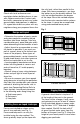
Install end and corner posts first. Tie
a string between the posts along the
fence line. This establishes a reference,
ensuring the posts are in line (see Fig. 3).
Brace the posts using 2x4s nailed to both
the posts and stakes in the ground. This
will keep them straight while the concrete
sets. Check for plumb (90º angle) on two
adjacent sides prior to pouring concrete.
Fill holes with ready-mix concrete
following the package instructions. Tamp
the concrete to remove any air pockets.
Overfill the holes at the top and slope
the concrete away from the post to keep
water from collecting around it. Recheck
plumb and alignment of all posts and
allow concrete to cure for 24 to 48 hours.
An easy method to ensure your post tops
are level is to run a string from corner
post to corner post at the desired height,
keeping the string taut (see Fig. 3). Mark
each post at the string line and cut off the
tops of the posts. Finish off your posts
with one of our decorative finial tops.
For preassembled fence panels, use
18d to 20d nails to attach them to the
posts. If possible, pre-drill holes through
the panels to minimize any splitting from
using such a large nail.
To install loose pickets to backer rails,
use 8d or 10d box nails. Start at one end
of the rail and check for level and plumb
every three or four pickets. If you wish
to build a solid “privacy” fence, butt the
pickets without leaving a gap in between.
To build a spaced picket fence, cut a
board the width of the desired gap and
use it as a spacer. Remember to check
for plumb every few pickets. Use two
backer rails for shorter fences, three rails
for fences 6' tall, and four rails for 8' tall
fences. NOTE: Attach rail 4" from the top
and bottom of pickets to minimize picket
movement.
Setting Posts
Cutting posts to the proper height
Installing panels and pickets
Fig. 3