
User guide
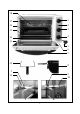


unit connection into the drive unit (see
picture II).
- Place the idle end of the spit into its
holding bracket on the other side (see
picture I).
- To remove the rotating spit, follow
these steps in reverse order.
Start up
-
Clean the appliance (see General care
and cleaning) and remove any packing
materials completely.
-
Before using the appliance for the first
time, let it heat up for 10 minutes with
both heating elements on. When the
appliance is switched on for the first time,
a slight smell may be emitted. This is
normal and will only last for a very short
time. Ensure sufficient ventilation.
Operation
-
Before using the appliance, make sure
that the reflector sheet is fitted in its
proper position underneath the lower
heating elements.
-
Pre-heat the oven compartment for
several minutes with the door closed,
using both heating elements. Set the
temperature control knob to the required
level and use the timer control knob to
select the desired pre-heating time. The
indicator lamp switches off once the pre-
set temperature has been reached. The
appliance is now pre-heated and ready
for use.
-
Place the food to be cooked on the
baking rack. When cooking food
containing fat or moisture, use the baking
tray to stop any dripping into the interior
of the appliance. When using the rotating
spit, always ensure that the baking rack
and baking tray are properly inserted
into one of the lower guide rails.
-
The baking tray must always be placed
on the baking rack and inserted into one
of the guide rails.
-
Close the door, set the temperature
control knob to the required level and
use the timer knob to select the desired
cooking time.
-
For overhead baking or grilling, either
the upper or the upper and lower
elements may be selected.
-
The switch settings (upper heat/lower
heat) may be changed during the cooking
process.
-
After the pre-programmed cooking time
has elapsed, the timer will automatically
switch off the heating elements.
-
To interrupt the cooking process
temporarily, set the 5-position switch to
the “
●” position. However, it should be
noted that the timer function continues
during the interruption.
-
To switch off the appliance earlier, set
the timer to “0” and turn the 5-position
switch to the “
●” position.
-
Always use the door handle to open the
hot door after use. When removing the
baking tray, use the tray handle provided.
Likewise, when removing the spit, the
spit handle must be used. Always place
the baking tray on a heat-resistant
surface.
-
After use, set the 5-position switch to the
“
●” position and remove the plug from
the wall socket.
Cooking times
The grilling/cooking times listed are
approximate times only, as each food to be
grilled or cooked is of a different nature and
consistency; please also refer to the
information contained on the food
packaging.
10