
User manual


10 SHARK FBQ100 User Manual
5. Rackmount (Optional)
With the available rackmount (optional) you have the possibility to place ve
SHARKs on two units of space in your rack.
◊ Before you begin with the work, please disconnect the Power Supply
Units from the SHARKs!
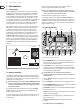
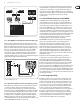
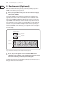
To mount the SHARKs on the rackmount you should use the supplied screws
(typeM3). You need two screws to x one FBQ100 onto the rackmount. In the
bottom of your SHARK you will nd two little threads. You have to position the
single SHARKs on the rackmount, so that the threads correspond to the cutouts
of the rackmount (see g.5.1). Now you can x the FBQ100 onto the rackmount.
Just take a cross-point screwdriver and tighten both screws loosely. After you
have xed all SHARKs on the rackmount, you can adjust the devices and tighten
all screws solidly.
Bottom FBQ100
Thread 1
Cutout 1
Cutout 2
Front Rackmount (Bottom View)
Thread 2
Fig. 5.1: Installation of the FBQ100 on the available rackmount (optional)
◊ Please, only use the supplied screws to install the SHARKs on the
rackmount. Longer or thicker screws can damage the electronics inside
of the device and doing so will void your warranty rights.
You will need 2 units of space for the FBQ100 rackmount. For technical reasons a
little gap remains above the rackmount.