
Owner's Guide

4
TOLL FREE: 1-800-798-7398
IMPORTANT: Do not use on unsealed wood
or unglazed ceramic floors. Do not use on wood
or tile floors that are highly worn, unfinished or
have a wax or oil finish. Surfaces that have been
treated with wax or some no wax floors may be
damaged by the cleaning solutions therefore it is
always recommended to test an isolated area of
the surface to be cleaned before proceeding. You
should always check the use and care instructions
from the floor manufacturer.
IMPORTANT: Make sure the floors are swept
or vacuumed before using the Professional Steam
& Spray
™
Mop.
Visit www.sharkclean.com for other great
quick cleaning products to complement your
Professional Steam & Spray
™
Mop, such as the
Shark
®
Rotator
™
vacuums.
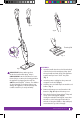
4 Twist the quick release cord holder to unwrap
the power cord completely. Plug into an
electrical outlet.
5 Make sure that the Cleaning Pad is attached to
the mop head.
6 The Steam Control button will flash blue.
If the light does not turn on, reference the
troubleshooting section on page 9.
IMPORTANT: When you are using the mop
for the first time, it might take longer than the
normal 30 seconds to start steaming.
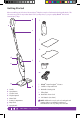
Using Your Professional Steam & Spray
™
Mop
IMPORTANT: When cleaning, do not use
the Professional Steam & Spray
™
Mop without
attaching a Cleaning Pad, filling the water tank
and inserting the Steam Energized
™
Cleanser
bottle first.
fig. 9
fig. 6
IMPORTANT: When cleaning, do not use
the Professional Steam & Spray
™
Mop without
attaching a Cleaning Pad, filling the water tank
and inserting the Steam Energized
™
Cleanser
bottle first.
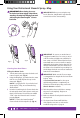
Cleaning Your Hard Floors
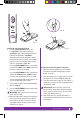
Filling the Water Tank:
1 Turn the water tank cap counter clockwise and
remove from the unit. (Fig. 6)
2 Using the filling flask, pour water into the water
tank. Do not overfill. Replace the cap on the
water tank. (Fig. 7)
NOTE: To prolong the life of your Professional
Steam & Spray
™
Mop, we recommend using
distilled water.
3 Insert the Steam Energized
™
Cleanser bottle into
the unit upside down. Push it down to make sure
that it is well inserted. You will hear an audible
“Click” when the Cleanser bottle is inserted
properly.(Fig. 8)
NOTE: To remove the Steam Energized
™
Cleanser bottle hold it and pull it up. (Fig. 9)
fig. 7
fig. 8