models 25N-S100 25N-S180 27N-S100 27N-S180 CONTENTS • • • • • • • • • • • • • • • Page Important Information .................................. 2 - 3 Important Safeguards .................................. 3 - 4 Supplied Accessories ....................................... 5 Before Operating Your Television ..................... 5 Antenna Connections ........................................ 6 Quick Reference Control Operation ............. 7 - 9 EZ SETUP during First Power On ..................
Welcome to the SHARP Family. We are pleased that you are now the owner of a SHARP Color Television – built for outstanding quality, reliability and performance. Every SHARP Color Television set is tuned and adjusted for proper color and sound, and has passed through the most stringent quality control tests at the factory. We have prepared this OPERATION MANUAL so that you may adjust the picture and color to your personal viewing preference.
Important Information (Continued) WARNING - FCC Regulations state that any unauthorized changes or modifications to this equipment not expressly approved by the manufacturer could void the user’s authority to operate this equipment. Important Safeguards CAUTION: Please read all of these instructions before you operate your television and save these intructions for later use. Electrical energy can perform many useful functions. This unit has been engineered and manufactured to assure your personal safety.
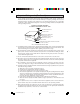
Important Safeguards (Continued) 14. If an outside antenna is connected to the television equipment, be sure the antenna system is grounded so as to provide some protection against voltage surges and built-up static charges.
Supplied Accessories Size AA Dry Batteries Infrared Remote Control Part Number : RRMCG1395CESA Before Operating Your Television Location • For normal operation, your TV should be located in an area of the room where cool adequate ventilation is provided. Do not place the back of the television set in a place where free airflow will be restricted. • Any magnetic force may disturb the color picture.
Antenna Connections Antennas • The antenna requirements for good color television reception are more important than those for black & white television reception. For this reason, a good quality outdoor antenna is strongly recommended. The following is a brief explanation of the type of connections that are provided with the various antenna systems: 1. A 75 ohm system is generally a round cable with F-type connector that can easily be attached to a terminal without tools (not supplied).
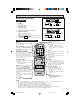
Quick Reference Control Operation L Location of Controls 25N-S100, 25N-S180 POWER Front Panel POWER A POWER Press → On. Press again → Off. B VOLUME UP/DOWN (+) Increases sound. (–) Decreases sound. CH — VOL + E CH A B C D 27N-S100, 27N-S180 C SENSOR AREA FOR REMOTE CONTROL D CHANNEL UP/DOWN (8) Selects next higher channel. (9) Selects next lower channel. • Press both at same time to access MAIN MENU Screen. VIDEO/AUDIO IN 2 TERMINALS (VIDEO/AUDIO terminals are also provided on the rear.
Referencia rápida de los controles de operación L Ubicación de los Controles (ESPAÑOL) Front Delantero 25N-S100, 25N-S180 A ALIMENTACION (POWER) Pulsando → Enciende (On). Pulsando nuevamente → Apaga (Off). B AUMENTO/DISMINUCION DEL VOLUMEN (VOL) (+) Aumenta el sonido. (–) Disminuye el sonido. C ZONA DEL SONSOR DEL MANDOA DISTANCIA D E POWER POWER — VOL + CH — VOL + CH E A B CANAL SUPERIOR/INFERIOR (CH) (8) Selecciona el siguiente canal superior.
Référence rapide sur les commandes L Emplacement des touches (FRANÇAIS) Panneau avant A 25N-S100, 25N-S180 ALIMENTATION (POWER) Appuyer pour mettre sous tension. Appuyer de nouveau pour mettre hors tension. B AUGMENTATION/RÉDUCTION DU VOLUME SONORE (VOL) (+) Pour augmenter le volume du son. (–) Pour diminuer le volume du son. C ZONE DE DÉTECTION DU CAPTEUR D TOUCHES DES CANAUX CROISSANT/DÉCROISSANT (CH) (8) Selectionne le canal supérieur suivant. (9) Sélectionne le canal inféfieur précédent.
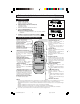
EZ SETUP during First Power On L When you turn on the TV for the first time, it will automatically memorize the broadcasting channels. Please perform the following instructions before you press the power button. (1) Insert the batteries into the remote control. (See page 5) (2) Connect the antenna cable to the TV set. (See page 6) (3) Plug in the AC POWER cord to the wall outlet.
DEMO Mode • To quickly learn more about the TV set, press and hold for more t h a n three seconds both CH UP (8) and DOWN (9) on the TV set. The TV (On the set) 9 CH set will go into DEMO mode and briefly explain the various features. • To cancel DEMO mode, again press both CH UP (8) and DOWN (9) on the TV set.
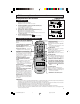
Sleep Timer L You can set the number of minutes for your TV to automatically turn off. 1 2 Press MENU to access MAIN MENU screen. Press VOL (+) or (–) to access TIMER SET mode. → (MAIN MENU screen) 3 4 Press VOL (+) or (–) to set a sleep time of 30, 60, 90 or 120 minutes. Press MENU to exit. → NOTE: (TIMER SET mode) • To turn off the Sleep Timer, repeat the above SLEEP TIMER steps and select “– – – REMAIN” during step 3.
Video Adjust (Continued) 5 Press VOL (+) or (–) to adjust the setting. VOL UP (+) increase contrast VOL DOWN (–) decrease contrast 6 Repeat steps 4 - 5 to adjust other settings. 7 Press MENU to exit. Audio Select L MTS (MULTICHANNEL TV SOUND) This circuit allows reception of stereo or bilingual TV sound.
Audio Select (Continued) Example: Actual screen indicating ON AIR when receiving STEREO broadcasts. Actual channel number “← ON AIR” will appear next to STEREO or SAP when receiving STEREO or SAP broadcasts. (Channel call on screen) L You can enjoy Hi-Fi stereo sound or SAP broadcasts where available. • Stereo broadcasts Live television transmission of sports, shows, concerts, etc. can be received in dynamic stereo sound. • SAP broadcasts Television broadcast can be received with either MAIN or SAP sound.
Closed Caption (Continued) 4 Press CH UP (8) or DOWN (9) to move the “ ” mark to either “MODE” or “DATA”. 5 Press VOL (+) or (–) to change the CLOSED CAPTION setting. MODE : 6 DATA : Press MENU to exit. NOTE: • If a broadcast has CLOSED CAPTION and the MUTE button is pressed, the set enters [CAPTION] mode automatically. Pressing MUTE again will return the set to its previous condition. • Closed Caption may malfunction (white blocks, strange characters, etc.
Parent Control (V-CHIP Operation Continued) • MPAA RATING (Example) Example 1. “PG-13” in the age-based RATING is blocked. This will automatically block the high ratings “R”, “NC-17” and “X” also. Example 2. “R” in the age-based RATING is blocked. This will automatically block the high ratings “NC17” and “X” also. NOTE: • MPAA RATING is only age-based ratings.
Parent Control (V-CHIP Operation Continued) Example 1.2 : Age-Based setting For “TV-G” select “BLOCK” for “AGE”. This will automatically block the higher age ratings “TV-PG”, “TV-14”, “TV-MA” and “TV-G”. Furthermore, the content ratings “D”, “L”, “S”, “V”, “FV” are automatically blocked as well for “TV-PG”, “TV-14” and “TVMA” in addition to “TV-G”. Example 2.
Parent Control (V-CHIP Operation Continued) L HOW TO SET V-CHIP REMOTE KEYPAD VOLUME (+)/(–) CHANNEL UP (8)/ DOWN (9) [1] MPAA RATING 1 MENU Press MENU to access MAIN MENU screen. T I ME R V I D EO A D J U S T AUD I O S E L EC T C L O S E D C A P T I ON P A R E N T CON T RO L E N E RG Y S A V E SE T UP (MAIN MENU screen) 2 Press CH UP (8) or DOWN (9) to move the “ CONTROL”. 3 Press VOL (+) or (–) to access PARENT CONTROL mode, then press VOL (+) or (–) to access V-CHIP select mode.
Parent Control (V-CHIP Operation Continued) [2] TV GUIDELINES 1 2 Repeat steps 1 - 3 of [1] MPAA RATING. 3 Press VOL (+) or (–) to access TV GUIDELINES mode. 4 Press CH UP (8) or DOWN (9) to move the “ GUIDELINES”. ” mark to “TV To change CONTENT SETTING, press CH UP (8) or DOWN (9) to move the “ ” to the desired rating and then press VOL (+) or (–) to select.
Parent Control (V-CHIP Operation Continued) [3] ACTIVATE ON TO TURN ON V-CHIP BLOCK 1 Press CH UP ( 8) or DOWN (9 ) to move the “ ” mark to “STATUS”, then press VOL (+) or (–) to activate the V-CHIP BLOCK. (If STATUS is OFF, V-CHIP BLOCK will not be operated.) → 2 Press MENU, then “INPUT SECRET No.” will be displayed. 3 Enter the 4-digit SECRET No. using the REMOTE KEYPAD. 4 Press MENU and SECRET No. is registered. L To cancel the V-CHIP BLOCK screen while V-CHIP BLOCK has been activated.
Parent Control (V-CHIP Operation Continued) L To change the V-CHIP BLOCK setting. (Secret No. is registered.) 1 Repeat steps 1 - 3 of [1] MPAA RATING, then “INPUT SECRET No.” will be displayed. 2 Enter the 4-digit SECRET No. using the REMOTE KEYPAD and the V-CHIP select mode will be displayed. Repeat configuration of the V-CHIP BLOCK. L If you intend to change or have forgotten your Secret No., clear the original Secret No. and set up a new one.
Parent Control (V-CHIP Operation Continued) L DOWNLOAD V-CHIP DATA REMOTE KEYPAD VOLUME (+)/(–) CHANNEL UP (8)/ DOWN (9) MENU 1 If you watch the program with “New Rating System Data”, DOWNLOAD screen will be displayed. (DOWNLOAD screen) 2 DOWNLOAD screen will disappear, if DOWNLOAD is finished. NOTE: • DOWNLOAD would not be started if you don’t watch the program with “New Rating System Data”. [3]-B. Additional mode (Example) 1 2 Repeat steps 1 - 2 of [3] Additional mode.
Parent Control (VIEW TIMER) L VIEW TIMER This function allows you to restrict TV viewing time and also allows you to control TV usage. This function is to prevent your children from watching too much TV. VIEWING TIME (an accumulative timer: counts only the time duration acquired while the TV is on.) • VIEWING TIME can be set from 30M (30 minutes) to 10H00M (10 hours) in 30 minutes intervals. OFF TIME (Restricts TV watching after the VIEWING TIME reaches zero.
Parent Control (VIEW TIMER Continued) 9 Enter the 4-digit SECRET No. using the REMOTE KEYPAD. 10 Press MENU, and SECRET No. is registered. → Example: • To restrict anybody from watching the TV for 5 hours, after watching the TV for 2 hours, your settings would look like this: • They can choose to watch the 2 hours of TV however they wish. For example, they could watch 1 hour of TV, turn TV off for 30 minutes, then turn TV on and watch the remaining 1 hour on the VIEWING TIMER.
Parent Control (VIEW TIMER Continued) 2 Press and hold both VOL (+) and CH DOWN (9) on the TV set simultaneously until the VIEW TIMER access screen is displayed. Now you can cancel the VIEW TIMER settings or can change the SECRET No. while “INPUT SECRET No.” is displayed. (On the set) - VOL + 9 CH 8 VOL(+) / CH DOWN(9) L Notice of Remaining VIEWING TIME • For every 30 minute interval, the “remaining time” will be displayed for four seconds.
Set Up REMOTE KEYPAD L EZ SETUP By operating the channel presetting functions, you can preset your TV to the desired channels for viewing. VOLUME (+)/(–) CHANNEL UP (8)/ DOWN (9) MENU 1 2 Press MENU to access MAIN MENU screen. Press CH UP (8) or DOWN (9) to move the “ UP”. ” mark to “SET → (MAIN MENU screen) 3 Press VOL (+) or (–) to access SET UP mode, then press CH UP (8) or DOWN (9) to move the “ ” mark to “CH SETTING”. → (SET UP mode) 4 Press VOL (+) or (–) to access CH SETTING mode.
Set Up (Continued) L CHANNEL SETTING If EZ SETUP does not memorize all the channels in your region, follow the instructions below to manually memorize the channel. 1 2 Press MENU to access MAIN MENU screen. Press CH UP (8 ) or DOWN (9 ) to move the “ ” mark to “SET UP”. → (MAIN MENU screen) 3 4 Press VOL (+) or (–) to access SET UP mode. Press CH UP (8 ) or DOWN (9 ) to move the “ ” mark to “CH SETTING”. → (SET UP mode) 5 Press VOL (+) or (–) to access CH SETTING mode.
Set Up (Continued) L Saving broadcast TV channels into memory. 1.1 Press MENU to access MAIN MENU screen, then press CH UP ( 8 ) or DOWN (9) to move the “ ” mark to “SET UP”. Press VOL (+) or (–) to access SET UP mode, then press CH UP ( 8 ) or DOWN (9) to move the “ ” mark to “CH SETTING”. Press VOL (+) or (–) to access CH SETTING mode. Press CH UP (8) or DOWN (9) to move the “ ” mark to “CH SEARCH”, then press VOL (+) or (–) to access CH SEARCH mode. 1.2 1.3 1.
Set Up (Continued) 2.1 2.2 Press VOL (+) or (–) to access CH MEMORY. Use CH UP (8) or DOWN (9) or REMOTE KEYPAD to select each desired channel to add or erase. 2.3 Press VOL (+) to add a channel to the TV’s memory or press VOL (–) to erase a channel from the TV’s memory. 2.4 Press MENU to exit.
Set Up (Continued) 6 Press MENU to exit. NOTE: • Poor reception due to weak signals, or too much noise might activate the BLUE SCREEN function despite the presence of a broadcast signal. To continue watching TV under these conditions, switch the BLUE SCREEN “OFF”. • While VCR input mode is selected, the BLUE SCREEN will not be shown on your TV even if the BLUE SCREEN is turned on. L PERSONAL PREFERENCE By setting the PERSONAL PREFERENCE channels in advance, you can select your favorite channels easily.
Set Up (Continued) 8 Press MENU to exit. L To select the PERSONAL PREFERENCE channel. If the channels are memorized as shown to the right, press the Remote’s “A” button to select the Channels below. L UNIVERSAL PLUS FUNCTION VCR input mode will be selected automatically by pressing VCR PLAY button on UNIVERSAL REMOTE CONTROL. 1 2 Press MENU to access MAIN MENU screen. Press CH UP (8 ) or DOWN ( 9) to move the “ “SET UP”.
Using the Video and Audio Input Jacks L Connecting video equipment for playback of video material. • When the television is connected to video equipment as shown below, the material being played back on the video equipment can be seen on the television screen. Connecting video device equipped with video output terminal.
Using the Video and Audio Input Jacks (Continued) L To watch video material playback. • Press the Remote’s INPUT to select VIDEO INPUT mode to which the video equipment you want to playback is connected. • The external VIDEO INPUT mode will change as follows each time the INPUT is pressed. • INPUT mode can be selected by pressing either the CH UP (8) on the TV remote control when the TV is set to the highest channel stored in memory, or by pressing the CH DOWN (9) when it is set to the lowest channel.
Operation of Remote Control L “ Identifying” Remote VCR and Cable TV Converters Your Remote Control has been set at the factory to operate your TV and many remote control VCRs and Cable Converters. However, in some cases an easy one-time set-up step may be necessary before the Remote will operate accessory VCRs and Cable Converters. • In this set-up step, the Remote locates and memorizes the remote control transmitter code for the VCR or Cable Converter.
Operation of Remote Control (Continued) VCR POWER DISPLAY REMOTE KEYPAD CHANNEL UP (8)/ DOWN (9) TV-CATV L HOW TO IDENTIFY A VCR The remote control may already be set to operate your VCR. Try this initial check to see if going on to the following “identify” section is necessary. (1) Point remote towards VCR and press VCR POWER. (2) Does the remote turn the VCR ON and OFF? • If yes, the remote is ready to operate the VCR and no further steps are needed. • If no, continue to the “identify” section.
Operation of Remote Control (Continued) VCR BRAND TV POWER DISPLAY REMOTE KEYPAD CHANNEL UP (8)/ DOWN (9) TV-CATV TIPS ON IDENTIFYING YOUR VCR: If your VCR model does not have the CHANNEL UP function on its remote control, it cannot be identified using the SEARCH method of identifying. For such models, please try the DIRECT ENTRY method of identifying. Be Patient: a minute or two can seem a lot longer when you’re waiting for something to happen, but the code should be identified within two minutes.
Operation of Remote Control (Continued) (1) Slide TV-CATV switch to CATV. (2) Press and hold down DISPLAY and CH DOWN (9) on your remote control. Then release both buttons. (3) Within ten seconds after releasing DISPLAY and CH DOWN (9), enter your converter’s twodigit code number using REMOTE KEYPAD (refer to list). • The remote control is now ready to send commands to your converter. • Some brands have more than one remote code listed due to changes in the remote codes from early to later model years.
Before Calling for Service Try a new channel, if OK, then possible station trouble. Is TV plugged in? Power at outlet? X Is TV’s POWER button on? X X X External Electrical Noise Interfering with TV’s Operation No Picture or Sound Dark and Blank Picture Sound OK, Picture Poor Picture OK, Sound Poor Ghosts in Picture Picture Blurred Weak Picture X X X X X X X X X Is antenna connected to terminal on the back of the set? X If outside antenna is being used, check for broken wire.
Antes de llamar al servicio de reparaciones Pruebe con otro canal y si todo está bien, el problema puede ser de la emisora.
Limited Warranty CONSUMER LIMITED WARRANTY SHARP ELECTRONICS CORPORATION warrants to the first consumer purchaser that this Sharp brand product (the “Product”), when shipped in its original container, will be free from defective workmanship and materials, and agrees that it will, at its option, either repair the defect or replace the defective Product or part thereof with a new or remanufactured equivalent at no charge to the purchaser for parts or labor for the period(s) set forth below.