Contact SAMSUNG WORLDWIDE If you have any questions or comments relating to Samsung products, please contact the SAMSUNG customer care center. Country Customer Care Center Web Site Address CANADA 1-800-SAMSUNG(726-7864) www.samsung.com/ca Samsung Electronics Canada Inc., Customer Service 55 Standish Court Mississauga, Ontario L5R 4B2 Canada Samsung Electronique Canada Inc., Service à la Clientèle 55 Standish Court Mississauga, Ontario L5R 4B2 Canada U.S.A 1-800-SAMSUNG(726-7864) www.samsung.
Figures and illustrations in this User Manual are provided for reference only and may differ from actual product appearance. Product design and specifications may be changed without notice. Important Warranty Information Regarding Television Format Viewing ✎✎ See the warranty card for more information on warranty terms. Wide screen format PDP Displays (16:9, the aspect ratio of the screen width to height) are primarily designed to view wide screen format full-motion video.
Contents Getting Started yy yy yy yy yy yy yy yy Support Menu.......................................................... 21 List of Features.......................................................... 4 Accessories............................................................... 4 Install the Stand......................................................... 5 Viewing the Control Panel.......................................... 6 Viewing the Remote Control .....................................
Getting Started List of Features yy Excellent Digital Interface & Networking: With a built-in HD digital tuner, nonsubscription HD broadcasts can be viewed without a cable box / STB (Set-Top-Box) satellite receiver. yy SRS TruSurround HD: provides a virtual surround system (p 17). yy Media Play: Allows you to play music files, pictures saved on a USB device (p 22). yy Self Diagnosis: You can check to make sure picture and sound operate normally (p. 21).
01 Getting Started Install the Stand See separate guide for installing the stand. (M4 X L16) Stand (1EA) Guide Stand (1EA) Screws (10EA) Follow the steps below to connect the TV to the stand. Top view Screws (M4 X L16) s s s s s s Guide Stand s s Stand 2 1 Rear 1. Connect the Guide Stand to the Stand using six screws (M4 X L16) as shown. Screws (M4 X L16) 2. With your TV upright, connect the TV to the Stand as shown. 3.
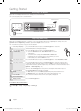
Getting Started Viewing the Control Panel ✎✎The product color and shape may vary depending on the model. Power Indicator Speakers SOURCEE MENU Remote control sensor Toggles between all the available input sources. In the on-screen menu, use this button as you would use the ENTERE button on the remote control. Displays an on-screen menu, the OSD (on screen display) of your TV’s features. Power Indicator P (Power) Adjusts the volume.
✎✎This is a special remote control for the visually impaired and has Braille points on the Power, Channel and Volume buttons. Displays and selects the available video sources (p. 11). Turns the TV on and off. 01 Getting Started Viewing the Remote Control Press to directly access channels. Press to select additional channels (digital) being broadcasted by the same station. For example, to select channel “54-3”, press “54”, then press “–” and “3”. Returns to the previous channel.
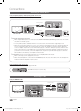
Getting Started Connecting to an Antenna When the TV is initially powered on, basic settings proceed automatically. ✎✎Connecting the power cord and antenna. VHF/UHF Antenna Antenna Cable (Not Supplied) or Cable ANT OUT Power Input Plug & Play (Initial Setup) When the TV is initially powered on, a sequence of on-screen prompts will assist in configuring basic settings. Press the POWERP button. Plug & Play is available only when the Input source is set to TV.
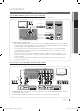
Connections 02 Connections Connecting to an AV Device Using an HDMI or HDMI/DVI cable HD connection (up to 720p/1080i) Available devices: DVD, Blu-ray player, HD cable box, HD STB (Set-Top-Box) satellite receiver Device R Red Device W White HDMI Cable (Not Supplied) HDMI OUT DVI OUT HDMI to DVI Cable (Not Supplied) AUDIO OUT R W R-AUDIO-L Audio Cable (Not Supplied) ✎✎HDMI IN 1(DVI), 2, DVI AUDIO IN xx When using an HDMI/DVI cable connection, you must use the HDMI IN 1(DVI) jack for video.
Connections Connecting to an Audio Device Using an Optical (Digital) or Audio (Analog) Cable Connection Available devices: Digital Audio System, Amplifier, DVD home theater Digital Audio System Optical Cable (Not Supplied) OPTICAL Audio Cable (Not Supplied) AUDIO IN Amplifier / DVD home theater R Red R-AUDIO-L W White ✎✎DIGITAL AUDIO OUT (OPTICAL) xx When a Digital Audio System is connected to the DIGITAL AUDIO OUT (OPTICAL) jack, decrease the volume of both the TV and the system. xx 5.
Optimal resolution yy PN42C430: 1024 X 768 @ 60Hz / PN50C430: 1360 X 768 @ 60Hz Mode Resolution Horizontal Frequency (KHz) Vertical Frequency (Hz) Pixel Clock Frequency (MHz) Sync Polarity (H / V) PN42C430 PN50C430 IBM 640 x 350 720 x 400 31.469 31.469 70.086 70.087 25.175 28.322 +/-/+ > > > > MAC 640 x 480 832 x 624 35.000 49.726 66.667 74.551 30.240 57.284 -/-/- > > > > VESA CVT 720 x 576 1280 x 720 35.910 56.456 59.950 74.777 32.750 95.
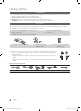
Basic Features How to Navigate Menus Channel Menu Before using the TV, follow the steps below to learn how to navigate the menu and select and adjust different functions. 1 MEDIA.P ¦¦ Seeing Channels Channel List Add, delete or set Favorite channels and use the program guide for digital broadcasts. CH LIST OO MENUm → Channel → Channel List 2 → ENTERE 3 4 A B C D 1 MENU button: Displays the main on-screen menu. S.MODE SLEEP 2 ENTERE / Direction button: Move the cursor and select an item.
Icons c * ) Operations A channel selected. A channel set as a Favorite. A reserved Program. ■■ Air: Air antenna signal. ■■ Cable: Cable antenna signal. ■■ Auto: Air and Cable antenna. ✎✎NOTE xx When selecting the Cable TV system: STD, HRC ¦¦ Using Favorite Channels OO MENUm → Channel → Channel List → ENTERE Add to Favorite / Delete from Favorite t Set channels you watch frequently as Favorites. 1. Select a channel and press the TOOLS button. 2.
Basic Features ■■ Add / Delete: Delete or add a channel to display the channels you want. ✎✎ NOTE xx All deleted channels will be shown on the All ■■ Information: Display a show you have reserved to watch. (You can also change the reservation Information.) ✎✎ Alternatively, you can view Information by highlighting a program and pressing the ENTER E button Channels menu. xx A gray-colored channel indicates the channel has been deleted.
xx When you make changes to Cell Light, Contrast, Brightness, Sharpness, Color or Tint (G/R), the OSD will be adjusted accordingly. Picture Options OO MENUm → Picture → Picture Options → ENTERE xx Settings can be adjusted and stored for each Picture Options external device connected to the TV. xx Lowering picture brightness reduces power consumption.
Basic Features xx After selecting Screen Fit in HDMI (1080i/1080p) or Component (1080i/1080p) mode, you may need to center the picture: 1. Press the ◄ or ► button to select Position. Pixel Shift (Off / On): Using this function, you can minutely move pixels on the PDP in horizontal or vertical direction to minimize after images on the screen. Optimum condition for pixel shift ✎✎ 2. Press the ENTERE button. 3. Press the ▲, ▼, ◄ or ► button to move the picture. 4. Press the ENTERE button. 5.
Auto Volume (Off / On) OO MENUm → Sound → Equalizer → ENTERE Because each broadcasting station has its own signal conditions, the volume can vary as you switch between channels. This feature lets you automatically adjust the volume of the desired channel by lowering the sound output when the modulation signal is high or by raising the sound output when the modulation signal is low. Equalizer Adjusts the sound mode. ■■ Balance L/R: Adjusts the balance between the right and left speaker.
Basic Features Clock Mode (Auto / Manual) −− Auto: Set the current time automatically using the time from a digital channel. The antenna must be connected in order to set the time automatically. ✎✎ −− Manual: Set the current time manually. Depending on the broadcast station and signal, the auto time set up may not be correct. In this case, set the time manually. ✎✎ Clock Set: Set the Month, Day, Year, Hour, Minute and am/pm manually. Available only when Clock Mode is set to Manual.
xx V-Chip is not available in HDMI or Component ✎✎ The V-Chip will automatically block any category that deals with more sensitive material. For example, if you block the G category, then PG, 14+ and 18+ will automatically be blocked. mode. xx The default PIN number of a new TV set is “0-0-0-0” xx Allow All: Press to unlock all TV ratings. xx Block All: Press to lock all TV ratings. ■■ V-Chip Lock (Off / On): You can block rated TV Programs.
Basic Features How to watch a restricted channel If the TV is tuned to a restricted channel, the V-Chip will block it. The screen will go blank and the following message will appear: This channel is blocked by V-Chip. Please enter the PIN to unblock. ✎✎If you forget the PIN, press the remote-control buttons in the following sequence, which resets the pin to “0-0-0-0:” POWER (off) → MUTE → 8 → 2 → 4 → POWER(on) ¦¦ Other Features program being broadcast.
Set so that a melody plays when the TV is turned on or off. ✎✎The Melody does not play. xx When no sound is output from the TV because the MUTE button has been pressed. xx When no sound is output from the TV because the volume has been reduced to minimum with the VOL – button. xx When the TV is turned off by Sleep Timer function. ¦¦ Economical Solutions OO MENUm → Setup → ENTERE Energy Saving (Off / Low / Medium / High) This adjusts the brightness of the TV in order to reduce power consumption.
Advanced Features Media Play MEDIA.P Enjoy photos and/or music files saved on a USB Mass Storage Class (MSC) device. O USB Device Name MENUm → Application → Media Play (USB) → ENTERE SUM 315.0MB/495.0MB Free E Enter e Exit ¦ Connecting a USB Device USB TV Side Panel 1. Turn on your TV. 2. Connect a USB device containing photo and/or music files to the USB jack on the side of the TV. Photo SUM 307.2MB/973.7MB 3. When USB is connected to the TV, popup window appears.
USB kHz). xx We recommend the sequential jpeg format. xx Do not disconnect the USB device while it is loading. xx MTP (Media Transfer Protocol) is not supported. xx The playing duration of an mp3 file may be displayed as “00:00:00” if its playing time information is not found at the start of the file. xx The higher the resolution of the image, the longer it takes to display on the screen. xx The Photo or Music List displays up to 300 folders or files.
Advanced Features Photo Music DSC_0558.JPG 580 * 440 78.0KB File.....jpg File.....jpg File.....jpg File.....jpg File.....jpg File.....jpg SUM 307.2MB/973.7MB File.....jpg File.....jpg File.....jpg File.....jpg 03 / 14 Using the MP3 List File.....jpg Photo Folder icon SUM 307.2MB/973.7MB SUM 307.2MB/973.7MB File.....jpg File.....jpg Music Music list icon Move to the previous folder stage icon Photo Music Setup Photo ✎✎Press � (REW) or µ (FF) buttons to change pages.
02-Run To Me.mp3 00:03:25 03-No More Sad Songs.mp3 00:03:25 04-Interference-gold.mp3 SUM 307.2MB/973.7MB 00:03:25 05-marketa_irglova-The_hill.mp3 00:03:25 06-I Will Carry You.mp3 00:03:25 07-marketa_irglova.mp3 00:03:25 08-Super World.mp3 00:03:25 04 Advanced Features Setup Using the Setup Menu ■■ Slide show Speed: Select to control the slide show speed. You can select Fast, Normal or Slow.
Advanced Features Anynet+ What is Anynet+? t Anynet+ is a function that enables you to control all connected Samsung devices that support Anynet+ with your Samsung TV’s remote. The Anynet+ system can be used only with Samsung devices that have the Anynet+ feature. To be sure your Samsung device has this feature, check if there is an Anynet+ logo on it. To connect to a Samsung Home Theater TV Rear Panel Anynet+ Device 1 Home Theater Anynet+ Device 2 HDMI cable HDMI cable HDMI cable Optical cable 1.
The Anynet+ menu changes depending on the type and status of the Anynet+ devices connected to the TV. Anynet+ Menu View TV Device List (device_name) MENU (device_name) INFO Recording: (*recorder) Stop Recording: (*recorder) Receiver Description Changes Anynet+ mode to TV broadcast mode. Shows the Anynet+ device list. Shows the connected device menus. E.g. If a DVD recorder is connected, the disc menu of the DVD recorder will appear. Shows the play menu of the connected device. E.g.
Advanced Features ¦¦ Listening through a Receiver You can listen to sound through a receiver (i.e Home Theater) instead of the TV Speaker. 1. Select Receiver and set to On. 2. Press the EXIT button to exit. ✎✎ If your receiver supports audio only, it may not appear in the device list. ✎✎ The receiver will work when you have properly connected the optical in jack of the receiver to the DIGITAL AUDIO OUT (OPTICAL) jack of the TV. ✎✎ When the receiver (i.
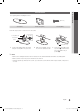
Other Information 05 Other Information Installing the Wall Mount Attaching the Blanking Bracket When installing the TV onto a wall, attach the Blanking Bracket as shown. Blanking Bracket Installing the Wall Mount Kit The wall mount kit (sold separately) allow you to mount the TV on the wall. For detailed information on installing the wall mount, see the instructions provided with the wall mount. Contact a technician for assistance when installing the wall mount bracket.
Other Information Product Family inches VESA Spec. (A * B) 42~50 400 X 400 58~63 600 X 400 70~79 800 X 400 80~ 1400 X 800 Standard Screw Quantity M8 4 PDP TV ✎✎ Unscrew the hole around before installing Wall-Mount on the wall. Do not install your Wall Mount Kit while your TV is turned on. It may result in personal injury due to electric shock. Securing the Installation Space Keep the required distances between the product and other objects (e.g. walls) to ensure proper ventilation.
Caution: Pulling, pushing, or climbing on the TV may cause the TV to fall. In particular, ensure your children do not hang over or destabilize the TV; doing so may cause the TV to tip over, causing serious injuries or death. Follow all safety precautions provided on the included Safety Flyer. For added stability, install the anti-fall device for safety purposes, as follows. Accessories TV-Holder 05 Other Information Securing the TV to the Wall Screw (M4 X L16) To prevent the TV from falling 1.
Other Information Troubleshooting If the TV seems to have a problem, first try this list of possible problems and solutions. If none of these troubleshooting tips apply, visit “www.samsung.com,” then click on Support, or call Samsung customer service at 1-800-SAMSUNG. Issues Solutions and Explanations Poor picture First of all, please perform the Picture Test and confirm that your TV is properly displaying the test image. (go to MENU - Support - Self Diagnosis - Picture Test) (p.
There is no picture/video. Solutions and Explanations • • • • • Check cable connections (remove and reconnect all cables connected to the TV and external devices). Set your external device’s (Cable/Sat Box, DVD, Blu-ray etc) video outputs to match the connections to the TV input. For example, if an external device’s output is HDMI, it should be connected to an HDMI input on the TV. Make sure your connected devices are powered on.
Other Information Issues Solutions and Explanations Image Retention (Burn In) Issue. • To minimize the possibility of screen burn, this unit is equipped with screen burn reduction technology. Pixel Shift technology enables you to set picture movement up/down (Vertical Line) and side to side (Horizontal Dot). The cable/set top box remote control doesn’t turn the TV on or off, or adjust the volume. • Program the Cable/Set remote control to operate the TV.
Environmental Considerations Operating Temperature Operating Humidity Storage Temperature Storage Humidity 50°F to 104°F (10°C to 40°C) 10% to 80%, non-condensing -4°F to 113°F (-20°C to 45°C) 5% to 95%, non-condensing Stand Swivel (Left / Right) -20˚ ~ 20˚ Model Name PN42C430 PN50C430 Screen Size (Diagonal) 42 inches (42.3 inches measured diagonally) 50 inches (49.9 inches measured diagonally) 10 W X 2 10 W X 2 40.6 x 2.8 x 24.8 inches (1031 x 70.9 x 631.0mm) 40.6 x 11.2 x 27.
Other Information Dimensions ■■ Front view / Side view` 7 1 2 5 3 6 4 8 (Unit: inches) Model name PN42C430 PN50C430 1 40.6 47.3 2 37.0 43.7 3 21.1 24.6 4 23.3 23.3 5 24.8 28.4 6 27.4 31.0 7 2.8 2.7 8 11.2 11.2 ■■ Jack panel detail / Rear view 5 6 1 2 4 3 (Unit: inches) Model name PN42C430 PN50C430 1 15.2 19.4 2 3.4 3.7 3 3.2 2.5 4 29.2 35.7 5 15.7 15.7 6 15.7 15.7 NOTE: All drawings are not necessarily to scale. Some dimensions are subject to change without prior notice.
A F Antenna Anynet+ AUDIO OUT Auto Volume 13 26 10 17 B Background Music Balance L/R Batteries Black Tone Blanking Bracket Brightness 25 17 7 15 29 14 Change PIN Channel Menu Clock Color Tone Component Connecting to a PC Connecting to an Audio Device 19 12 17 15 9 10 10 D 10, 26 14 15 Eco Sensor Edit Name Editing Channels Energy Saving Equalizer External Speaker HDMI Home Theater 21 11 13 21 17 17 9, 26 10, 26 I 30 L Language License 20 34 M Media Play Melody Mono Music 22 21 17 24 12 11
This page is intentionally left blank. [PC430-NA]BN68-02576A-03Eng.