
Setup Manual


4
E
MOUNTING PRECAUTIONS
• This product is for use indoors.
• When moving the monitor, be sure to hold its sides or
bottom. Do not hold the LCD panel or buttons. This may
cause product damage, failure, or injury. This may cause
product damage, failure, or injury.
• Use the monitor with the surface perpendicular to a level
surface.
• This monitor should be used at an ambient temperature
between 41°F (5°C) and 95°F (35°C).
Provide enough space around the monitor to prevent heat
from accumulating inside.
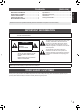
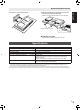
For the monitor in landscape orientation
7-7/8 [200]
Unit: inch [mm]
3-1/4 [82]
2-13/16 [71]
2
[50]
2
[50]
For the monitor in portrait orientation
1-7/16 [36]
7-7/8 [200]
6 [153]
Unit: inch [mm]
Power LED
2
[50]
2
[50]
• Temperature condition may change when using the monitor
together with the optional equipments recommended by
SHARP. In such cases, please check the temperature
condition specied by the optional equipments.
• Do not block any ventilation openings. If the temperature
inside the monitor rises, this could lead to a malfunction.
• Do not place the monitor on a device which generates heat.
• To install the monitor in portrait orientation, a mounting
bracket compliant with VESA specications is required.
A stand supplied with this product cannot be used for
installation in portrait orientation.
• Adhere to the following when installing the monitor in its
portrait orientation. Failing to adhere to the following may
cause malfunctions.
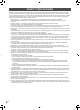
- Install the monitor such that the power LED is located on
the bottom side.
-
Set the PORTRAIT/LANDSCAPE INSTALL in the MONITOR
menu to PORTRAIT. (See OPERATION MANUAL.)
-
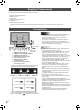
Be sure to clamp the power cord (supplied) onto the cable
clamp attachment using the supplied cable clamp. When
clamping the power cord, take care not to stress the terminal
of the power cord. Do not bend the power cord excessively.
Power cord
(Supplied)
Cable clamp
attachment
Cable clamp
• Do not press the monitor surface. Doing so may cause
display unevenness.
• After mounting, please carefully ensure the monitor is
secure, and not able to come loose from the wall or mount.
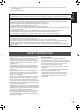
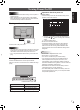
• To attach a VESA-compliant mounting bracket, use M6
screws that are 5/16 inch (8 mm) to 3/8 inch (10 mm)
longer than the thickness of the mounting bracket.
Screws (M6)
Mounting bracket
Monitor mounting
5/16 - 3/8 inch (8-10 mm)
• Be sure to use a wall-mount bracket designed or
designated for mounting the monitor.
• This monitor and bracket must be installed on a wall which
can endure at least 4 times or more the weight of the
monitor. Install by the most suitable method for the material
and the structure.
• Do not use an impact driver.
• Do not use any screw holes other than those for mounting
brackets, located on the rear of the monitor, for installation.
n
Removing the stand
Caution
• If there are cables already connected, disconnect them all.
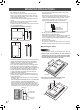
1. Spread a thick, soft cloth (blanket, etc.) that will prevent
damage to the LCD panel on a stable at surface where
the entire monitor can be placed, and place the monitor
with the LCD panel face down on the cloth.
Soft cloth
2. Remove the screws(x2) that fasten the stand.
Keep the removed screws in a safe place.