
Start Guide GB, DE, FR, ES, PL, RO


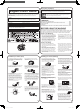
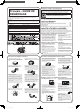

EN3
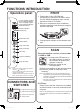
FUNCTIONS INTRODUCTION
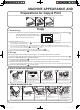
ID MODE
5.5×8.5
in
8.5×11
8.5×11
5.5×8.5
(3) (4)
(1) (2)
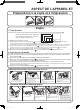
Operation panel
Toner cartridge replace-
ment required indicator
Drum cartridge replace-
ment required indicator
Misfeed indicator
Density indicator
Density key
Mode select key
LED indicator
Copy Count key
Photo mode key
Clear key
SCAN to USB key
Copy Start key
Note: • If the "Toner cartridge replacement required"
indicator (
) is steadily on.
• If the copies show white lines, lighter-colored
printing or fogged image.
It indicates that the toner cartridge is running out
of toner, please replace it with a new cartridge.
PRINT
1. Please take out the CD-ROM that
accompany the machine to install the driver.
(For the detailed installation steps, see the
Operation Guide in CD-ROM.)
2. Be sure to complete the driver installation,
and then connect the machine and computer
with the USB cable.
3. Confi gure print settings on the computer and
print.
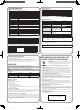
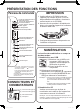
CONNECTORS AND
SWITCHES
(1) USB Connector (A type)
(2) USB Connector (B type)
(3) Power Line Connector
(4) Power Switch
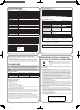
SCAN
The scan function consists of two modes:
1. SCAN to USB
2. PC Scan
(1) Connect the USB memory to
the USB connector (A type) of
the machine as shown in the
diagram on the left.
(2) Place the original on the
document glass.
Please ensure that the scan driver is installed
and the machine is correctly connected to the
computer.
Note: For the detailed steps of the scan function, please refer
to the Operation Guide (in the companion CD-ROM of the
machine).
(3) Select scan settings on the operation panel.
(4) Press the [SCAN to USB] key to start
scanning.
Note: • The USB memory can only be removed when the
LED indicator of the machine has stopped rotating il-
lumination, which indicates that the data transmission
has been completed.
• The date of the fi le created by Scan to USB is fi xed to
be 01/01/2011 0:00:00.
AL-1035_A_en_a4.indd 3AL-1035_A_en_a4.indd 3 2011-9-21 9:15:122011-9-21 9:15:12