MODEL AL-1600 AL-1610 DIGITAL COPYING MACHINE OPERATION MANUAL • GETTING STARTED Page 2 • MAKING COPIES 15 • STATUS INDICATORS 24 • GENERAL INFORMATION 32
FOR YOUR PROTECTION... To aid in reporting this compact copier in case of loss or theft, please record below the model number and serial number located on the back of the unit. We also suggest you record all the information listed and retain for future reference.
CONTENTS INTRODUCTION GETTING STARTED ● ● ● ● ● ● ● Conventions used in this manual In this manual, the following icons are used to provide the user with information pertinent to the use of the copier. ● CAUTIONS . . . . . . . . . . . . . . . . . . . . . . . . . . . . . . . . . . . . . . 2 MAIN FEATURES . . . . . . . . . . . . . . . . . . . . . . . . . . . . . . . . 3 PART NAMES AND FUNCTIONS . . . . . . . . . . . . . . . . . . . . 4 – Overall layout . . . . . . . . . . . . . . . . . . . . . . . . . .
CAUTIONS GETTING STARTED Follow the cautions below when using this copier. Cautions ● The fusing area is hot. Exercise care in this area when removing misfed paper. ● Do not look directly at the light source. Doing so may damage your eyes. ● The socket-outlet shall be installed near the equipment and shall be easily accessible. ● Place the copier on a firm, level surface. ● Do not install the copier in a humid or dusty location.
MAIN FEATURES ● GETTING STARTED q High-speed laser copying ● First-copy time is only 7.2 seconds (except in a power save mode or immediately after power on). Copying speed is 16 copies/min., which adapts to business use, allowing improvement of working efficiency. w High-quality digital image ● High-quality copying at 600 dpi is performed. ● In addition to the automatic exposure mode, the manual exposure can be adjusted in five steps.
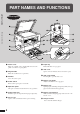
PART NAMES AND FUNCTIONS GETTING STARTED Overall layout e q o Part names and functions !1 w y e !0 !2 !3 u r t !4 i q Platen cover Place the original on the original table and close the platen cover before copying starts. w Original table Place the document to be copied here. e Handles Use to move the copier. r Power switch Press to turn copier power on and off. t Operation panel All copier controls are located here for easy operation.
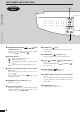
PART NAMES AND FUNCTIONS GETTING STARTED !5 !7 Part names and functions !6 @2 !8 !9 @0 ! 5 Drum cartridge handle Hold to pull out the drum cartridge. ! 6 Drum cartridge Copy images are formed on the photoconductive drum. ! 7 TD cartridge lock release lever Use to unlock the TD cartridge. @1 @1 Fusing unit release levers Lower to remove misfed paper. The fusing unit is hot. Take care in removing paper. @2 Paper guide Open to remove misfed paper.
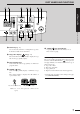
PART NAMES AND FUNCTIONS Operation panel GETTING STARTED Part names and functions q AUTO/MANUAL/PHOTO ( / / ) key and indicators (p. 15) Use to sequentially select the exposure modes: AUTO, MANUAL ( ), or PHOTO ( ). w Alarm indicators : Paper required indicator (p.13) : Misfeed indicator (p.28) : TD cartridge replacement required indicator (p.24) : Drum replacement required indicator (p.26) e Paper feed location/misfeed location indicators (p.
PART NAMES AND FUNCTIONS GETTING STARTED Part names and functions ! 2 Zoom keys (p. 17) Use to select any reduction or enlargement copy ratio from 50% to 200% in 1% increments. ) key (p. 17) !3 Copy ratio display ( Press and hold down during standby to display the copy ratio in the copy quantity display. ! 4 Copy quantity keys Use to select the desired copy quantity or to make user program entries. !5 CLEAR ( ) key Clears the copy quantity display or terminates a copy run.
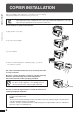
COPIER INSTALLATION GETTING STARTED Improper installation may damage the copier. Please note the following during initial installation and whenever the copier is moved. If the copier is moved from a cool place to a warm place, condensation may form inside the copier. Operation in this condition will cause poor copy quality and malfunctions. Leave the copier at room temperature for at least 2 hours before use.
CAUTIONS ON HANDLING GETTING STARTED Be careful in handling the copier as follows to maintain the performance of this copier. Do not drop the copier, subject it to shock or strike it against any object. Cautions on handling Do not expose the drum cartridge to direct sunlight. Doing so will damage the surface (green portion) of the drum cartridge, causing poor copy quality. Store spare supplies such as drum cartridges and TD cartridges in a dark place without removing from the package before use.
CHECKING PACKED COMPONENTS AND ACCESSORIES GETTING STARTED Open the carton and check to ensure that the following components and accessories are included. TD cartridge Checking packed components and accessories Operation manual Power cord Copier Drum cartridge (installed in copier) ● If anything is not included or is damaged, contact our Technical Assistance Department at 1(630)378-3590 in the USA or Toll Free 1-877-SHARP-CC in Canada. ● Save the carton and packing materials.
SET-UP GETTING STARTED Set-up 1 2 Remove all pieces of tape. Then open the platen cover and remove the protective material. Use a coin (or suitable object) to remove the screw. Store the screw in the paper tray as described in step 6 because it will be used if the copier has to be moved. (p. 42) 3 Install the TD cartridge. ● For installation of the TD cartridge, see steps 1 to 2 and steps 4 to 7 of TD CARTRIDGE REPLACEMENT on pages 24 and 25. 4 Gently lift and pull out the paper tray until it stops.
SET-UP GETTING STARTED Pressure plate lock 6 Store the pressure plate lock which has been removed in step 5 and the screw which has been removed in step 2 in the front of the paper tray. ● To store the pressure plate lock, rotate the lock to fix it on the relevant location. Set-up Screw 7 Ensure that the power switch of the copier is in the OFF position. Plug the power cord into the nearest outlet.
LOADING COPY PAPER GETTING STARTED To save space, this copier has been designed with an adjustable front-loading tray, which is easily opened for paper loading. For best results, use only SHARP recommended paper. (See page 40.) The paper required ( ) indicator will light up when there is no copy paper in the selected paper feed station, or when the paper tray is not installed or is improperly installed. If you change the copy paper size in the tray, be sure to set the paper size using user program No. 21.
LOADING COPY PAPER GETTING STARTED Loading copy paper Changing the copy paper size in the tray Left guide 1 Gently lift and pull out the paper tray until it stops. 2 Push the pressure plate down until it locks in place. 3 Squeeze the lock lever of the front guide and slide the front guide to match the width of the paper. 4 Move the left guide to the appropriate slot as marked on the tray.
TD CARTRIDGE REPLACEMENT If the machine detects an insufficient amount of toner being added, copying will stop and the machine will add toner. During this time the START key indicator will blink. When sufficient toner has been added the indicator will remain on steadily indicating that copying can be resumed. However, if toner addition continues for a maximum of two minutes, the TD cartridge replacement required ( ) indicator will light up in addition to the START key being lighted steadily.
TD CARTRIDGE REPLACEMENT 6 Gently insert the TD cartridge along the guides until it locks in place. STATUS INDICATORS 5 Remove the protective cover from the TD cartridge by unlatching three cover hooks from the holes on the cartridge and then pulling the cover in the direction indicated by the arrow in the illustration. 7 Close the front cover by pushing both sides with your hands and then close the side cover by pressing the handle on the cover. The indicator will go out .
DRUM CARTRIDGE REPLACEMENT The useful life of the drum cartridge is approximately 30,000 copies. When the internal counter reaches approximately 29,000 copies, the drum replacement required ( ) indicator will light up indicating that replacement of the drum cartridge will be needed soon. When the indicator begins to blink, replace the drum cartridge by following the procedure given below.
DRUM CARTRIDGE REPLACEMENT 5 Remove the new drum cartridge from the protective bag and gently insert the lead end of the drum cartridge along the guides. Do not touch the surface of the drum (green portion) of the cartridge. Doing so may cause smudges on the copies. 8 Close the front cover by pushing both sides with your hands and then close the side cover by pressing the handle on the cover. The drum replacement required ( ) indicator will go out.
MISFEED REMOVAL The copier will stop when a misfeed occurs. The misfeed ( ) indicator will blink. If paper is accidentally torn during removal, be sure to remove all pieces. Be careful not to damage the photoconductive drum. Misfeed in the bypass tray STATUS INDICATORS 1 Gently pull the misfed paper out. 2 Lift slightly on the side cover and slide the cover out until it stops. Close the side cover by pressing the handle on the cover. ● The misfeed ( ) indicator will go out.
MISFEED REMOVAL A. Misfeed in the paper feed area 2 Carefully remove the misfed paper. Turn the roller rotating knob in the direction of the arrow to assist in removing it. Roller rotating knob The fusing unit is hot. Take care in removing paper. Do not touch the surface of the drum (green portion) of the drum cartridge when removing the misfed paper. Doing so may damage the drum and cause smudges on copies. ● The misfeed ( ) indicator will go out.
MISFEED REMOVAL Roller rotating knob 2 Turn the roller rotating knob in the direction of the arrow. 3 Carefully remove the misfed paper. Lower the fusing unit release levers to allow easier removal. Return the release levers to their operating positions. Fusing unit release lever The fusing unit is hot. Take care in removing paper. ● ● STATUS INDICATORS 4 Do not touch the surface of the drum (green portion) of the drum cartridge when removing the misfed paper.
MISFEED REMOVAL 3 Close the side cover by pressing the handle on the cover. ● The misfeed ( ) indicator will go out. Misfeed in the paper tray Before opening the paper tray, be sure to open the bypass tray, lift slightly on the side cover and slide the cover out until it stops, and then perform steps 1 to 3 described in the “A. Misfeed in the paper feed area” section. 2 Close the paper tray. 3 Lift slightly on the side cover and slide the cover out until it stops.
USER PROGRAMS The user programs allow the parameters of certain functions to be set, changed, or canceled as desired. List of user programs This copier has the following user programs. Program No. Program name Description 1 Auto clear time Sets the auto clear time. The copier returns to the initial settings when the auto clear time elapses after the last copy is made. 2 Preheat mode Sets the time that elapses before the copier enters the preheat mode after any operation is made. See page 34.
USER PROGRAMS 4 Select the desired parameter using the right copy quantity ( ) key. ● The entered parameter number will blink on the right side of the copy quantity display. ● The parameters are shown in the table below. For example, to change the setting of the auto power shut-off timer to 60 min., enter 2. Program name Auto clear time Preheat mode Auto power shut-off timer Auto power shut-off setting Paper size setting Parameters 0 e OFF 1 e 30 sec. * 2 e 60 sec. 3 e 90 sec. 4 e 120 sec.
POWER SAVE MODES The copier has two power save modes to reduce overall power consumption thereby reduce the cost of operation. In addition, these modes conserve natural resources and help reduce environmental pollution. The two power save modes are preheat mode and auto power shut-off mode. ● User programs The preheat activation time and the auto power shut-off time have been preset at the factory to 90 sec. for preheat mode and 30 min. for auto power shut-off mode.
POWER SAVE MODES Setting the power save modes The time that elapses before the copier enters a power save mode after any operation is made can be set manually. This time is set with user program No. 2 for the preheat mode and user program No. 3 for the auto power shut-off mode. For these settings, see page 32. ● The copier will enter the preheat mode first and then the auto power shutoff mode after a preset time has elapsed when no copier operation has been made.
USER MAINTENANCE Proper care is essential for clean, sharp copies. Please take a few minutes to regularly clean your copier. Original table and platen cover Stains or dirt on the original table or platen cover will also be copied. Wipe the original table and platen cover with a soft, clean cloth. ● If necessary, dampen the cloth with water. Do not use thinner, benzene, or similar volatile cleaning agents.
USER MAINTENANCE Charger cleaner 1 2 Turn the power switch off. 3 Gently lift and pull out the paper tray and take the charger cleaner out by holding the tab. 4 Set the charger cleaner onto the transfer charger and gently slide the cleaner in the direction indicated by the arrow two or three times. Open the bypass tray. Lift slightly on the side cover and slide the cover out until it stops. User maintenance ● If the white sheet metal is smudged with toner, wipe it with a soft, clean cloth.
COPIER TROUBLE? Problem Solution ● Copier plugged in? Plug the copier into a grounded outlet. See page 8. ● Power switch ON? Turn the power switch ON. See page 15. Copies are too dark or too light. ● Copy density properly adjusted? See pages 15 and 22. Blank copies ● Is the original placed face down? Place the original face down on the original table. ● Paper too heavy? Use copy paper within the specified range. See page 40. ● Paper damp? Replace with dry copy paper.
COPIER TROUBLE? Problem Power is on but copying is not possible. ● Is the POWER SAVE ( indicator blinking? ) ● Is the indicator on? Copy paper is needed. See page 13, LOADING COPY PAPER. ● Is blinking in the copy quantity display? The TD cartridge is not installed. Install the TD cartridge. ● Is steadily lit in the copy quantity display? Side cover is open. Close the front and side covers securely. ● Is the indicator blinking? The TD cartridge must be replaced.
SUPPLIES Types and sizes of copy paper Size Weight Capacity (21 lb. bond paper) Paper tray 5-1/2" x 8-1/2" to 11" x 17" 15 lbs. to 21 lbs. 250 sheets Bypass tray Ordinary paper: 5-1/2" x 8-1/2" to 11" x 17" Envelopes: Commercial 10 (4-1/8" x 9-1/2") International DL (110 x 220 mm) International C5 (162 x 229 mm) 15 lbs. to 34 lbs.* (Ordinary paper) 100 sheets Special paper Transparency film, labels, envelopes** * For paper weighing from 28 to 34 lbs.
SUPPLIES Genuine supplies statement Standard supplies for this copier that are to be replaced by the user are copy paper, TD cartridge, and drum cartridge. For best copying results, be sure to use only SHARP Genuine Supplies which are designed, engineered and tested to maximize the life and performance of SHARP copiers. Look for the Genuine Supplies label on the TD cartridge and drum cartridge. GENUINE SUPPLIES Proper storage 1. 2.
MOVING INSTRUCTIONS When moving this copier, follow the procedure below. When moving this copier, be sure to remove the TD cartridge in advance. TD cartridge lock release lever 1 Turn the power switch off and disconnect the power cord. 2 Open the bypass tray. Lift slightly on the side cover and slide the cover out until it stops. Push gently the right side of the front cover to open the cover.
SPECIFICATIONS Copy system Dry, electrostatic transfer Originals Sheets, bound documents Original sizes Max. 11" x 17" Copy sizes Max. 11" x 17" Min. 5-1/2" x 8-1/2" Image loss: Max. 5/32" (4 mm) (leading and trailing edges) Max. 5/32" (4 mm) (along other edges in total) Copying speed (at 100% copy ratio) 16 copies/min. (8-1/2" x 11") 12 copies/min. (8-1/2" x 11"R) 10 copies/min. (8-1/2" x 14") 9 copies/min. (11" x 17") Continuous copy Max. 99 copies; subtractive counter First-copy time 7.
SPECIFICATIONS Overall dimensions (with bypass tray folded) 23-15/64" (W) x 20-23/32" (D) (590 mm (W) x 526 mm (D)) Weight Approx. 70.6 lbs. (32 kg) TD and drum cartridges included Copier dimensions 23-15/64" (W) x 20-23/32" (D) x 18-33/64" (H) (590 mm (W) x 526 mm (D) x 470 mm (H)) Operating conditions Temperature: 59°F to 86°F (15°C to 30°C) Humidity: 20% to 85% First-copy time and warm-up time may differ depending on operating conditions, such as powersupply voltage and room temperature.
INDEX A Auto clear . . . . . . . . . . . . . . . . . . . . . . . . . . . . . . . . . . . . 7 Automatic exposure adjustment . . . . . . . . . . . . . . . . . . 22 Auto power shut-off mode . . . . . . . . . . . . . . . . . . . . . . 34 B Bypass tray . . . . . . . . . . . . . . . . . . . . . . . . . . . . . . . . . . 18 C Cautions on handling . . . . . . . . . . . . . . . . . . . . . . . . . . . 9 Copier trouble? . . . . . . . . . . . . . . . . . . . . . . . . . . . . . . . 38 Copying – large original . . . .
INDEX S Screw . . . . . . . . . . . . . . . . . . . . . . . . . . . . . . . . . . . 11, 42 Special paper . . . . . . . . . . . . . . . . . . . . . . . . . . . . . . . . 18 Specifications – copier . . . . . . . . . . . . . . . . . . . . . . . . . . . . . . . . . . . . . 43 – paper . . . . . . . . . . . . . . . . . . . . . . . . . . . . . . . . . . . . . 40 Status indicators . . . . . . . . . . . . . . . . . . . . . . . . . . . . . . 24 Supply – life . . . . . . . . . . . . . . . . . . . . . . . . . . . . .
S H A R P Date Issued:Nov. 1, 1998 MATERIAL SAFETY DATA SHEET MSDS No. F-00841 Section 1. Product Identification Product: AL-160TD (Black Toner) Section 2. Supplier’s Name and Address Sharp Corporation 22-22 Nagaike-cho, Abeno-ku, Osaka, Japan Local suppliers are listed below. Please contact the nearest supplier for additional information. (Country) U.S.A. Canada United Kingdom Section 3. Ingredients Ingredients Styrene-Acrylate copolymer Carbon black Iron oxide Metal Complex dye Section 4.
Section 6. Physical Chemical Characteristics Boiling / Melting Point: Vapor Pressure: Vapor Density: Evaporation Rate: Appearance: Odor: Section 7. Not applicable Not applicable Not applicable Not applicable Fine powder Odorless Not applicable >350°C (LEL); Not applicable (UEL); Not applicable CO2, dry chemical, foam or water None This material has no unusual fire or explosion hazards.
S H A R P Date Issued :Nov. 1, 1998 MATERIAL SAFETY DATA SHEET MSDS No. F-30841 Section 1. Product Identification Product AL-160TD(Black Developer) Section 2. Supplier’s Name and Address Sharp Corporation 22-22 Nagaike-cho, Abeno-ku, Osaka, Japan Local suppliers are listed below. Please contact the nearest supplier for additional information. (Country) U.S.A. Canada United Kingdom Section 3. Ingredients Ingredients Iron powder Styrene-Acrylate copolymer Carbon black Section 4.
Section 6. Physical Chemical Characteristics Boiling / Melting Point: Vapor Pressure: Vapor Density: Evaporation Rate: Appearance: Odor: Section 7. Not applicable Not applicable Not applicable Not applicable Fine powder Odorless Not applicable >350°C (LEL); Not applicable (UEL); Not applicable CO2, dry chemical, foam or water None This material has no unusual fire or explosion hazards.
MEMO 51
MEMO
♠♠♠♠♠♠♠♠♠♠♠♠♠♠♠♠♠♠♠♠♠♠♠♠♠♠♠♠♠♠♠♠♠♠♠♠ For users in the USA WARNING: FCC Regulations state that any unauthorized changes or modifications to this equipment not expressly approved by the manufacturer could void the user’s authority to operate this equipment. Note: This equipment has been tested and found to comply with the limits for a Class A digital device, pursuant to Part 15 of the FCC Rules.
AL-1600/AL-1610 SHARP ELECTRONICS CORPORATION Sharp Plaza, Mahwah, New Jersey 07430-2135. SHARP ELECTRONICS OF CANADA LTD.