SHAR~ AQuas LC-60E77UN LC-65E77UM LIQUID CRYSTAL TELEVISION TELEVISEUR ACL TELEVISOR CON PANTALLA DE CRISTAL LiQUIDO OPERATION MANUAL MODE D'EMPLOI MANUAL DE OPERACION WI 'U1j;14iNit NOM 1245 III DOLB'l HIGH-DEFINITION TELEVISION DIGITAL I HIGH DEFINITION MULrlMEOIA INTERFACE IMPORTANT : Please read this operation manual before starting operating the equipment. IMPORTANT : Veuillez lire ce mode d'emploi avant de commencer a utiliser I'appareil.
LC-60E77UN LC-65E77UM LIQUID CRYSTAL TELEVISION ENGLISH OPERATION MANUAL IMPORTANT: To aid reporting in case of loss or theft, please record the TV's model and serial numbers in the space provided. The numbers are located at the rear of the TV. I Model No. Serial No.: IMPORTANT INFORMATION WARNING: TO REDUCE THE RISK OF FIRE OR ELECTRIC SHOCK, DO NOT EXPOSE THIS PRODUCT TO RAIN OR MOISTURE.
IMPORTANT INFORMATION WARNING: FCC Regulations state that any unauthorized changes or modifications to this equipment not expressly approved by the manufacturer could void the user's authority to operate this equipment. CAUTION: This product satisfies FCC regulations when shielded cables and connectors are used to connect the unit to other equipment. To prevent electromagnetic interference with electric appliances such as radios and televisions, use shielded cables and connectors for connections.
DEAR SHARP CUSTOMER Thank you for your purchase of the Sharp Liquid Crystal Television. To ensure safety and many years of trouble-free operation of your product, please read the Important Safety Instructions carefully before using this product. IMPORTANT SAFETY INSTRUCTIONS Electricity is used to perform many useful functions, but it can also cause personal injuries and property damage if improperly handled. This product has been engineered and manufactured with the highest priority on safety.
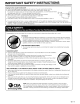
IMPORTANT SAFETY INSTRUCTIONS • Outdoor Antenna Grounding - If an outside antenna is connected to the television equipment, be sure the antenna system is grounded so as to provide some protection against voltage surges and built-up static charges.
IMPORTANT SAFETY INSTRUCTIONS Caring for the Liquid Crystal panel • Turn off the main power and unplug the AC cord from the wall outlet before handling. • Gently wipe the surface of the display panel with a soft cloth (cotton, flannel, etc.). To protect the display panel, do not use a dirty cloth, liquid cleaners, or a chemical cloth (wet! dry sheet type cloth, etc.). This may damage the panel surface. • Wiping with a hard cloth or using strong force may scratch the panel surface.
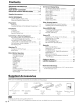
Contents IMPORTANT INFORMATION 1 Trademarks. . . . . . . . . . . . . . . . . . . . . . . . . . . . . . . . . . . . . .. 2 DEAR SHARP CUSTOMER 3 IMPORTANT SAFETY INSTRUCTIONS 3-5 6 Supplied Accessories QUICK REFERENCE QUICK INSTALLATION TiPS 7 Using the Remote Control Unit . . . . . . . . . . . . . . . .. 7 Preparation Antennas 8 Installing Batteries in the Remote Control Unit. ..
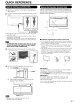
QUICK REFERENCE QUICK INSTALLATION TIPS Using the Remote Control Unit 1 Attach your antenna to the back of the television. (See page 8.) 2 Connect the AC plug for the television into the AC outlet. Use the remote control unit by pointing it towards the remote control sensor on the TV. Objects between the remote control unit and the remote control sensor may prevent proper operation. ----..Jlj IL-l It I •.-:::::::::::.a. '-------.::c.;...,;:.....::-.:..
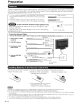
Preparation Antennas To enjoy a clearer picture, use an outdoor antenna. The following is a brief explanation of the types of connections that are used for a coaxial cable. If your outdoor antenna uses a 75-ohm coaxial cable with an F-type connector, plug it into the antenna terminal at the rear of the 1V set. ----m IF-type connector 1.A 75-ohm system is generally a round cable with F-type connector that can easily be attached to a terminal without tools (Commercially available). 2.
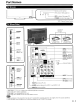
Part Names TV (Front) - - - - - - - - - Remote control sensor ' I- - - - - - POWER ope () e II (3 L ---- L- OPC sensor* (See page 22.) OPC indicator (See page 22.) POWER indicator (See page 15.) * OPC: Optical Picture Control TV (Rear/Side) *2 POWER I II ACINPUT terminal POWER button _____1-------1-----~-~- '3 I MENU I MENU button 1+ INPUT LC-60E77UN LC-65E77UM INPUT button *1 CH A W~~.-------t------r------INPUT Channel buttons (CHA.
Part Names TV POWER: Switch the TV power on or enter standby. (See page 15.) Remote Control Unit 17 1 2 3 4 rri.
Connecting to External Equipment You can connect many types of external equipment to your TV. To view external source images, select the input source from INPUT on the remote control unit or on the TV. (See page 16.) For connecting the TV to external equipment, use commercially available cables. EmD • To protect equipment, always turn off the TV before connecting any external equipment. • Please read the relevant operation manual (Blu-ray disc player, etc.) carefully before making connections.
Connecting to External Equipment • When using Component cable (INPUT 1 or 2): • Blu-ray disc player • DVD player • HD cable/satellite set-top box Audio cable Component video cable Connecting a VCR, Game Console, Camcorder or Cable/Satellite Set-top Box • When using S-VIDEO cable (INPUT 2): • Game console • VCR • Camcorder S-VIDEO cable Audio cable • When using Composite cable (INPUT 1 or 3): • Game console • Camcorder Side panel • VCR • Cable/Satellite set-top box Rear of the TV H, .
Connecting to External Equipment Connecting an Audio Amplifier • When using optical fiber cable: It is possible to output audio through the DIGITAL AUDIO OUTPUT terminal. (See page 31 for details.) PCM audio outputs from the terminal. Rear of the TV Optical fiber cable 6 . .w .. . ~ . .. OPTICAL m;m • Depending on the connected equipment, audio will not output from the DIGITAL AUDIO OUTPUT terminal in HDMI connection. In this case, set the audio formats of the connected equipment to PCM, 32/44.
Connecting to External Equipment Connecting a PC Refer to page 40 for a list of PC signals compatible with the TV. Side panel • When using HOMI cable (INPUT 5, 6, 7 or 8): Rear of the TV """'= HOMI-certified cable 1~~ II I I ~~ ~®1~~k,~I~I~I~~111 ~R \J nlUJJiif' Em Hom, II I''1".\ J. . f~ I~I\.J'!'V tllu . i . .: ' l'-:J II." ~,i! ~ll~J~ll~j ~.,'~~=j. '_ki1J y • Oepending on the board, only video signals may be output.
Watching TV Turning On/Off the Power ~ POWER I Press POWER on the TV, or TV POWER on the remote control unit to turn the power on. II MENU i l.-- ~i'. • POWER indicator (Green): The 1V is on. (After a few seconds, a window appears with sound.) I PO WER r:m m • The initial setup starts when the 1V powers on for the first time. If the 1V has been turned on before, the initial setup will not be invoked.
Direct Button Operation Sleep Timer El ED • ' .. INPUT FLASHBACK FREEZE MENU c:::::I:::::> 0 I 0 I EXIT e - - - - - ' ) RETURN 8
Direct Button Operation AVMODE AUDIO AV MODE gives you several viewing options to choose from to best match the surrounding environment of the lV, which can vary due to factors like room brightness, type of program watched or the type of image input from external equipment. Press AV MODE. Current AV MODE displays. • Press AV MODE again before the mode displayed on the screen disappears.
Direct Button Operation 1 POWER SAVING Allows you to set the Power Saving level in order to decrease the power consumption and increase the backlight lifespan. Press POWER SAVING. • Each time you press POWER SAVING, the mode changes as shown below. Off t Standard - • This will present the Closed Caption information display. 2 Air DIGITAL 22.1 Saving" on the menu items. (See page 24.) •• • Press CC while the Closed Caption information is still on the screen.
Direct Button Operation VIEW MODE You can select the screen size. SOURCE REC \\ LIGHT (3 @) 8 G EJ 8 CD CD 0 (3 8 • I .. 8@8 FREEZE 0 \\ MENU $& EXIT . . 0 0 PRETURN 0 I 1 Press VIEW MODE. • The View Mode menu displays. • The menu lists the View Mode options selectable for the type of video signal currently being received. 2 Press VIEW MODE or J../T while the View Mode menu is displayed to select a desired item on the menu.
On-Screen Display Menu On-Screen Display Menu Operation ~~ LCFONT embedded Example Example .-;, "'I .// Picture Option AQUOS LINK Setup D Audio Only .. HI Auto Volume [Off] Clear Voice [Off] Output Select [Fixed] @ Caption Setup ® Program Title Display [No] Favorite CH Operation Lock Out [Off] Channel Selecting Effect [Yes] Demo Mode CD Item displayed in yellow • This indicates the item currently selected. • Press ENTER to go to the adjustment screen for this item.
On-Screen Display Menu Menu Items mm • When AV MODE is set to "AUTO", part of the menu may not be displayed correctly or the setting range of the menu may be changed. • Some menu items may not be displayed depending on the selected input source. • When configuring a menu, be sure to select the input source according to the menu items to be configured. If a menu is not displayed, check whether one of the following may be the source of the problem. ., A TV program is being viewed (1V).
On-Screen Display Menu ope Setting Picture Menu Adjusts the picture to your preference with the following picture settings. Example "1/ Automatically adjusts the brightness of the screen. Off: The brightness is fixed at the value set in "Backlight". On: Automatically adjusts. On: Display: Displays the OPC effect on the screen while adjusting the brightness of the screen.
On-Screen Display Menu Use Fine Motion Enhanced to view fast-action video more clearly. On: For obtaining a clearer image. Off: Normal image. em • "Fine Motion Enhanced" may cause image noise. If this occurs, tum the function "Off". Automatically adjusts the image contrast according to the scene. On: Automatically adjusts the image contrast. Off: No adjustment. '. ,.. ~Yf~'~~?Th' ~!(.MMl~··· Adjusts the differences of picture tones between bright parts and dark parts.
On-Screen Display Menu Power Control Menu Audio Menu You can adjust the sound quality to your preference with the following settings. Power control setting allows you to save energy. Example Example I~ Treble [ 0] -15 Bass [ OJ -15 Balance [ 0) L • . . r r ~ .~ [Oft] No Signal Off [Disable] +15 No Operation Off [Disable] R [Off] Bass Enhancer [On] I M;U ~ ~~i)' O~REORN 1 2 II [I I A'OSIOP OPTION DO FAVOAIlE SLEEP AUDIO AV IAOOE 0CC SU~DDDD e:;) 4 Press J;.
On-Screen Display Menu Setup Menu CH Setup . If initial setup does not memorize all the channels in your region, follow the instructions below to manually memorize the channels. Example "" POWER SAVING EZ Setup @ CH Setup ,eH H''''' " MUTE 0 - FnEEZE MENU O~~ Antenna Setup-DIGITAL @~m Input Skip EXIT ~RETURN - FAVORITE CH - 0®@@ Position [Englishj Reset AQuas 1 Press MENU to display the MENU screen, and then press ~/~ to select "Setup". 2 Press ...
On-Screen Display Menu Position For adjusting a picture's horizontal and vertical position. H-Pos.: Centers the image by moving it to the left or right. V-Pos.: Centers the image by moving it up or down. miD • For resetting adjustments to the factory preset values, press J;./T to select "Reset", and then press ENTER. • When connecting a PC to the HDMI terminal, the image position will be automatically adjusted. It cannot be manually adjusted.
On-Screen Display Menu • TV Parental Guidelines Example V-CHIP is an electronic filtering device built into your N. This tool gives parents a great degree of control over broadcasts accessed by their children. It allows parents to select programs judged suitable for child viewing while blocking ones judged not suitable. It does so automatically once you activate the V-CHIP feature in your N. "V-Chip" and "Status" will not be selectable from the menu if you do not first configure your secret number.
On-Screen Display Menu Canadian Rating Systems (Canadian English ratings and Canadian French ratings) • The TV rating systems in Canada are based on the Canadian Radio-Television and Telecommunications Commission (CRTC) policy on violence in television programming. • While violence is the most important content element to be rated, the structure developed takes into consideration other program content like language, nudity, sexuality and mature themes.
On-Screen Display Menu Option' Menu Input Select If the image does not come in clearly from the external equipment connected to INPUT 1 or INPUT 2, you may need to change the input signal type setting on the "Input Select" menu .
On-Screen Display Menu Color System Select the video signal system compatible with your equipment from the list below: Auto/NTSC/PAL-M/PAL-N 1mB • "Color System" can only be set for the INPUT 1 VIDEO, INPUT 2 S-VIDEO and INPUT 3 VIDEO. • If you have already set the Secret No., input the 4-digit secret number here. See page 26 for setting a secret number. Caption Setup This function allows you to adjust the closed caption screen appearance to suit your preference.
On-Screen Display Menu Software Update Digital Setup Menu Example I_ FREEZE o Digital Setup AudiO Setup [PCM] MENU 1-' EO ", Identification Software Update - • $l "R'ORN This function allows software updates by inserting a USB memory device with the update file into the SERVICE terminal on the TV. To check for the availability of a software update, visit www.sharpusa.com. If you have any questions, please call 1-800-BE-SHARP (800-237-4277).
On-Screen Display Menu 5 6 Press ENTER to start checking the data in the USB memory device. 7 Press ENTER to start updating. • The screen becomes dark for a while until the update screen can be displayed. Please wait for the update screen to appear. Do not unplug the AC cord. During the data checking, "Checking" blinks. Example • The current version of the 1V software and the version of the update file on the USB memory device are displayed.
Other Viewing Options Presetting Remote Control Function You can operate the connected AV products (AV receiver, cable box, SAT tuner, DTV, VCR, DVD, LD) using the presetting manufacturer function of your remote control unit. r--i\ / : ; ) C:rsAT V 0 :~: :::g;: 0 SOURCE 1 1 ----I!+-. 2 3 4 • I 1 SOURCE POWER I II . . . • ~II~~ 1\ 1\::: 1'1 REC ••• II II 8 9 _11_ 10 •• • ~H ·~Ifi-I -11 II 12 ~~'-+-1-13 • J-~-14 - • Rewinds the tape and allows picture search.
Other Viewing Options Manufacturer codes VCR BRAND Akai Audio Broksonic Canon Capehart Craig Curtis Mathis Daewoo DBX Dynatech Emerson Fisher Funai G.E.
Using AQUOS LINK Controlling HOMI Equipment Using AQUaS LINK What's AQUaS LINK? • Using the HOMI CEC (Consumer Electronics Control) protocol, with AQUaS LINK you can interactively operate compatible system equipment (Blu-ray disc equipment, AVamplifier, OVO) . • By connecting AQUaS LINK-compatible devices with HOMI-certified cables to the 1V, you can control a recorder or AV amplifier using the remote control of the 1V. • AQUaS LINK allows you to operate the HOMI-connected equipment with one remote control.
Using AQUOS LINK AQUOS LINK Setup When multiple AQUOS LINK-compatible devices are connected, this function allows you to set the recorder for recording when you press REC on the TV's remote control unit. 1 Press MENU to display the MENU screen, and then press .... /~ to select "Option". 2 Press It../~ to select "AQUOS LINK Setup", and then press ENTER. 3 Press It../~ to select a specific item, and then press ENTER. 4 Press It../~ (or ..... /~ ) to select the desired setting, and then press ENTER.
Using AQUOS LINK One Touch Playback AQUaS LINK Menu I AQUaS LINK allows you to operate the HDMIconnected equipment with one remote control. ~8@) so. URCE. LIGHT.. ~ \1\ o REC €lID @i:) ~ EJ:!i) AQUOS LINK Recorder EPG Top menu/title list Media change \elcaGIDI Press ~ .By AQUOS AUDIO SP to start playing back a title. ByAQUOS SP • The last played program is played back. You can use the following buttons during broadcast viewing. Description 'Buttons • _.
Using AQUOS LINK Playback of Titles Using AQUOS LINK This section explains how to play back a title in the AQUOS LINK-compatible equipment. 1 Power on the AQUOS LINK-compatible equipment, and select appropriate external input. 2 Press OPTION to display the AQUOS LINK MENU screen. 3 Press ../." to select "Top menu/title list", and then press ENTER. • The title list data from the connected AQUOS L1NKcompatible equipment displays. 4 Select the title with .. /." / ....
Using a PC Displaying a PC Image on the Screen VIEW MODE You can select the screen size. LIGHT SOURCE I 1 (3 8 El G REC 0 0 El El FREEZE rn 8 0 • MENU 0 $ 888 II II 0 EXIT 0 1'p PRETURN 0 Press VIEW MODE. • The View Mode menu displays. • The menu lists the View Mode options selectable for the type of video signal currently being received. 2 Press VIEW MODE or Ji'/~ while the View Mode menu is displayed to select a desired item on the menu .
Using a PC Setting Audio Input PC Audio Select Determines whether the AUDIO terminal is used for INPUT 4 (PC-IN) or INPUT 6 (HDMI). 1 2 Press MENU to display the MENU screen, and then press ~/~ to select the Setup or Option menu. • For adjusting "Auto Sync," or "Fine Sync,", select the Setup menu. • For setting "PC Audio Select", select the Option menu. Press ~/~ to select a specific adjustment item, and then press ENTER to set each item, 3 Press Ji..
Using a PC RS-232C Port Specifications • PC control of the TV • Attach an RS-232C cable cross-type (commercially available) to the supplied Din/D-Sub RS-232C for the connections. • Command format Eight ASCII codes + CR Command 4-digits • This operation system should be used by a person who is accustomed to using computers. • Communication conditions Set the RS-232C communication settings on the PC to match the 1V's communication conditions.
Appendix Removing the Stand • Before detaching (or attaching) the stand, unplug the AC cord from the AC INPUT terminal. E't!mm • Do not remove the stand from the TV unless using an optional wall mount bracket to mount it. Before attaching/detaching the stand • Before performing work, make sure to turn off the TV. 1 2 l :':~~ ~:~~ Unfasten the four screws used to secure the stand in place. Detach the stand from the TV. ImiB • To attach the stand, perform the above steps in reverse order.
Appendix Troubleshooting Possible Solution Problem • No power • Check if you pressed TV POWER on the remote control unit. .. Page 15 If the indicator on the lV does not light up, press POWER on the lV. • Is the AC cord disconnected? .. Page 7 • Has the power been turned on? .. Page 15 • Unit cannot be operated. • External influences such as lightning, static electricity, may cause improper operation.
Appendix Problem Possible Solution Is connection to other components correct? .. Pages 11, 12, 13, 14 and 35 Is correct input signal source selected after connection? .. Page 29 Is the correct input selected? .. Page 16 Is "On" selected in "Audio Only"? .. Page 29 If the PC image is not displayed, check the following: - When connecting a laptop PC to the 1V, check that display output mode of the PC is set to external rnonitor. - Check the resolution setting on the PC.
Appendix Specifications' Item LCD panel Model: LC-60E77UN Size 60" Class (60 '/32" Diagonal) Resolution 2,073,600 pixels (1,920 1V-standard (CCIR) 1V Function .
Appendix Information on the Software License for This Product • Software composition The software included in this product is comprised of various software components whose individual copyrights are held by SHARP or by third parties.
Calling for Service For location of the nearest Sharp Authorized Service, or to obtain product literature, accessories, supplies, or customer assistance, please call1-800-BE-SHARP.
VALID IN CANADA ONLY SHAR~--...... LIMITED WARRANTY Consumer Electronics Products Congratulations on your purchase! Sharp Electronics of Canada Ltd.
Dimensional Drawings Unit: inch (mm) Unite: pouce (mm) Unidad: pulgada (mm) LC-60E77UN ._----~5~6-5/8~(-14-38~)- I I _ J ~ ~i e.~ ~~ _ I ------ :52 17 /32 (1334) , I , -t 1 ~~r- k;rLl=::===r,.....L=--.=i==~- =~r==~ .~ J __ ~.,., N- 15 __
SHAR~ SHARP ELECTRONICS CORPORATION Sharp Plaza, Mahwah, New Jersey 07495-1163 SHARP CORPORATION Printed in Mexico Imprime au Mexique Impreso en Mexico TINS-E339WJZZ 09P09-MX-NM
WITH THE PURCHASE OF YOUR AQUOS@ LCD- TV, Dear Valued Customer, Congratulations on your recent purchase! Thank you for selecting SHARp® as your LCD-lV provider. We are truly excited that you have chosen one of our premier AQUOS televisions and are proud to welcome you to our AQUOS AdvantageSM program. Our goal is simple - to provide you with a premium level of service and support for your new AQUOS LCD-lV.
BENEFITS - Receive a FREE Three-Month Limited Warranty Extension With Your Activation . Take immediate advantage of the following program benefits by activating your membership today! • -. > • Dedicated Member Support Line: Calls to 1-87-SEE-AQUaS are routed directly to professionally trained AQUaS Advantage Advisors who are available to assist you with: .-. > • Extended support hours • Access to live Web chat > Call us at: 1-87-SEE-AQUOS (1-877-332-7867) Or visit our website at: www.
PRODUCT REGISTRATION DEPARTMENT Please do not send any products or other correspondence to this address. If you have comments or suggestions about our product, please write to: SHARP Consumer Electronics Group Sharp Plaza, Mahwah, NJ 07430-2135 U.S.A. First-Class Postage Required Post Office will not deliver without proper postage. Register online at www.sharpusa.com c C YO 1 SHARP ELECTRONICS CORPORATION PO BOX 171098 DENVER CO 80217-1098 1111111111.111.1111111111111.11111111.1111 •• 1.111.11.11.111.
SHARR IMPORTANT! Please fill out and return within the next 10 days. This is your Sharp Product Registration Card. Returning this card will not affect warranty coverage, but may expedite the processing of warranty claims. The additional information will also help us to develop new products that best meet your needs and desires. Register ONLINE at www.sharpusa.com 1. 1. i : Mr. 2. i Mrs. 3. [ I Ms. J 4. First Name c C YO 1 Miss LCDTV last Name Inilial Sireet Apt. No.
22. To help us understand our customers' lifestyles, please indicate the interests and activities in which you or your spouse enjoy participating on a regular basis. Home life Travel 01. I, I' Grandchildren 02. ;'1 Home Improvement/Do-It-Yourself 03. [ I Gardening 04. [1 Own a Dog 05. n Own a Cat leisure 06. [ I Cultural/Art Events 07. 1'1 Avid Book Reading 15. Airline Club/Frequent Flyer [ 'I 16. Travel in USA [] 17. Foreign Travel 18. [] Cruise Ship Vacations 19. il RV Vacations 20.