
User Manual


6
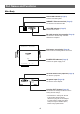
Wall Mount
You will find it convenient to mount AN-LS1 on the wall, using two screws, as indicated below.
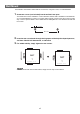
1 Screw two screws (not included) into the wall 96.5 mm apart.
The heads of the screws should be 5-7 mm in diameter, and the shafts should be 3 mm in diameter.
(It is recommended to use screws of 12 mm or more in length.) Do not screw the screws in all the
way—leave a space of about 4 mm to allow room for sliding AN-LS1’s ears between the wall and
the screws.
5-7 mm
96.5 mm
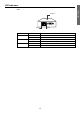
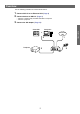
2 Insert the two screw heads through the large parts of the keyhole shaped apertures,
and then slide AN-LS1 downwards, as indicated.
3 For added stability, simply tighten the two screws.
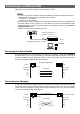
AN-LS1
POWER
RS-232C(CONTROLLER)
RS-232C(PROJECTOR) INIT. DC IN
TX/RX 10BASE-T LINK
AN-LS1
POWER
RS-232C(CONTROLLER)
RS-232C(PROJECTOR) INIT. DC IN
TX/RX 10BASE-T LINK
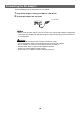
• To remove AN-LS1 from the wall mount, simply reverse steps 2 and 3 above.