
User manual

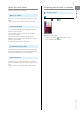
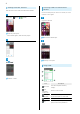
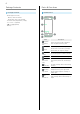
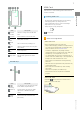
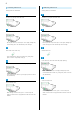
Table Of Contents
- AQUOS Xx2 mini User Guide
- Contents
- Introduction
- Getting Started
- Basic Operations
- Handset Interface
- Welcome Sheet (Lock Screen) Basics
- Home Screen (Feel Home) Basics
- Icons at Display Top (Status Bar)
- Checking Handset Status & Notifications (Notifications Window)
- Customizing Welcome Sheet (Lock Screen)
- Customizing Home Screen (Feel Home)
- Capturing Screenshots (Clip Now)
- Disabling Touch Operation Temporarily (Childlock)
- Copying Onscreen Text (Copy Anywhere)
- Writing Notes on Display (KAKU Notepad)
- Phone
- Messaging & Internet
- Camera
- Music & Images
- Connectivity
- Global Services
- Handset Settings
- For Assistance
- Safety Precautions
- Index

8
Inserting USIM Card
Always power off beforehand.
Use notch (○) to open Card Slot Cover
Pull out USIM Tray
・Do not pull USIM Tray forcefully or at an angle; damage may
result. Gently pull it out horizontally from the edge.
Place USIM Card in USIM Tray
・Check orientation of USIM Card (see notch), then gently
place it with IC chip (metal) facing up.
Insert USIM Tray into USIM Card Slot (right opening)
・Check orientation of USIM Tray, then gently insert it all the
way horizontally.
Close Card Slot Cover
・When closing Card Slot Cover, press ○ areas firmly and
make sure that there is no gap between Card Slot Cover and
handset.
Removing USIM Card
Always power off beforehand.
Use notch (○) to open Card Slot Cover
Pull out USIM Tray
・Do not pull USIM Tray forcefully or at an angle; damage may
result. Gently pull it out horizontally from the edge.
Remove USIM Card
Insert USIM Tray into USIM Card Slot (right opening)
・Do not insert USIM Tray at an angle; damage may result.
Check orientation of USIM Tray, then gently insert it all the
way horizontally.
Close Card Slot Cover
・When closing Card Slot Cover, press ○ areas firmly and
make sure that there is no gap between Card Slot Cover and
handset.