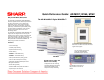
Quick Reference Guide: AR-M207, M165, M162 Description: Features & Options Why the AR-M207, M165, M162 The AR-M162 and AR-M207 Digital IMAGERs™ Document Systems deliver advanced performance for today’s small office—all in a value-driven, multifunction copier. With a 500-sheet paper capacity, (250 sheets on AR-M162), 100-sheet bypass tray, standard 600 dpi host-based printing, and auto duplexing (AR-M207), these compact performers keep pace with even the most demanding offices.
Quick Reference Guide: AR-M207, M165, M162 Pre-Setup: Tools, MSDSs, & Admonitions Equipment & Service Documentation Description Toolbox Basics Part Number AR-M207, M165, M162 Service Manual SM-AR-M207 Code: 00ZARM207/A1E AR-M207, M165, M162 Circuit Diagram CD-AR-M2007 Code: 00ZARM207/C1/ AR-M207, M165, M162 Parts Guide PG-AR-M207 Code: 00ZARM207/P1E *AR-EB9 Service Manual Digital Laser Copier Printer Option Dual Function Board SM-AR-EB9 Code: 00ZAREB9//A1E AR-FX11 Service Manual Fax Expansion Ki
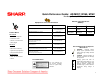
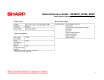
Quick Reference Guide: AR-M207, M165, M162 Configuration Configuration Configuration AR-M162, M165 AR-M207 (Copier/Printer/Scanner Model) (with the RSPF installed) 16 PPM Black & White 20 PPM Black & White AR-M162/AR-M165 AR-M207 3
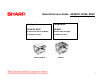
Quick Reference Guide: AR-M207, M165, M162 Configuration with Common Options AR-NB3 Network Expansion Kit with PCL Network Printing and Network Scanning (requires AR-EB9) AR-SP6N 40-Sheet Single Pass Feeder AR-FX11 Fax Expansion Kit AR-VR5 Document Cover (Standard on AR-M162 only) AR-RP6N 40-Sheet Reversing Single Pass Feeder AR-VR5 Document Cover (Standard on AR-M162 only) AR-EB9 Electronic Sorting Kit (includes Card Shot and USB 2.
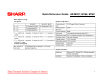
Quick Reference Guide: AR-M207, M165, M162 Consumables Consumable Items Supply System Table (USA/Canada) 5
Quick Reference Guide: AR-M207, M165, M162 Power Source/Consumption and Environment Support Power Source Environment Support Power Consumption *Must conform to energy saving laws, international standards, and company regulations.
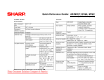
Quick Reference Guide: AR-M207, M165, M162 Specifications Base Engine Copy Speed (CPM) Base Engine First Copy Time Print Performance 7
Quick Reference Guide: AR-M207, M165, M162 Specifications (cont’d) Base Engine (cont’d) Job Speed Engine Composition Continuous Copying Engine Resolution 8
Quick Reference Guide: AR-M207, M165, M162 Specifications (cont’d) Scanner Section SPF/RSPF Document Table AB and inch can be switched to each other by SIM.
Quick Reference Guide: AR-M207, M165, M162 Specifications (cont’d) Operation Panel Display Device Key Characters used in LCD 10
Quick Reference Guide: AR-M207, M165, M162 Specifications (cont’d) Operation Panel (cont’d) Controller Board Interface 11
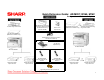
Quick Reference Guide: AR-M207, M165, M162 External Views and Internal Structures External Appearance Note: The External Appearance Legend is located on the following page.
Quick Reference Guide: AR-M207, M165, M162 External Views and Internal Structures (cont’d) External Appearance (cont’d) Legend: 13
Quick Reference Guide: AR-M207, M165, M162 External Views and Internal Structures (cont’d) Internal Arrangement Note: The Internal Arrangement Legend is located on the following page.
Quick Reference Guide: AR-M207, M165, M162 External Views and Internal Structures (cont’d) Internal Arrangement (cont’d) Legend: 15
Note: The Internal Arrangement Legend Quick Reference Guide: AR-M207, M165, M162 Operation Panel For USA: Note: The Operation Panel Legend is located on the following page.
Quick Reference Guide: AR-M207, M165, M162 Operation Panel (cont’d) For USA (cont’d) Legend: 17
Quick Reference Guide: AR-M207, M165, M162 Operation Panel (cont’d) Operation Panel (cont’d) Functionality Note: The Operation Panel Functionality Legend is located on the following page.
Quick Reference Guide: AR-M207, M165, M162 Operation Panel (cont’d) Operation Panel (cont’d) Display (Base Screen) Example: Copy Mode 19
Quick Reference Guide: AR-M207, M165, M162 Operation Panel (cont’d) Operation Panel (cont’d) Icons Appearing in the Special Function Icon Display 20
Quick Reference Guide: AR-M207, M165, M162 Simulaltions Simulations Entering the Simulation Mode List of Simulations Perform the following procedure to enter the simulation mode: # key → * key → C key → * key → Main code → Start key → Sub code → Start key Canceling the Simulation Mode To cancel the simulation mode, press the CLEAR ALL key. Important: After canceling the simulation mode, be sure to turn the power OFF/ON and check the operation.
Quick Reference Guide: AR-M207, M165, M162 Simulations (cont’d) List of Simulations (cont’d) 22
Quick Reference Guide: AR-M207, M165, M162 Simulations (cont’d) List of Simulations (cont’d) 23
Quick Reference Guide: AR-M207, M165, M162 Trouble Codes Trouble Code List 24
Quick Reference Guide: AR-M207, M165, M162 Maintenance Maintenance Table 25
Quick Reference Guide: AR-M207, M165, M162 Maintenance (cont’d) Maintenance Table (cont’d) 26
Quick Reference Guide: AR-M207, M165, M162 Maintenance (cont’d) Maintenance Display System 27
Quick Reference Guide: AR-M207, M165, M162 Key Operator Program Key Operator Program Custom Setting 28
Quick Reference Guide: AR-M207, M165, M162 Key Operator Program (cont’d) Key Operator Program Custom Setting (cont’d) 29
Quick Reference Guide: AR-M207, M165, M162 Flash ROM Version Up Procedure Flash Rom Version Up Procedure 3. Check that the following display is shown. Select “Install from a list or the specific location” and press the [Next] button. Preparation USB Joint Maintenance Program Installation The driver is installed by plug and play. Installation Procedure on Windows XP 1. Machine side: Executable by performing the Service Simulation No. 49-01 (Flash ROM program-writing mode).
Quick Reference Guide: AR-M207, M165, M162 Flash ROM Version Up Procedure Flash Rom Version Up Procedure Installation Procedure on Windows XP (cont’d) 4. Select “Include this location in the search”. If the retrieval area does not include the folder that includes the maintenance tool driver (Mainte.inf), select the [Browse] button. 5. Select the folder which includes the maintenance tool driver (Mainte.
Quick Reference Guide: AR-M207, M165, M162 Flash ROM Version Up Procedure (cont’d) Flash Rom Version Up Procedure Driver Installation Procedure (cont’d) 6. Check that the path to the folder which includes the maintenance tool driver (Mainte.inf) is shown, and press the [Next] button. 7. Check that the following display is shown. Press the [Continue Anyway] button.
Quick Reference Guide: AR-M207, M165, M162 Flash ROM Version Up Procedure (cont’d) Flash Rom Version Up Procedure Driver Installation Procedure (cont’d) Installation Procedure on Windows 2000 8. 1. When installation is completed, the following display is shown. Press the [Finish] button. Machine side: Executable by performing the Service Simulation No. 49-01 (Flash ROM program-writing mode). Note: The words “Download Mode” appear on the operation panel to denote the download mode status. 2.
Quick Reference Guide: AR-M207, M165, M162 Flash ROM Version Up Procedure (cont’d) Flash Rom Version Up Procedure 5. Select “Specify a location” and press the [Next] button. 6. If the reference position is not the folder that includes the maintenance tool driver (Mainte.inf) select the [Browse] button. If the reference position is the folder which includes the maintenance tool driver, press the [OK] button to go to procedure (9). Installation Procedure on Windows 2000 4.
Quick Reference Guide: AR-M207, M165, M162 Flash ROM Version Up Procedure (cont’d) Flash Rom Version Up Procedure Installation Procedure on Windows 2000 (cont’d) 7. Specify the folder that contains the maintenance tool driver (Mainte.inf), and press the [Open] button. 8. Check to confirm that the path to the folder which includes the maintenance tool driver (Mainte.inf) is displayed, and press the [OK] button.
Quick Reference Guide: AR-M207, M165, M162 Flash ROM Version Up Procedure (cont’d) Flash Rom Version Up Procedure Installation Procedure on Windows 2000 (cont’d) 9. Press the [Next] button, and installation is started. 10. When installation is completed, the following display is shown. Press the [Finish] button. 11. When the indication is displayed to reboot the PC, press the [Yes] button and boot the PC. The installation procedure (on Windows 2000) is completed with the above operation.
Quick Reference Guide: AR-M207, M165, M162 Flash ROM Version Up Procedure (cont’d) Flash Rom Version Up Procedure Download Procedure 1. Main Body Side: Executable by performing the Service Simulation No. 49-01 (Flash ROM program-writing mode). 3. PC Side: Boot “Maintenance.exe” and select [AR-M207/M162/M165 Series] on the model selection menu. Note: The words “Download Mode” appear on the operation panel to denote the download mode status. 2. Connect the machine and the PC with a USB cable.
Quick Reference Guide: AR-M207, M165, M162 Flash ROM Version Up Procedure (cont’d) Flash Rom Version Up Procedure Download Procedure (cont’d) 4. PC Side: Check to confirm that “Simulation Command List” is displayed on the integrated maintenance program. 5. PC Side: If “The copier is off.” is displayed on the lower left side after booting the integrated maintenance program, select [File] and then [Reconnect] on the menu bar.
Quick Reference Guide: AR-M207, M165, M162 Flash ROM Version Up Procedure (cont’d) Flash Rom Version Up Procedure Download Procedure (cont’d) 6. PC Side: Check to confirm that the tree is displayed on [Special (MCU/IMC2/Panel/Facsimile)] of the integrated maintenance program. If the tree is not displayed, check that the USB is properly connected and select [Reconnect] again as in the previous procedure (5). 7.
Quick Reference Guide: AR-M207, M165, M162 Flash ROM Version Up Procedure (cont’d) Flash Rom Version Up Procedure 9. Download Procedure (cont’d) 8. PC Side: When the DWL data file is specified, the DWL data file is transferred from the PC to the machine. Downloading proceeds automatically. PC Side: Specify the download file (*.dwl). 10. PC Side: When the message below is displayed, download is completed. The completion message reads: Download is completed.
Quick Reference Guide: AR-M207, M165, M162 Flash ROM Version Up Procedure (cont’d) Flash Rom Version Up Procedure Download Procedure (cont’d) 11. Main Body Side: Wait until the words “Processing finished. Turn OFF the power.” appears on the operation panel. Failed Downloads The appearance of “Processing finished. Turn OFF the power.” indicates the completion of the download (writing to ROM).
Quick Reference Guide: AR-M207, M165, M162 Flash ROM Version Up Procedure (cont’d) Flash Rom Version Up Procedure Version Confirming Procedure 1. Machine Side: Executable by performing the Service Simulation No. 49-01 (Flash ROM program-writing mode). 4. PC Side: Check to confirm that “Simulation Command List” tree is displayed on the integrated maintenance program. Note: The words “Download Mode” appear on the operation panel to denote the download mode status. 2.
Quick Reference Guide: AR-M207, M165, M162 Flash ROM Version Up Procedure (cont’d) Flash Rom Version Up Procedure Version Confirming Procedure 5. PC Side: If “The Copier is Off.” is displayed on the left lower side after booting the integrated maintenance program, select [File] and then [Reconnect] on the menu bar. 6. PC Side: Check to confirm that the tree is displayed on [Special (MCU/IMC2/Panel/Facsimile)] of the integrated maintenance program.
Quick Reference Guide: AR-M207, M165, M162 Flash ROM Version Up Procedure (cont’d) Flash Rom Version Up Procedure 8. PC Side: Check to confirm that the display below is indicated. Version Confirming Procedure 7. PC Side: Double-click [Special (MCU/IMC2/Panel/Facsimile)] on the main tree items to extend the sub-tree items, and select [Confirm version]. Verification Procedures for Version Confirming Version confirming is completed with the following procedures: • In version confirming, “**.**.