
AR-M200/M201 Operation-Manual Setup-Guide GB


6
1
INSTALLING THE SOFTWARE (THAT
ACCOMPANIES THE MACHINE)
BEFORE INSTALLATION
HARDWARE AND SOFTWARE REQUIREMENTS
Before installing the software, see "HARDWARE AND SOFTWARE REQUIREMENTS" on page 36 to make sure
your computer meets the hardware and software requirements.
INSTALLING THE SOFTWARE
Standard installation
The procedure for a standard installation of the software is explained below.
Normally, it is recommended that you use the standard installation.
1
Make sure that the USB cable is not
connected to the machine.
If the cable is connected, a Plug and Play window
will appear. If this happens, click the [Cancel]
button to close the window and disconnect the
cable.
2
Insert the "Software CD-ROM (1)" that
accompanies the machine into your
computer's CD-ROM drive.
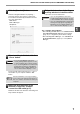
3
Click the "Start" button, click
"Computer", and then double-click the
CD-ROM icon ( ).
• In Windows XP, click the "start" button, click
"My Computer", and then double-click the
CD-ROM icon.
• In Windows 2000, double-click "My Computer",
and then double-click the CD-ROM icon.
4
Double-click the [Setup] icon ( ).
5
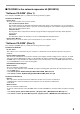
The "SOFTWARE LICENSE" window
will appear. Make sure that you
understand the contents of the license
agreement and then click the [Yes]
button.
6
Read the message in the "Welcome"
window and then click the [Next]
button.
If the machine is used as a shared printer via a server and you only wish to install certain components, select
"Custom installation". (Pages 8 to 9)
Note
The cable will be connected in step 9.
If the language selection screen appears
after you double click the [Setup] icon, select
the language that you wish to use and click
the [Next] button. (Normally the correct
language is selected automatically.)
Note
Note