ENGLISH DEUTSCH FRANÇAIS LC-32LE140E SHARP ELECTRONICS (Europe) GmbH Sonninstraße 3, D-20097 Hamburg SHARP CORPORATION 50219198 http://www.sharp.
Contents Features ................................................................. 3 Dear SHARP customer........................................... 3 Introduction ............................................................. 3 Preparation ............................................................. 3 Important safety precautions .................................. 4 Safety Precautions ................................................. 5 Package Contents ..................................................
SPECIAL NOTE FOR USERS IN THE U.K. The mains lead of this product is fitted with a non-rewireable (moulded) plug incorporating a 5A fuse. Should or and of the same rating the fuse need to be replaced, a BSI or ASTA approved BS 1362 fuse marked as above, which is also indicated on the pin face of the plug, must be used. ASA Always refit the fuse cover after replacing the fuse. Never use the plug without the fuse cover fitted.
Dear SHARP customer Features • Remote controlled colour LCD TV. • Fully integrated Terrestrial digital-cable TV (DVBT-C- MPEG2) (DVB-T-C MPEG4). • HDMI connectors for digital video and audio. This connection is also designed to accept high definition signals. • USB input. • Programme recording • Programme timeshifting • 1000 programmes (analogue+digital). • OSD menu system. • Integrated tuner DVB-T-C HD, MPEG 2 / MPEG 4 compatible.
Important safety precautions • Cleaning—Unplug the AC cord from the AC outlet before cleaning the product. Use a damp cloth to clean the product. Do not use liquid cleaners or aerosol cleaners. • Use a soft damp cloth to gently wipe the panel when it is dirty. To protect the panel, do not use a chemical cloth to clean it. Chemicals may cause damage or cracks in the cabinet of the TV.
Safety Precautions Lightning Read the following recommended safety precautions carefully for your safety. Power Source The TV set should be operated only from a 220-240V AC, 50Hz outlet. Ensure that you select the correct voltage setting for your convenience. Power Cord Do not place the set, a piece of furniture, etc. on the power cord (mains lead) or pinch the cord. Handle the power cord by the plug.
LCD Screen The LCD panel is a very high technology product with about a million thin film transistors, giving you fine picture details. Occasionally, a few non-active pixels may appear on the screen as a fixed blue, green or red point. Please note that this does not affect the performance of your product. Warning! Do not leave your TV in standby or operating mode when you leave your house. Connection to a Television Distribution System (Cable TV etc.
Package Contents Environmental Information • This television is designed to consume less energy to save environment. SLEEP SCREEN FAV LANG. You not only help to save the environment but also you can save money by reducing electricity bills thanks to the energy efficiency feauture of this TV. To reduce energy consumption, you should take the following steps: PRESETS • You can use Power Save Mode setting, located in the Other Settings menu.
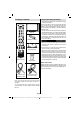
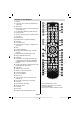
Remote Control Buttons 1. Standby 2. Image size / Zooms videos (in Media Browser video mode) 3. Sleep Timer 4. Mono / Stereo - Dual I-II / Currrent Language (*) (in DVB channels) SLEEP SCREEN FAV LANG. PRESETS 5. Favourite Mode Selection (in DVB channels) 6. Numeric buttons 7. Electronic programme guide (in DVB channels) 8. No function 9. Media Browser 10. Navigation buttons (Up/Down/Left/Right) EPG SWAP 11. No function 12. Recordings Library SOURCE 13.
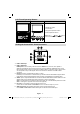
LCD TV and Operating Buttons FRONT and REAR VIEW Control buttons VIEW Control Buttons 1. Standby/On button 2. TV/AV button 3. Programme Up/Down buttons 4. Volume Up/Down buttons ” and buttons Note: Press “ at the same time to view main menu. 1 2 Viewing the Connections - Back Connectors VGA SPDIF Coax.OUT SCART 1. HDMI 2: HDMI Input 2. HDMI 1: HDMI Input HDMI Inputs are for connecting a device that has an HDMI socket.
Viewing the Connections - Side Connectors 1. CI Slot is used for inserting a CI card. A CI card allows you to view all the channels that you subscribe to. For more information, see “Conditional Access” section. 2. USB Inputs. Note that programme recording feature is available via these USB inputs. You can connect external hard disk drives to this input. 5. Headphone jack is used for connecting an external headphone to the system. Connect to the HEADPHONE jack to listen to the TV from headphones (optional).
Using USB Inputs SIDE VIEW USB Connection • You can connect a USB hard disk drive or USB memory stick to your TV by using the USB inputs of the TV. This feature allows you to play files stored in a USB drive or record programmes. USB MEMORY USB 5Vdc Max:500mA • 2.5” and 3.5” inch (hdd with external power supply) external hard disk drives are supported. CAUTION ! • To record a programme, you should first connect a USB disk to your TV while the TV is switched off.
• Recordings of HD programmes can occupy bigger size on the USB disk depending on the broadcast’s resolution. For this reason it is recommended to use USB hard disk drives for recording HD programmes. • Do not plug out the USB/HDD during the recording. This may harm the connected USB/HDD. • Multipartiton support is available. Maximum two different partitions are supported. If the disk have more than two partitions, crash may occur. First partition of the usb disk is used for PVR ready features.
Connecting the LCD TV to a PC For displaying your computer’s screen image on your LCD TV, you can connect your computer to the TV set. Power off both computer and display before making any connections. Use 15-pin D-sub display cable to connect a PC to the LCD TV. When the connection is made, switch to PC source. See “Input selection” section. Set the resolution that suits your viewing requirements.
• If the TV will not be used for a long period i.e. holidays, then unplug the power cord from the mains socket. Standby Notifications If the TV switches off while in No Signal mode, the following on-screen message will be displayed on the next switch-on: Basic Operations You can operate your TV using both the remote control and onset buttons.
Viewing Electronic Programme Guide (EPG) You can view the electronic programme guide (EPG) to view information about available programmes.To view the EPG menu please press EPG button on the remote control. Green button (Next Time Slice): Displays the programmes of the next time slice. Yellow button (Prev Day): Displays the programmes of previous day. Blue button (Next day): Displays the programmes of the next day. • Press “ ”/“ ” buttons to navigate through channels.
Digital Teletext (*) Record / Delete Record Timer (*) If available in your country IMPORTANT: To record a programme, you should first connect a USB disk to your TV while the TV is switched off. You should then switch on the TV to enable recording feature. Otherwise, recording feature will not be available. • Press the “TXT” button. • The digital teletext information appears. • Operate it with the coloured buttons, cursor buttons and OK button.
have selected the Country as Netherlands. Automatic Channel Scan will be displayed instead. ): • By pressing “ ” or “ ” button, select the country you want to set and press “ ” button to highlight Search Type option. Use “ ”/“ ” to set the desired search type. Available search types are digital only, analog TV only and full. • When set, press “ ” to select Teletext Language. Use “ ” or “ ” to select the desired Teletext Language. • Press “ ” button after setting Teletext Language option.
Manual Tuning HINT: This feature can be used for direct broadcast entry. • Select Manual Channel Scan from the Installation menu by using “ ”/“ ” and OK buttons. Manual Scan options screen will be displayed. • Select the desired Search Type using “ ” or “ ” button. Manual search options will change accordingly. Use “ ”/“ ” button to highlight an item and then press “ ” or “ ” button to set an option. You can press “MENU” button to cancel. • Press OK button to quit channel list and watch TV.
(*) If you have selected the Country option to Netherlands in First Time Installation, cable manual search option will not be available. Operating the Channel List Analogue Manual Search • Press “ ” or “ ” button to select the channel that will be processed. Press “ ” or “ ” button to select a function on Channel List menu. After selecting search type as analogue, you can use “ ”/“ ” button to highlight an item and then press “ ” or “ ” button to set an option.
• Pressing “ ” or “ ” button moves to the previous/ next character. Pressing “ ” or “ ” button toggles the current character, i.e., ‘b’ character becomes ‘a’ by “ ” and ‘c’ by “ ”. Pressing the numeric buttons ‘0...9’ replaces the highlighted character with the characters printed above the button one by one as the button is pressed. • BLUE: Displays filtering options. • When finished, press OK button to save. Press “MENU” to cancel. You can select broadcasts to be listed in the channel list.
Note: If the Country option is set to France, you can use 4725 as the default code. Media Playback Using Media Browser If the USB stick is not recognized after power off/on or First Time Installation, first, plug the USB device out and power off/on the TV set. Plug the USB device in again. To display Media Browser window, press either “MENU” button on the remote control and then select Media Browser by pressing “ ” or “ ” button. Press OK button to continue. Media Browser menu options will be displayed.
OK: Views the selected picture in full screen. Press once more to enable only Shuffle. Press again to enable all. You can follow the disabled functions with the change of the icons. Up/Down: Navigate. Note: Slideshow ( all images. If you start the playback with the button and activate symbol, the TV will play the next music/video the file. The playback will proceed accordingly and when the end of the list is reached, it will be played again from the beginning (loop function).
BLUE button (Sort): Changes the order of the recordings. You can select from a wide range of sorting options. • This playback is performed in x1 playback speed. You will see the timeshift gap between the real and the timeshifted programme in the info bar. OK button: Activates play options menu: / (PREVIOUS/NEXT) buttons to move • Use forward or backward on timeshift playback. When the timeshift is reached, timeshifting mode will be quitted and you will switch back to watching normal broadcast.
Slow Forward If you press (PAUSE) button while watching recorded programmes, slow forward feature will be available. You can use button to slow forward. Pressing button consecutively will change slow forwarding speed. Select Yes by using “ ” or “ ” / OK buttons to cancel instant recording. Note: Switching to a different broadcast or source; and viewing Media Browser are not available during the recording. Watching Recorded Programmes In the main menu, use “ ” or “ ” buttons to select Media Browser.
Note: You can shift to screen up or down by pressing “ ” / “ ” buttons while picture zoom is selected as panaromic, 14:9 Zoom, Cinema or Subtitle. 14:9 This zooms up the wide picture (14:9 aspect ratio) to the upper and lower limits of the screen. Configuring Picture Settings You can use different picture settings in detail. Press “MENU” button and select the Picture icon by using “ ” or “ ” button. Press OK button to view Picture Settings menu.
Noise Reduction: If the broadcast signal is weak and the picture is noisy, use Noise Reduction setting to reduce the noise amount. Noise Reduction can be set to one of these options: Low, Medium, High or Off. Advanced Settings • Colour Temp: Sets the desired colour tone. Setting Cool option gives white colours a slight blue stress. For normal colours, select Normal option. Setting Warm option gives white colours a slight red stress.
Sound Settings Menu Items Configuring Your TV’s Settings Volume: Adjusts volume level. Equalizer: Press OK button to view equalizer submenu. Detailed settings can be configured to suit your personal preferences. Press “MENU” button and select Settings ikon by using “ ” or “ ” button. Press OK button to view Settings menu. In equalizer menu, the preset can be changed to Music, Movie, Speech, Flat, Classic and User. Press the “MENU” button to return to the previous menu.
Using a Conditional Access Module Configuring Language Preferences IMPORTANT: Insert or remove the CI module only when the TV is SWITCHED OFF. You can operate the TV’s language settings using this menu. • In order to watch certain digital channels, a conditional access module (CAM) can be necessary. This module must be inserted in the CI slot of your TV. Press “MENU” button and select the fifth icon by using “ ” or “ ” button. Press OK button to view Settings menu.
Language Settings Note: If the Country option is set to France, you can use 4725 as the default code. After coding the correct PIN number, parental settings menu will be displayed: Parental Settings Menu Operation • Select an item by using “ ” or “ ” button. • Use “ ” or “ ” button to set an item. In the configuration menu, highlight the Language Settings item by pressing “ ” or “ ” buttons.
Deleting a Timer Timers To view Timers menu, press “MENU” button and select Settings icon by using “ ” or “ ” button. Press OK button to view Channel List menu. Use “ ” or “ ” button to highlight Timers and press OK to continue: Setting Sleep Timer This setting is used for setting the TV to turn off after a certain time. • Highlight Sleep Timer by using “ ” or “ ” button. • Select the timer you want to delete by pressing “ ” or “ ” button. • Press RED button.
Note: If the Country option is set to France, you can use 4725 as the default code. After you enter the pin, a pop-up menu appears on the screen to ensure that the hard disk should be formatted, select “YES” and press OK to format the hard disk. Select “NO” and press OK to cancel. Ensure you back up important recordings before you format the USB disk unit. Configuring Source Settings You can enables or disable selected source options.
Scan Encrypted Channels: When this setting is on, search process will locate the encrypted channels as well. If it is set as Off, encrypted channels will not be located in automatic search or manual search. If the country option in the First Time Installation/Other Settings is set to Netherlands, Scan Encrypted will always be YES and this cannot be modified. Blue Background (Optional): Activates or deactivates blue background system when the signal is weak or absent.
Teletext The teletext system transmits information such as news, sports and weather on your TV. Note that if the signal degrades, for example in poor/adverse weather conditions, some text errors may occur or the teletext mode may be aborted. Teletext function buttons are listed below: “ ” Teletext / Mix : Activates teletext mode when pressed once. Press again to place the teletext screen over the programme (mix).Pressing again will quit the teletext mode. “RETURN” Index: Selects the teletext index page.
Appendix A: PC Input Typical Display Modes Appendix B: AV and HDMI Signal Compatibility (Input Signal Types) The display has a maximum resolution of 1366 x 768. The following table is an illustration of some of the typical video display modes. Your TV may not support different resolutions. Supported resolution modes are listed below. If you switch your PC to an unsupported mode, a warning OSD will appear on the screen.
Appendix C: Supported DVI Resolutions When connecting devices to your TV’s connectors by using DVI to HDMI cables (not supplied), you can refer to the following resolution information.
Appendix D: Supported File Formats for USB Mode Media Format File Extension .mpg, .mpeg Video MPEG1, 2 .dat MPEG1, 2 .vob MPEG2 .mkv H.264, MPEG1,2,4 Audio MPEG Layer 1/2/3 Remarks (Maximum resolution/Bit rate etc.) MPEG2 EAC3 / AC3 MAX 1920x1080 @ 30P 20Mbit/sec MPEG4, Xvid 1.00, .mp4 Xvid 1.01, Xvid 1.02, Xvid 1.03, Xvid 1.10beta1/2 H.264 PCM/MP3 MPEG2, MPEG4 PCM/MP3 .avi Xvid 1.00, Xvid 1.01, Xvid 1.02, Xvid 1.03, Xvid 1.10-beta1/2 H.264 PCM Movie .avi, Divx 3.11, Divx 4.Divx .
Appendix E: Software Upgrade • Your TV is capable of finding and updating new software upgrades over broadcast channels. • For broadcast channels search, TV looks the available channels stored in your settings. So before software upgrade search, it is advised to auto search and update all available channels. 1) Software upgrade search via user interface • It is possible manually to check if there is a new software upgrade for your TV set. • Simply navigate on your main menu.
Digital Reception (DVB-C) Specifications TV BROADCASTING Transmission Standards: PAL/SECAM B/G D/K K’ I/I’ L/L’ DVB-C, MPEG2, DVB-C, MPEG4 RECEIVING CHANNELS i. DEMODULATION VHF (BAND I/III) -Symbolrate: 4.0 Msymbols/s to 7.2 Msymbols/s UHF (BAND U) - Modulation: 16-QAM , 32-QAM ,64-QAM, 128-QAM and 256-QAM HYPERBAND ii. VIDEO NUMBER OF PRESET CHANNELS - All MPEG2 MP@ML formats with up-conversion and filtering to CCIR601 format.
Dimensional Drawings 490 522 773 English - 39 - A01_MB62_[GB]_1910UK_IDTV_TC_PVR_NICKEL17_32942LED_ROCKER_ZIGGO_10075634_50219198.indd 39 28.03.
End of life disposal English - 40 - A01_MB62_[GB]_1910UK_IDTV_TC_PVR_NICKEL17_32942LED_ROCKER_ZIGGO_10075634_50219198.indd 40 28.03.
Installing the Stand IMPORTANT Please read the following information carefully before attaching the stand to your new Sharp Television. Installing the Stand ! Before fitting the stand, ensure that the TV is unplugged from its power source. ! Place the Sharp Television (1) on a soft, stable and flat surface, facing down. ! Place the Stand (3) on the stand mounting pattern on the rear side of the TV.
Uninstalling the Stand IMPORTANT Please read the following information carefully before detaching the stand of your Sharp Television. Uninstalling the Stand ! Before detaching the stand, ensure that the TV is unplugged from its power source. ! Place the Sharp Television on a soft, stable and flat surface, facing down. ! Unscrew gently the four screws that attach the foot assembly and remove the screws when they are completely unscrewed. ! Remove the stand and plastic moulding gently from the panel.
Screw Dimensions L D Model D L Item Number Ø4 30 8 LC-32LE140E VESA Installation of the Screw To the wall 200 x 100 (W x H) M4 18 4 To the product English - 43 - A01_MB62_[GB]_1910UK_IDTV_TC_PVR_NICKEL17_32942LED_ROCKER_ZIGGO_10075634_50219198.indd 43 28.03.
Inhalt Funktionen ............................................................ 46 Werter SHARP-Kunde .......................................... 46 Einleitung .............................................................. 46 Vorbereitung ......................................................... 46 Wichtige Sicherheitshinweise ............................... 47 Sicherheitsvorkehrungen ...................................... 48 Inhalt der Verpackungseinheit ..............................
SPEZIELLE HINWEISE FÜR BENUTZER IN GB/UK Das Netzkabel dieses Produkts ist mit einem nicht austauschbaren (angeformten) Netzstecker mit eingebauter 5A-Sicherung ausgestattet. Muss die Sicherung ausgetauscht werden, darf nur eine Sicherung vom Typ BS 1362 mit Zulassung durch BSI oder ASTA verwendet werden. Diese muss dieselben Nennwerte aufweisen, die auch auf der Kontaktseite des Steckers angeführt sind. Setzen Sie nach dem Austauschen der Sicherung stets die Abdeckung wieder ein.
Werter SHARP-Kunde Funktionen • LCD-Farbfernsehgerät mit Fernbedienung. • Voll integriertes terrestrisches Digital-TV (DVB-T C - MPEG2) (DVB-T C- MPEG4). • HDMI-Anschlüsse für Digital-Video und -Audio sind vorhanden. Dieser Anschluss kann außerdem HighDefinition-Signale empfangen. • USB-Eingang • Programm-Aufnahme • Programmm-Timeshift-Aufnahme • 1000 Programme (analog + digital). • • OSD-Menüsystem • Integrierter Tuner DVB-T-C HD, MPEG 2- / MPEG 4-kompatibel.
Wichtige Sicherheitshinweise • Reinigung • Ziehen Sie den Netzstecker aus der Steckdose, bevor Sie das Gerät reinigen. Verwenden Sie zur Reinigung ein feuchtes Tuch. Verwenden Sie keine flüssigen Reinigungsmittel oder Sprühreiniger. • Verwenden Sie ein weiches, feuchtes Tuch, um den Bildschirm zu reinigen. Verwenden Sie keine chemischen Reinigungstücher, um den Bildschirm zu reinigen. Diese können zu Beschädigungen und Rissen im Gehäuse des TV-Geräts führen.
Sicherheitsvorkehrungen Hitze und offenes Feuer Das Gerät darf nur an einer Netzsteckdose mit 220240 V Wechselspannung und einer Frequenz von 50Hz betrieben werden. Stellen Sie sicher, dass Sie die richtige Spannung auswählen. Das Gerät darf weder offenem Feuer noch anderen Quellen intensiver Hitzestrahlung, wie elektrischen Radiatoren, ausgesetzt werden. Stellen Sie sicher, dass keine offenen Flammen, wie z. B. brennende Kerzen, auf das Gerät gestellt werden.
Trennen des Geräts vom Netz Der Netzstecker wird verwendet, um das TV-Gerät vom Netz zu trennen und muss daher stets gut zugänglich sein. Kopfhörer-Lautstärke Zu hoher Schalldruck oder zu hohe Lautstärken von Kopf- oder Ohrhörern können zu Gehörschäden führen. Installation Um Verletzungen zu vermeiden, muss dieses Gerät in Übereinstimmung mit den Installationsanweisungen sicher an der Wand befestigt werden (wenn diese Option verfügbar ist).
Umweltinformationen Inhalt der Verpackungseinheit • Dieses TV-Gerät wurde so konstruiert, dass es die Umwelt schützt und weniger Energie verbraucht. SLEEP SCREEN FAV LANG. • Sie können helfen, die Umwelt zu schonen, und gleichzeitig Geld sparen, indem Sie die Energiesparfunktion des TV-Geräts verwenden. Um den Energieverbrauch zu senken, gehen Sie wie folgt vor: PRESETS • Verwenden Sie die Einstellung Energiesparmodus im Menü Andere Einstellungen.
Tasten der Fernbedienung 1. Standby 2. Bildgröße / Videozoom (im MedienbrowserVideomodus) 3. Ausschalttimer 4. Mono/Stereo - Dual I-II / Aktuelle Sprache (*) (bei DVB-Kanälen) SLEEP SCREEN FAV LANG. PRESETS 5. Auswahl Favoritenmodus (bei DVB-Kanälen) 6. Zifferntasten 7. Elektronischer Programmführer (bei DVBKanälen) 8. Keine Funktion 9. Medienbrowser EPG 10. Navigationstasten (Up/Down/Links/Rechts) SWAP 11. Keine Funktion SOURCE 12. Aufnahmebibliothek 13.
LCD-TV und Bedientasten VORDER- und RÜCKANSICHT Ansicht Steuertasten Steuertasten 1. Standby- / Ein-Taste 2. TV/AV-Taste 3. Tasten Programm aufwärts/ abwärts 4. Tasten Lautstärke +/Hinweis: Drücken Sie die Tasten ” und “ ” gleichzeitig, “ um das Hauptmenü anzuzeigen. 1 2 Ansicht der Anschlüsse – Anschlüsse an der Rückseite VGA SPDIF Coax.OUT SCART 1. HDMI 2: HDMI-Eingang 2. HDMI 1: Der HDMI-Eingang dient zum Anschluss eines Geräts mit einer HDMI-Buchse.
Ansicht der Anschlüsse – Anschlüsse an der Seite 1. Der CI-Steckplatz dient zum Einsetzen einer CI-Karte. Mit einer CI-Karte können Sie alle Kanäle sehen, die Sie abonniert haben. Weitere Informationen finden Sie im Abschnitt “Conditional Access”. 2. Seitlicher USB-Eingang. 3. Die Component Video-Eingänge (YPbPr) werden zum Anschließen von Component Video verwendet. Sie können hier ein Gerät anschließen, das über Component-Ausgänge verfügt.
Verwendung der USB-Eingänge USB-Anschluss Über die USB-Eingänge am TV-Gerät können Sie eine USB-Festplatte oder einen USB-Speicherstick an das TV-Gerät anschließen. Mit dieser Funktion können Sie auf einem USB-Laufwerk gespeicherte Dateien wiedergeben oder Programme darauf aufnehmen. Hinweis: Beim Formatieren von USB-Festplatten mit 1 TB (Terabyte) Speicher oder mehr können unter Umständen Probleme auftreten. Formatieren Sie die Festplatte in diesem Fall über einen PC.
• Aufnahmen von HD-Programmen benötigen je nach der Auflösung der Sendung mehr Speicherplatz auf der USB-Festplatte. Aus diesem Grund empfehlen wir, für die Aufnahme von HD-Programmen stets USB-Festplattenlaufwerke zu verwenden. • Trennen Sie während der Aufnahme die USB-HDD nicht vom Gerät ab. Dies könnte die USB-HDD beschädigen. • Auch mehrere Partitionen werden unterstützt. Maximal zwei Partitionen werden unterstützt. Wenn die Festplatte mehr als zwei Partitionen hat, kann es zu Systemabstürzen kommen.
• Wenn der Anschluss hergestellt ist, schalten Sie auf die Quelle YPbPr. Siehe dazu den Abschnitt Eingangsauswahl. Hinweis: Zum Anschließen eines YPbPr-Geräts verwenden Sie bitte das mitgelieferte Component(YPbPr)-Kabel. 1 2 • Sie können den Anschluss auch über den SCARTEingang vornehmen. VGA SPDIF Coax.OUT SCART Verwendung der seitlichen Anschlüsse Mit den seitlichen Anschlüssen können Sie eine Reihe von Zusatzgeräten an Ihr LCD-TV anschließen.
Ein-/Ausschalten Einschalten des TV-Geräts Schließen Sie das Netzkabel an ein 220-240V ACNetz mit 50 Hz an. • Bringen Sie den Schalter ”rechts unter dem Bildschirm in die Position “|”, und das Gerät schaltet automatisch in den Standby-Modus. Die StandbyLED leuchtet auf.
Ansicht des Hauptmenüs • Drücken Sie die Tasten “ ”/ “ ” gleichzeitig, um das Hauptmenü anzuzeigen. Wählen Sie im Hauptmenü über die Taste “AV” ein Untermenü aus und öffnen Sie dieses Untermenü über die Tasten “ ” oder “ ”. Informationen über die Benutzung der Menüs finden Sie im Abschnitt Menüsystem. AV-Modus • Drücken Sie mehrmals die Taste “ AV” im Bedienfeld am TV-Gerät, um zwischen den AVModi umzuschalten.
Taste Rot (Vorherg.Zeitabschnitt): Zeigt die Programme des vorhergehenden Zeitabschnitts an. Taste Grün (Nächster Zeitabschnitt): Zeigt die Programme des nächsten Zeitabschnitts an. Taste Gelb (Vorherg. Tag): Zeigt die Programme des vorigen Tages an. Taste Blau (Nächster Tag): Zeigt die Programme des nächsten Tages an. Zifferntasten (Springen): Mit den Zifferntasten können Sie direkt zu den entsprechenden Kanälen springen. SWAP (Jetzt): Zeigt das aktuelle Programm an.
Erste Installation WICHTIG: Stellen Sie sicher, dass die Antenne angeschlossen ist, bevor Sie das TV-Gerät für die erste Installation einschalten. • Wird das TV-Gerät zum ersten Mal eingeschaltet, führt der Installationsassistent Sie durch den Vorgang. Zuerst wird der Bildschirm zur Länderauswahl angezeigt: Kanal auswählen (Select Channel) Mit dieser Option können Sie im EPG-Menü zum gewählten Kanal umschalten.
• Sie können den Speicher-Modus mit der Taste “ ” oder “ ” aktivieren. Ist der Speichermodus auf „Aktivert“ eingestellt, wird im Menü „Andere Einstellungen“ die Option E-Pop zur Verfügung gestellt. Wenn der Speicher-Modus auf „Deaktiviert“ eingestellt wird, wird der Speicher-Modus nach der Erstinstallation nicht mehr verfügbar sein. Hinweis: Ist der Speicher -Modus aktiviert, können einige TV-Eigenschaften beeintächtigt werden. • Drücken Sie die Taste OK auf der Fernbedienung, um fortzufahren.
Installation Manuelle Einstellung Drücken Sie die Taste “MENU” auf der Fernbedienung und wählen Sie mit der Taste ” oder “ ” die Option Installation. Drücken Sie die Taste OK und der folgende Menübildschirm wird angezeigt. TIPP: Diese Funktion wird zur direkten Eingabe von Sendern verwendet. • Wählen Sie mit den Tasten“ ”/“ und OK die Option Manuelle Kanalsuche aus dem Installationsmenü. Der Bildschirm mit den Optionen für die Manuelle Suche wird eingeblendet.
Suchtyps Digital Kabel, können Sie die gewünschte Option einstellen und die OK-Taste drücken, um die Suche zu starten. (*) Wenn Sie in der Erstinstallation als Land die Niederlande gewählt haben, wird die Option manuelle Kabel Suche nicht verfügbar sein. Manuelle Analoge Suche Die Select Active Network Funktion gibt Ihnen die Möglichkeit, nur die Broadcast im gewählten Netzwerk zu wählen. Wählen Sie Kanalliste bearbeiten, um alle gespeicherten Kanäle zu verwalten.
Kanäle verschieben • Wählen Sie zuerst den gewünschten Kanal. Wählen Sie die Option Verschieben in der Kanalliste und drücken Sie die Taste OK. • Der Bildschirm Nummer bearbeiten wird angezeigt. Geben Sie die gewünschte Kanalnummer über die Zifferntasten der Fernbedienung ein. Ist bereits ein Kanal unter dieser Nummer gespeichert, wird eine Warnmeldung eingeblendet. Wählen Sie Ja, wenn Sie den Kanal verschieben wollen, und drücken Sie OK.
Sender verwalten: Kanalliste sortieren Sie können die Sender auswählen, die in der Kanalliste aufgelistet werden. Um bestimmte Sendertypen anzuzeigen, sollten Sie die Einstellung Aktive Kanalliste verwenden. Wählen Sie die Option Aktive Kanalliste mit den Tasten “ ” oder “ aus dem Kanallistenmenü. Drücken Sie die Taste OK, um fortzusetzen. Hinweis: Wenn die Option Land auf Frankreich eingestellt ist, können Sie 4725 als Standardcode verwenden.
Springen (Zifferntasten): Das TV-Gerät springt zur Datei, deren Namen mit dem über die Zifferntasten auf der Fernbedienung eingegebenen Buchstaben beginnt. Aktuelle Datei (Taste OK): Gibt die ausgewählte Datei wieder. Videos über den USB anschauen Wenn Sie Fotos aus den Hauptoptionen wählen, werden die verfügbaren Bilddateien gefiltert und am Bildschirm aufgelistet. Auf / Ab: Navigieren Wiedergabe ( Taste): gibt alle Mediendateien im Ordner beginnend mit der ausgewählten Datei wieder.
Musik über USB wiedergeben Wenn Sie Musik aus den Hauptoptionen wählen, werden die verfügbaren Audiodateien gefiltert und am Bildschirm aufgelistet. 0..9 (Zifferntasten): Das TV-Gerät springt zur Datei, deren Namen mit dem über die Zifferntasten auf der Fernbedienung eingegebenen Buchstaben beginnt. Aktuelle Datei (Taste OK): Gibt die ausgewählte Datei wieder. Vorige/Nächste (Tasten Links/Rechts) : Springt zur vorhergehenden oder nächsten Datei und gibt diese wieder. GELB: Wechselt den Anzeigestil.
INFO (Details): zeigt die erweiterte Kurzbeschreibung im Detail an. Medienbrowser-Einstellungen Verwenden Sie die Tasten / (PREVIOUS/ NEXT), um in der Timeshift-Wiedergabe nach vor oder zurück zu gehen. Ist das Ende der TimeshiftWiedergabe erreicht, wird der Timeshift-Modus verlassen, und Sie kehren zur normalen Programmansicht zurück. Drücken Sie die Taste( Modus zu verlassen. (STOP), um den Timeshift- (*) Die Dauer der max.
Drücken Sie die Taste (STOP), um die Sofortaufnahme zu stoppen. Die folgende OSDMeldung wird eingeblendet • Fortsetzen: setzt die Aufnahme fort Wiedergabe ab Zeitpunkt: gibt einen bestimmten Wiedergabepunkt an. Hinweis: Während der Wiedergabe ist das Ansehen des Hauptmenüs und der Menüoptionen nicht möglich. Wählen Sie mit den Tasten ” oder “ / OK Ja aus, um die Sofortaufnahme abzubrechen. Hinweis: Während der Aufnahme können Sie nicht den Sender oder die Quelle wechseln oder den Medienbrowser aufrufen.
Untertitel Kino Mit dieser Funktion wird ein breites Bild (Bildseitenformat von 16:9) mit Untertiteln auf volle Bildschirmgröße gezoomt. Mit dieser Funktion wird ein breites Bild (Bildseitenformat von 16:9) auf volle Bildschirmgröße gezoomt. Hinweis: Sie können den Bildschirminhalt nach oben oder unten verschieben, indem Sie die Tasten “ ”/“ udrücken, während als Bildformat Panorama, 14:9, Kino oder Untertitel ausgewählt ist.
Energiesparmodus: Wählen Sie die Option Energiesparmodus mit den Tasten “ ” oder “ ” aus. Drücken Sie die Taste “ ” oder “ ”, um den Energiesparmodus auf Ökö, Bild-Aus oder Deaktiviert einzustellen. Weitere Informationen zum Energiesparmodus finden Sie im Abschnitt “Umweltinformation” in diesem Handbuch. Hintergrundbeleuchtung (optional) Diese Einstellung steuert die Hintergrundbeleuchtung. Sie kann auf Auto, Maximal, Minimal und Mittel eingestellt werden.
Phase: Abhängig von der Auflösung und Abtastfrequenz, die Sie in das TV-Gerät einspeisen, kann es zu einem schmutzigen oder gestörten Bild auf dem Bildschirm kommen. In diesem Fall können Sie mit dieser Option durch mehrmalige Versuche ein klareres Bild erhalten. Konfiguration der Klangeinstellungen Hinweis: Die Einstellungen des Menüs Equalizer können nur dann geändert werden, wenn Benutzer als der Equalizermodus eingestellt ist.
• Drücken Sie die Taste OK, um eine Option auszuwählen. • Drücken Sie die Taste “MENU”, um abzubrechen. Optionen des Menüs Einstellungen Conditional Access: Einstellen der CA-Module, sofern vorhanden. Sprache: Legt die Spracheinstellungen fest. Jugendschutz: Legt die Jugendschutzeinstellungen fest. Timer: Legt die Timer für gewählte Programme fest. Datum/Zeit: Stellt Datum und Zeit ein. Quellen: Aktiviert oder deaktiviert die gewünschten Quellenoptionen.
Hinweis: Wenn die Option Land auf Dänemark, Schweden, Norwegen, Niederlande oder Finnland eingestellt ist, funktioniert das Menü Spracheinstellungen wie folgt: Spracheinstellungen (Language Settings) Jugendschutz Um das Ansehen bestimmter Programme zu verhindern, können Kanäle und Menüs mit der Jugendschutzoption gesperrt werden. Diese Funktion aktiviert bzw. deaktiviert das MenüSchutzsystem und ermöglicht eine Änderung des PIN-Codes.
Kindersicherung (optional): Wenn Kindersicherung aktiviert wird, kann das TV-Gerät nur über die Fernbedienung gesteuert werden. In diesem Fall sind die Tasten am Bedienfeld des TV-Gerätes mit Ausnahme der Standby/Ein-Taste außer Funktion gesetzt. Ist die Kindersicherung aktiviert, können Sie das TV-Gerät mit der Taste Standby/Ein in den Standby-Modus schalten. Um das TV-Gerät wieder einzuschalten, benötigen Sie die Fernbedienung.
Aufnahmeeinstellungen Um die Aufnahmeeinstellungen festzulegen, wählen Sie die Option Aufnahmeeinstellungen im Menü Einstellungen. Zur Konfiguration der Aufnahmen wird das folgende Menü eingeblendet. Hinweis: Wenn die Option Land auf Frankreich eingestellt ist, können Sie 4725 als Standardcode verwenden. Nach Eingabe des PINs erscheint ein Popup-Menü und fragt, ob die Festplatte wirklich formatiert werden soll. Um die Festplatte zu formatieren, wählen Sie “JA” und drücken Sie die Taste OK.
Wenn Sie in der Erstinstallation als Land die Niederlande gewählt haben, können die Datum-/Zeit-Einstellungen nicht geändert werden. • Die Einstellungen werden automatisch gespeichert. Drücken Sie “MENU”, um abzubrechen.. Konfiguration der Quelleneinstellungen Andere Einstellungen konfigurieren Um die allgemeinen Einstellungen anzuzeigen, wählen Sie im Menü Einstellungen die Option Andere Einstellungen und drücken Sie OK. Hier können Sie die gewählten Quellenoptionen aktivieren oder deaktivieren.
Sie können durch Einstellen der Option Automatische Suche die automatische Aktualisierung aktivieren oder deaktivieren. E-Pop : Wenn Sie den E-pop auf “Aktiviert” stellen, werden die TV-Funktionen oben auf dem Bildschirm dargestellt. Mit Suche nach Upgrade können Sie manuell nach neuer Software suchen. Um diese Funktion zu deaktivieren, wählen Sie bitte “Deaktiviert”. Anwendungsversion: Zeigt die aktuelle SoftwareVersion an.
“INFO” - Anzeigen Zeigt verborgene Informationen an (z. B. Lösungen von Rätseln oder Spielen). “OK” Halten Hält falls gewünscht eine Seite an. Um die Haltefunktion aufzuheben, nochmals diese Taste drücken. “ ”/“ ” Unterseiten Wählt Unterseiten aus (sofern verfügbar), wenn der Teletext aktiv ist. P+ / P- und Ziffern (0-9) Zum Auswählen einer Seite drücken. Hinweis: Die meisten TV-Sender verwenden die Seitennummer 100 für die Indexseite.
Anhang A: PC-Eingang – typische Anzeigemodi Das Anzeigegerät hat eine maximale Auflösung von 1366 x 768. Die folgende Tabelle stellt einige der üblichen Videoanzeigemodi dar. Abweichende Auflösungen werden eventuell nicht von Ihrem Fernsehgerät unterstützt. Die unterstützten Auflösungsmodi werden nachstehend aufgelistet. Wenn Ihr PC in einem nicht unterstützten Modus arbeitet, wird eine Warnmeldung auf dem Bildschirm angezeigt.
Anhang C: Unterstützte DVI-Auflösungen Wenn Sie Zusatzgeräte über DVI-zu-HDMI-Kabel (nicht mitgeliefert) mit den Anschlüssen Ihres Fernsehgerätes verbinden, können Sie sich an die folgenden Auflösungsinformationen halten: Index Auflösung 1 640 x 400 Frequenz 70 Hz 2 640 x 480 60 Hz / 66 Hz / 72 Hz / 75 Hz 3 800 x 600 56 Hz / 60 Hz / 70 Hz / 72 Hz / 75 Hz 4 832 x 624 75 Hz 5 1024 x 768 60 Hz / 66 Hz / 70 Hz / 72 Hz / 75 Hz 6 1152 x 864 60 Hz / 70 Hz / 75 Hz 7 1152 x 870 75 Hz 8 1280
Anhang D: Im USB-Modus unterstützte Dateiformate Medium Format Dateierweiterung .mpg, .mpeg Video MPEG1, 2 .dat MPEG1, 2 .vob MPEG2 .mkv H.264, MPEG1,2,4 Audio MPEG Layer 1/2/3 Hinweise (Max. Auflösung / Bitrate etc.) MPEG2 EAC3 / AC3 MAX 1920x1080 @ 30P 20Mbit/sek. MPEG4, Xvid 1.00, .mp4 Film .avi Xvid 1.01, Xvid 1.02, Xvid 1.03, Xvid 1.10beta1/2 H.264 PCM/MP3 MPEG2, MPEG4 PCM/MP3 Xvid 1.00, Xvid 1.01, Xvid 1.02, Xvid 1.03, Xvid 1.10-beta1/2 H.264 PCM .avi, Divx 3.11, Divx 4.Divx .
Anhang E: Softwareaktualisierung • Ihr TV-Gerät kann neue Software-Upgrades über das Internet oder über TV-Übertragungskanäle finden und installieren. Bei der Suche über TV-Übertragungskanäle durchsucht das TV-Gerät die in den Einstellungen gespeicherten Kanäle. Vor der Upgradesuche sollten daher alle verfügbaren Kanäle eingestellt und aktualisiert werden. 1) Softwareupgrade-Suche über Benutzerschnittstelle Sie können eine manuelle Suche nach neuen Softwareupgrades für Ihr TV-Gerät durchführen.
Digitaler Empfang (DVB-C) Technische Daten TV-ÜBERTRAGUNG Übertragungsnormen: PAL/SECAM B/G D/K K’ I/I’ L/L’ DVB-C, MPEG2, DVB-C, MPEG4 EMPFANGSKANÄLE i. DEMODULATION VHF (BAND I/III) -Symbolrate: 4.0 Msymbole/s bis 7.2 Msymbole/s UHF (BAND U) HYPERBAND -Modulation: 16-QAM , 32-QAM ,64-QAM, 128-QAM und 256-QAM ANZAHL DER VOREINGESTELLTEN KANÄLE ii. VIDEO 1000 Alle MPEG2 MP@ML-Formate mit Aufwärtskonvertierung und Filterung auf CCIR601Format.
Maßzeichnungen 490 522 773 Deutsch - 85 - A02_MB62_[DE]_1910UK_IDTV_TC_PVR_NICKEL17_32942LED_ROCKER_ZIGGO_10075634_50219198.indd 85 28.03.
Entsorgung am Ende der Lebensdauer A. Informationen zur Entsorgung für Endbenutzer (Privathaushalte) 1. In der Europäischen Union Achtung: Wenn Sie dieses Produkt entsorgen wollen, geben Sie es bitte nicht in den normalen Müll! Elektrische und elektronische Altgeräte müssen separat in Übereinstimmung mit den gesetzlichen Vorschriften gesammelt, behandelt und der Wiederverwertung zugeführt werden.
Montage des Standfußes WICHTIG Bitte lesen Sie die folgenden Informationen aufmerksam durch, bevor Sie den Standfuß Ihres neuen TV-Geräts von Sharp montieren. Montage des Standfußes ! Stellen Sie vor der Montage sicher, dass das TV-Gerät von der Spannungsquelle getrennt ist. ! Legen Sie das Sharp-TV (1) mit der Bildschirmseite nach unten auf eine weiche, stabile und ebene Oberfläche. ! Positionieren Sie den Standfuß (3) auf der markierten Stelle auf der Rückseite des TV-Geräts.
Demontage des Standfußes WICHTIG Bitte lesen Sie die folgenden Informationen aufmerksam durch, bevor Sie den Standfuß Ihres neuen TV-Geräts von Sharp demontieren. Demontage des Standfußes ! Stellen Sie vor der Demontage sicher, dass das TV-Gerät von der Spannungsquelle getrennt ist. ! Legen Sie das Sharp-TV mit der Bildschirmseite nach unten auf eine weiche, stabile und ebene Oberfläche.
Schraubenabmessungen L D Modell D L Artikel-Nr. Ø4 30 8 M4 18 4 LC-32LE140E VESA Verwendung der Schraube An der Wand 200 x 100 (W x H) Am Produkt Deutsch - 89 - A02_MB62_[DE]_1910UK_IDTV_TC_PVR_NICKEL17_32942LED_ROCKER_ZIGGO_10075634_50219198.indd 89 28.03.
Table des matières Fonctions .............................................................. 92 Cher/Chère client(e) SHARP ................................ 92 Introduction ........................................................... 92 Préparation ........................................................... 92 Précautions de sécurité importantes .................... 93 Précautions de sécurité ........................................ 94 Contenu du carton ................................................
REMARQUE IMPORTANTE À L’ATTENTION DES UTILISATEURS DU RU Le câble secteur du présent produit est doté d’une fiche non démontable (moulée) intégrant un fusible de 5A. or même intensité nominale que Si le fusible doit être remplacé, assurez-vous que le fusible neuf a la celle indiquée ci-dessus et est approuvé par ASTA ou BSI (conforme à la norme BS1362). ASA Toujours remonter le couvercle du fusible. N’utilisez jamais le cordon indépendamment du fusible.
Cher/Chère client(e) SHARP Fonctions • Télévision LCD couleur avec télécommande. • Téléviseur câble numérique entièrement intégré (DVB-T-C - MPEG2) (DVB-T-C - MPEG4). • Prise HDMI pour vidéo et audio numériques. Ce branchement est également conçu pour accepter des signaux haute définition. • Entrée USB. • Enregistrement de programmes • Décalage de programmes • 1000 programmes (analogiques+numériques). • Menu de paramétrage OSD. • Tuner DVB-T-C HD intégré, compatible avec MPEG 2 / MPEG 4.
Précautions de sécurité importantes • Nettoyage—Débranchez le cordon secteur de la prise électrique avant de nettoyer l’appareil. Utilisez un chiffon mouillé pour le nettoyer. N’utilisez pas de produits nettoyant liquides ou en aérosols. • Utilisez un chiffon doux et humide pour essuyer délicatement le panneau s’il est sale. Pour préserver le panneau, n’utilisez pas de chiffon abrasif pour le nettoyer. Les produits chimiques pourraient endommager ou fissurer le coffret du téléviseur.
Précautions de sécurité Lisez les consignes de sécurité recommandées ci-après pour votre sécurité. Source d’alimentation Cet appareil fonctionne avec une prise 220-240V CA, 50 Hz. Assurez-vous de sélectionner la tension appropriée pour votre convenance. Cordon d’alimentation Ne placez pas l’appareil, ni une pièce de mobilier, etc. sur le cordon d’alimentation (alimentation secteur); évitez tout pincement du cordon. Tenez le cordon d’alimentation par sa fiche.
Volume du casque Une pression sonore excessive provenant des écouteurs et du casque peut provoquer une perte auditive. Installation Pour éviter toute blessure, cet appareil doit être solidement fixé au mur conformément aux instructions d’installation lors d’un montage mural (si l’option est disponible). Écran LCD L’écran LCD est un produit de très haute technologie avec un film fin d’environ un million de transistors, vous offrant des détails d’image raffinés.
Contenu du carton Informations à caractère environnemental • Ce téléviseur a été fabriqué dans l’intention de consommer moins d’énergie afin de protéger l’environnement. SLEEP SCREEN FAV LANG. Grâce à l’option d’économie d’énergie offerte par le présent téléviseur, vous avez la possibilité non seulement de préserver l’environnement, mais aussi et surtout de réaliser des économies sur votre facture de consommation électrique.
Boutons de la télécommande 1. Veille 2. Taille de l’image / Zooms vidéos (En mode vidéo du navigateur média) 3. Minuteur de mise en veille 4. Mono/Stéréo - Dual I-II / Langue en cours (*) (dans les chaînes DVB) SLEEP SCREEN FAV LANG. PRESETS 5. Les chaînes favorites 6. Touches numériques 7. Guide électronique de programme (dans les chaînes DVB) 8. Aucune fonction 9. Navigateur média EPG SWAP 10. Touches de navigation (Haut/Bas/Gauche/Droite) 11. Aucune fonction SOURCE 12.
TV LCD et boutons de commande VUE AVANT et ARRIÈRE AFFICHAGE des boutons de commande Boutons de contrôle 1. Bouton de mise en veille (Standby) 2. Bouton TV/AV 3. Boutons programme haut/bas 4. Boutons de volume haut/bas ” / “ ” Remarque : Pressez “ les boutons simultanément pour afficher le menu principal. 1 2 Affichage des branchements – Connecteurs arrière VGA SPDIF Coax.OUT SCART 1. HDMI 2: Entrée HDMI 2.
Affichage des branchements - Connecteurs latéraux 1. La fente CI sert à insérer une carte CI. Une carte CI vous permet de regarder toutes les chaînes auxquelles vous êtes abonné(e). Pour plus d’informations, référez-vous à la section « Accès conditionnel ». 2. Entrée USB latérale. 5Vdc Max:500mA YPbPr 3. L’entrée vidéo en composante (YPbPr) est utilisée pour connecter une vidéo en composante.
Utilisation des entrées USB Branchement de l’USB • Vous pouvez connecter un lecteur de disque dur USB ou une carte mémoire USB à votre téléviseur grâce aux entrées USB du téléviseur. Cette option vous donne la possibilité de lire des fichiers mémorisés dans un disque USB ou d’enregistrer les programmes. Remarque: Pendant le formatage d’un disque dur USB d’une capacité de 1TO (Tera Octet), il peut arriver que vous soyez confronté à certains problèmes au cours du processus de formatage.
• Le décalage temporel peut être interrompu selon la vitesse d’écriture du périphérique USB. Si la vitesse du périphérique USB n’est pas suffisante pour le bitrate du flux vidéo, le décalage temporel peut être interrompu et l’enregistrement pourrait échouer. Si le bitrate du service HD est supérieur à 13 Mbp/sec, le phénomène de gel peut être enregistré pendant le décalage temporel aussi bien sur le disque USB que sur le disque dur externe.
• Une fois le branchement effectué, passez en source YPbPr. Voir la section Sélection d’entrée . Remarque: Pour brancher le périphérique YPbPr, vous devez utiliser le câble de connexion (YPbPr) du composant fourni. 1 2 • Vous pouvez également brancher à travers le PERITEL. VGA SPDIF Coax.OUT SCART Utilisation des connecteurs AV latéraux Vous avez la possibilité de brancher une série d’appareils à votre téléviseur LCD à l’aide de ses connecteurs latéraux.
Mise sous/hors tension Mise sous tension du téléviseur tension. Sélectionnez NON pour annuler. Le téléviseur s’éteindra aussi si vous n’effectuez aucune sélection sur cet écran. Branchez le cordon d’alimentation à une prise de courant alternatif 220-240V AC 50 Hz. • Faites basculer la touche “ ” du côté droit inférieur du bas de l’écran vers la position “|” de sorte que le téléviseur bascule en mode de veille. Le TÉMOIN de mise en veille s’allume.
Affichage du menu précédent • Appuyez parallèlement sur les touches “ ”/“ ” pour afficher le menu principal. Dans le menu principal, sélectionnez le sous-menu à l’aide des touches “P/CH -” ou “P/CH +”, et ouvrez le sous-menu en utilisant les boutons “ ” ou “ ”. Pour en savoir davantage concernant l’utilisation des menus, reportez-vous aux sections du système du menu. Mode AV • Appuyez sur la touche “TV/AV” qui figure sur le panneau de contrôle du téléviseur pour passer aux modes AV.
HAUT/BAS/GAUCHE/DROIT: Parcourir Touche Rouge (Intervalle de temps précédent): affiche les programmes du jour précédent. ÉCHANGER (Maintenant) : Affiche le programme en cours. Télétexte numérique (*) Touche verte (Intervalle de temps suivant): Affiche les programmes de l’intervalle de temps suivant. (*) Si disponible dans votre pays Bouton Jaune (Jour précédent): affiche les programmes du jour précédent. • L’information du télétexte numérique apparaît.
Première installation IMPORTANT: Assurez-vous que l’antenne est branchée avant d’allumer le téléviseur pour la première fois. • Lorsque vous allumez votre téléviseur pour la première fois, un assistant d’installation vous guidera tout au long du processus. Tout d’abord, l’écran de sélection de langue s’affichera : Sélectionner une chaîne Dans le menu EPO, grâce à cette option, vous pouvez passer à la chaîne sélectionnée.
chaînes codées. Ensuite, sélectionnez la langue de télétexte de votre choix. • Vous pouvez activer l’option du mode magasin en vous servant du bouton “ ” ou “ ”. Si le mode magasin est défini sur “Activé”, l’option E-Pop sera disponible dans le menu des autres réglages. S’il est en revanche défini sur “Désactivé”, le mode magasin ne sera pas disponible après la première installation. Remarque: Si le mode magasin est activé, certaines fonctionnalités peuvent en être affectées.
Installation Réglage manuel Appuyez sur la touche « MENU » de la télécommande et sélectionnez l’option Installation à partir de la touche “ ” ou “ ” Appuyez sur la touche OK pour afficher l’écran de menu suivant: Sélectionnez l’option « Automatic Channel Scan (Retune)” (Balayage de chaînes automatique (nouveau réglage)) en appuyant sur la touche “ ” ou “ ” et sur OK. Les options de recherche automatique de chaînes (Nouveau réglage) s’afficheront.
Dans la recherche manuelle de chaînes câblées, vous pouvez saisir une fréquence, une modulation, un débit symbole, et une recherche de chaînes réseau. Après avoir sélectionné l’option Câble numérique comme type de recherche, vous pouvez définir les options souhaitées et appuyer sur la touche OK pour effectuer la recherche. Le téléviseur trie toutes les stations mémorisées dans la liste des chaînes.
Les chaînes présentées peuvent également être triées grâce au filtre de la liste des chaînes actives. Le numéro de la dernière chaîne disponible est 999. • Sélectionnez la chaîne à verrouiller et choisissez l’option Lock (Verrouiller). Appuyez sur la touche OK pour continuer. Si vous avez sélectionné l’option de pays Hollande au cours de la première installation, effectué la recherche du réseau Ziggo et mémorisé les chaînes Ziggo, seules les options OK et LOCK (VERROUILLAGE) seront disponibles.
Gestion des chaînes : Trier une liste de chaînes Vous pouvez sélectionner les émissions à inclure dans la liste des chaînes. Pour afficher les types de diffusions spécifiques, vous devez utiliser l’option Active channel list (Liste de chaîne active). Sélectionnez Active channel list (Liste de chaînes actives) à partir du menu Channel list (Liste de chaînes) en utilisant le bouton “ ”/“ ”. Appuyez sur la touche OK pour continuer.
Sauter (Touches numériques): le téléviseur sélectionnera les fichiers en commençant par celui portant la lettre que vous avez saisie grâce aux touches numériques de la télécommande. Lire ceci (Touche OK) : Lit le fichier sélectionné. Affichage de photos via USB Lorsque vous sélectionnez Photos à partir des options principales, les fichiers d’image disponibles seront filtrés et présentés à l’écran.
Lire la musique via USB Lorsque vous sélectionnez Musique à partir des options principales, les fichiers audio disponibles seront filtrés et présentés à l’écran. Précédent/Suivant (Boutons Gauche/Droit) : Passe à la lecture du fichier précédent ou suivant. JAUNE: Bascule le style d’affichage. BLEU : Modifie le type de support.
Réglages du navigateur média • Utilisez les touches / (PRÉCÉDENT/ SUIVANT) pour avancer ou reculer la lecture décalée. Une fois le décalage atteint, vous quittez automatiquement le mode Décalage temporel et basculez en diffusion normale. • Appuyez sur la touche (STOP) pour quitter le mode de décalage temporel. Vous pouvez régler les préférences de votre navigateur média grâce à la boîte de dialogue Réglages.
Appuyez sur la touche (STOP) pour annuler l’enregistrement instantané. Le message ci-après s’affichera à l’écran : • Lire à partir du début: Lit l’enregistrement à partir du début. • Reprendre: Recommence les enregistrements. • Lire à partir d’ici: Spécifie un point de lecture. Remarque: L’affichage du menu principal et les rubriques du menu seront indisponibles pendant la lecture. Sélectionnez Oui en appuyant sur les touches “ ” ou “ ” / OK pour annuler l’enregistrement instantané.
Sous-titre Cinéma Ce mode agrandit l’image (format d’image 16:9) avec les sous-titres en plein écran. Ce mode agrandit l’image (format d’image 16:9 ) pour en faire un plein écran. Remarque: Vous pouvez passer à l’option Ecran Haut ou Bas en appuyant sur les touches “ ” / “ ” tandis que Zoom d’images est sélectionné ainsi qu’il suit: Panoramique, Zoom 14:9, Cinéma ou Sous-titres. 14:9 Ce mode agrandit l’image (format d’image 14:9) vers les limites supérieure et inférieure de l’écran.
Eléments du menu Réglages d’image Contraste: Règle les valeurs de l’éclairage et de l’obscurité de l’écran. • Mode Film (Facultatif): Les films sont enregistrés à un nombre d’images par seconde différent des programmes de télévision normaux. Pressez le bouton “ ” ou “ ” pour sélectionner Mode Film. Appuyez sur le bouton “ ” ou “ ” pour définir cette option sur Auto ou Désactivé. Définissez cette fonction sur Auto lorsque vous regardez des films afin de mieux visualiser les images accélérées.
Fréquence pilote: Les réglages de la fréquence pilote corrigent les interférences qui apparaissent comme des lignes verticales dans l’image pour des présentations telles que les feuilles de calcul, les paragraphes ou les textes dans des polices plus petites. Phase : Selon la résolution et la fréquence de balayage que vous saisissez pour le téléviseur, vous pouvez voir une image voilée ou bruitée à l’écran. Dans un tel cas vous pouvez utiliser cet élément pour obtenir une image claire par essais et erreurs.
Configuration des paramètres de votre téléviseur Utilisation du module d’accès conditionnel Les paramètres détaillés peuvent être configurés en fonction de vos préférences personnelles. IMPORTANT: Insérez ou effacez le module CI uniquement lorsque le téléviseur est ETEINT (SWITCHED OFF). Appuyez sur la touche « MENU » et sélectionnez l’icône Paramètres à l’aide de la touche “ ” ou “ ” Appuyez sur OK pour afficher le menu Settings (Paramètres).
Configuration des préférences linguistiques Paramètres linguistiques Vous pouvez faire fonctionner les paramètres linguistiques du téléviseur grâce à ce menu. Appuyez sur le bouton « MENU » et sélectionnez la cinquième icône en utilisant le bouton “ ” ou “ ” Appuyez sur OK pour afficher le menu Settings (Paramètres). Utilisez le bouton “ ” ou “ ” pour sélectionner Language (Langue) et appuyez sur OK pour continuer.
Paramétrage du code PIN: Définit un nouveau code PIN. Utilisez les boutons numériques pour saisir un nouveau mot de passe. Vous aurez à saisir votre nouveau mot de passe pour une deuxième fois afin de le confirmer. Pour afficher les options du menu de verrouillage, saisissez le code PIN. Le code PIN par défaut est 0000. Remarque: Si l’option Pays est définie sur France, vous pouvez utiliser 4725 comme code par défaut.
Durée: Affiche la durée entre l’heure de démarrage et l’heure de fin. (*) Disponible uniquement pour les options des pays de l’UE. Répétition: Règle une minuterie suivant les options ci-après : Une fois, Quotidien, ou Hebdomadaire. Utilisez le bouton “ ” ou “ ” pour sélectionner une option. Terminer ultérieurement (*) Modifier / Supprimer: Règle le changement/ supprime la permission. Lecture: Définit les permissions de lecture et les réglages parentaux.
Configurer le réglage Date/ Heure Sélectionnez Date/Time (Date/Heure) dans le menu Settings (Réglages) pour configurer les réglages Date/ Heure. Pressez le bouton OK. Configuration des paramètres source Vous pouvez activer ou désactiver les options source sélectionnées. Le téléviseur ne basculera pas vers les options de source désactivées quand vous appuyez sur le bouton « SOURCE ». • Utilisez le bouton “ ” ou “ ” pour sélectionner Date / Time (Heure).
Fonctionnement • Appuyez sur le bouton “ ” ou “ ” pour sélectionner une option. • Utilisez le bouton “ ” ou “ ” pour sélectionner une option. • Appuyez sur OK pour afficher un sous-menu. Temporisation du menu : Change la durée de temporisation des écrans de menu. Balayage des chaînes cryptées: Lorsque ce paramètre est activé, le processus de recherche localisera également les chaînes cryptées.
Autres Fonctions Télétexte Affichage des informations TV: Les informations relatives au numéro du programme, nom du programme, indicateur de son, heure, télétexte, type de chaîne, et résolution sont affichées à l’écran quand un nouveau programme est saisi ou lorsque le bouton “INFO” est pressé. Le télétexte transmet des informations portant sur l’actualité, le sport et la météo sur votre téléviseur.
Conseils Entretien de l’écran : Nettoyez l’écran avec un chiffon doux légèrement humecté. N’utilisez pas de solvants abrasifs parce qu’ils peuvent endommager la couche de revêtement de l’écran du téléviseur. Pour votre sécurité, débranchez la prise d’alimentation lors du nettoyage du poste. Quand vous déplacez le téléviseur, tenez-le de façon appropriée par le bas. Persistance d’image: Veuillez remarquer que des images fantômes peuvent s’afficher en même temps qu’une image persistante.
Annexe A : Modes d’affichage typiques d’une entrée de PC L’écran dispose d’une résolution maximale de 1366 x 768. Le tableau suivant illustre certains modes d’affichage vidéo typiques. Votre téléviseur ne peut pas prendre en charge différentes résolutions. Les modes de résolution pris en charge figurent sur la liste ci-dessous. Si vous faites passer votre PC à un mode non pris en charge, un message d’avertissement apparaît à l’écran.
Annexe C: Résolutions DVI prises en charge Reportez-vous aux résolutions suivantes au moment de raccorder les connecteurs à votre téléviseur à l’aide des câbles DVI à HDMI (non fournis).
Annexe D : Formats de fichier pris en charge pour le mode USB Média Format Extension de fichier .mpg, .mpeg Vidéo MPEG1, 2 .dat MPEG1, 2 .vob MPEG2 .mkv Remarques Audio : (Résolution maximale/Débit binaire, etc.) MPEG Layer 1/2/3 MPEG2 H.264, MPEG1,2,4 EAC3 / AC3 MAX 1920x1080 @ 30P 20Mbit/sec MPEG4, Xvid 1.00, .mp4 Xvid 1.01, Xvid 1.02, Xvid 1.03, Xvid 1.10beta1/2 H.264 PCM/MP3 MPEG2, MPEG4 PCM/MP3 .avi Xvid 1.00, Xvid 1.01, Xvid 1.02, Xvid 1.03, Xvid 1.10-beta1/2 H.264 PCM Lecture .
Annexe E: Mise à jour du logiciel • Votre téléviseur a la possibilité de rechercher et d’effectuer la mise à jour de nouveaux logiciels sur les chaînes de télévision. • Pour rechercher les chaînes de diffusion, le téléviseur cherche les chaînes disponibles mémorisées dans vos paramètres. Avant toute recherche de mise à jour de logiciel donc, il est conseillé d’effectuer une recherche automatique et d’effectuer la mise à jour de toutes les chaînes disponibles.
Réception numérique (DVB-C) Spécifications TÉLÉDIFFUSION Normes de transmission : PAL/SECAM B/G D/K K’ I/I’ L/L’ DVB-C, MPEG2, DVB-C, MPEG4 RÉCEPTION DE CANAUX i. DÉMODULATION VHF (BANDE I/III) -Débit symbole: 4.0 Msymbols/s à 7.2 Msymbols/s UHF (BANDE U) -Modulation: 16-QAM , 32-QAM ,64-QAM, 128-QAM et 256-QAM HYPERBANDE ii. VIDÉO NOMBRE DE CANAUX PRÉRÉGLÉS - Tous les formats MPEG2 MP à ML avec conversion ascendante et filtrage vers le format CCIR601.
Dessins dimensionnels 490 522 773 Français - 132 - A03_MB62_[FR]_1910UK_IDTV_TC_PVR_NICKEL17_32942LED_ROCKER_ZIGGO_10075634_50219198.indd 132 28.03.
Mise au rebut A. Informations sur la mise au rebut à l'intention des utilisateurs privés (ménages) 1. Au sein de l'Union européenne Attention: Si vous souhaitez mettre cet appareil au rebut, ne le jetez pas dans une poubelle ordinaire ! Les appareils électriques et électroniques usagés doivent être traités séparément et conformément aux lois en vigueur en matière de traitement, de récupération et de recyclage adéquats de ces appareils.
Installation du support IMPORTANT Veuillez lire attentivement les informations suivantes avant de fixer le support à votre nouveau téléviseur de marque Sharp. Installation du support ! Avant de fixer le support, veiller à ce que le téléviseur soit débranché de sa source d'alimentation. ! Installez le téléviseur Sharp (1) sur une surface douce, stable, et plane, la partie avant orientée vers le bas. ! Installez le support (3) sur le modèle de montage du support à l'arrière du téléviseur.
Désinstallation du support IMPORTANT Veuillez lire attentivement les informations suivantes avant de démonter le support de votre nouveau téléviseur de marque Sharp. Désinstallation du support ! Avant de démonter le support, veiller à ce que le téléviseur soit débranché de sa source d'alimentation. ! Installez le téléviseur Sharp sur une surface douce, stable, et plane, la partie avant orientée vers le bas.
Dimensions des vis L D Modèle D L Numéro de l’article Ø4 30 8 LC-32LE140E VESA Installation de la vis Sur le mur 200 x 100 (W x H) M4 18 4 Sur le produit Français - 136 - A03_MB62_[FR]_1910UK_IDTV_TC_PVR_NICKEL17_32942LED_ROCKER_ZIGGO_10075634_50219198.indd 136 28.03.