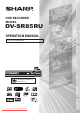
Before you start DV-SR85RU Connections DVD RECORDER MODEL Getting started OPERATION MANUAL Please read this Operation Manual carefully before using your DVD RECORDER. Recording Disc Playback PROG. DV-SR85 REV FWD STOP PLAY OPERATE OPEN/CLOSE REC MODE DVD-RW/-R DVD-RW -R RECORDER REC/OTR 5 The region number for this unit is 5. PULL OPEN Editing PROGRESSIVE SCAN Changing the Setup menu Others Downloaded From Disc-Player.
Before you start Precautions NOTE: This unit can be used only where the power supply is AC 220–240V ~ ± 10%, 50Hz ± 0.5%. It cannot be used elsewhere. CAUTION: USE OF CONTROLS OR ADJUSTMENTS OR PERFORMANCE OF PROCEDURES OTHER THAN THOSE SPECIFIED HEREIN MAY RESULT IN HAZARDOUS RADIATION EXPOSURE. AS THE LASER BEAM USED IN THIS UNIT IS HARMFUL TO THE EYES, DO NOT ATTEMPT TO DISASSEMBLE THE CABINET. REFER SERVICING TO QUALIFIED PERSONNEL ONLY.
Before you start Before you start Precautions (cont’d) Copyright Audio-visual material may consist of copyrighted works which must not be recorded without the authority of the owner of the copyright. Please refer to relevant laws in your country. Copy Protection Connections This unit supports Macrovision copy protection. On DVD discs that include a copy protection code, if the contents of the DVD disc are copied using a VCR, the copy protection code prevents the videotape copy from playing normally. U.
Before you start Precautions (cont’d) If There Is Noise Interference on the TV While a Broadcast Is Being Received Depending on the reception condition of the TV, interference may appear on the TV monitor while you watch a TV broadcast and the unit is left on. This is not a malfunction of the unit or the TV. To watch a TV broadcast, turn off the unit. Maintenance SERVICING 1. Please refer to relevant topics in the “Troubleshooting” on page 85 before returning the product. 2.
Before you start Before you start . . . . . . . . . . . . . . . . . . . . . . . . . . . . . . . 2 Connections . . . . . . . . . . . . . . . . . . . . . . . . . . . . . . . . . .13 Connecting to a TV. . . . . . . . . . . . . . . . . . . . . . . . . . . . . . . . . . . . .13 Connecting to external equipment. . . . . . . . . . . . . . . . . . . . . .14 Connecting to an Audio System. . . . . . . . . . . . . . . . . . . . . . . . .15 Getting started . . . . . . . . . . . . . . . . . . . . . . . . . . . . . . .
Before you start Features Recording The unit is compatible with DVD-RW discs, which are recordable repeatedly, and DVD-R discs, which are recordable only once. Recording up to 8 programmes: You can programme the unit to record up to 8 programmes, up to a month in advance. Daily or weekly programme recordings are also possible. One-touch Timer Recording: You can set your required recording end time easily.
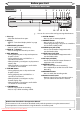
Before you start Front Panel 2 1 3* 4 PROG. DV-SR85 5 6 7 8* 9 REV FWD STOP PLAY OPERATE REC MODE Connections OPEN/CLOSE REC/OTR DV 15 Before you start Functional overview VIDEO L(MONO)-AUDIO-R 14 13 12 11 10 Editing Changing the Setup menu Others Button names described in the Operation Manual The instructions in this manual are described mainly with the operations using the remote control. Some operations can be carried out using the buttons on the front panel.
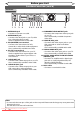
Before you start Functional overview (cont’d) Rear Panel S-VIDEO COMPONENT VIDEO OUTPUT IN AV2 (DECODER) OUT IN (AV3) AUDIO IN ANALOG (AV3) AUDIO OUT Y L L DIGITAL AUDIO OUTPUT PCM/BITSTREAM R R PB/CB OUT AV1 (TV) ANTENNA 1 2 3 4 PR/CR COAXIAL 5 6 7 8 9 10 1 ANTENNA IN jack • Connect to an antenna or cable. 2 ANTENNA OUT jack • Connect to the Aerial jack on your TV, cable box or direct broadcast system. Use the supplied Round Coaxial cable.
Before you start B g H F G C DVD RECORDER NB034 Editing Changing the Setup menu Others 9 Disc Playback EN Recording Downloaded From Disc-Player.com Sharp Manuals Getting started h • Press to change the bilingual audio source of an external equipment to “Main”, “Sub”, or “Main/Sub”. (Available only when the “External Input Audio” in the DVD setup menu is set to “Bilingual” in advance.) • Press to display the audio menu during playback. • Press to select the sound mode.
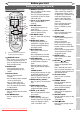
Before you start Functional overview (cont’d) Installing batteries in the remote control About the remote control Install two R6 (AA) size batteries (supplied) into the remote control, carefully match with the polarity indicated inside the battery compartment. • Make sure there is no obstacle between the remote control and the remote control sensor on the unit. • Use within the operating range and angle as shown. • The maximum operable range as follows: 1 PROG.
Before you start Before you start Functional overview (cont’d) Guide to On-Screen Displays DISPLAY menu 1 1 0:00:00 DVD-R Video mode P08 5 Each icon means: : Search : Audio : Subtitle : Angle (except VR mode) : Repeat : Marker : Noise Reduction Getting started 2 5 1 Disc type and format mode In some descriptions in this manual, only one type of disc is indicated as an example.
Before you start Functional overview (cont’d) 2 4 Front Panel Display Guide 1 3 6 5 1. Current Status of the unit : Appears when a DVD / DivX® is inserted into the unit, or when recording. : Appears when disc playback is paused. Appears also during step by step playback. : Appears when a DVD-RW disc is inserted into the unit. : Appears when playing back a disc. : Appears during slow forward or slow reverse playback.
Connections • Be sure to turn off the unit and equipment to be connected before connecting. • Read through the Operation Manual for the equipment to be connected. • Be sure to keep the unit connection cables separate from the TV antenna cable when you install the unit, because it may cause electrical interference when you are watching television programmes.
Connections Connecting to a TV (cont’d) Note • The unit is sending each video signals simultaneously. If you connected an S-VIDEO OUT and/or a COMPONENT VIDEO OUTPUT with the VIDEO OUT (SCART), make sure your TV’s input mode is set correctly according to the connection you made. • You will not be able to hear all of the sound being output by the unit if you use the Audio cables (commercially available) to a monaural TV that has only one Audio input jack.
Connections Playing 2 channel audio Connecting the unit to audio equipment provides normal stereo sound, plus powerful stereo sound enhanced by Dolby Digital 5.1 channel surround sound, DTS and MPEG audio.
Getting started Easy DVD recording The following will help you to understand easily how to record on DVD discs. Make sure batteries are in the remote control and you have connected this unit and the TV correctly. Step 1: Choose a disc type. Step 2: Insert a blank disc. There are several types of recordable DVD discs to choose from. Choose a recordable DVD disc type based on your playback / recording / editing needs.
Getting started Step 3: Select the recording mode. Step 4: Select the desired channel. Step 5: Record to DVD discs. TUV AUDIO PQRS 7 8 9 7 8 9 DISPLAY SPACE CLEAR SETUP DISPLAY SPACE CLEAR SETUP TOP MENU MENU/LIST RETURN ENTER TOP MENU MENU/LIST RETURN ENTER PQRS TUV WXYZ OPERATE WXYZ AUDIO Connections 0 Before you start Easy DVD recording (cont’d) 0 OPEN/CLOSE ZOOM TIMER PROG.
Getting started Initial setting Turn on this unit for the first time, you need to follow these steps. 1 Press [ OPERATE]. 2 4 OPERATE Press [ENTER] to start Channel Tuning. The unit will start getting channels available in your area. Turn the TV on. Select the input to which the unit is connected. “Начальная настройка (Initial Setting)” will automatically appear. P 1 A .@/: 01 OPEN/CLOSE ZOOM TIMER PROG.
Getting started Before you start Channel setting (cont’d) Manual Tuning Manually tune each channel. OPERATE 7 1 In stop mode, press [SETUP]. 3 Select “Manual Tuning” using [Cursor K / L], then press [ENTER]. Manual Tuning Position P01 Channel 2 Decoder OFF Skip ON 5 6 Select “Channel” using [Cursor K / L], then press [Cursor B]. 2 3 JKL MNO 4 5 6 PQRS TUV WXYZ 7 8 9 DISPLAY SPACE CLEAR SETUP TOP MENU MENU/LIST RETURN ENTER PROG.
Getting started Channel setting (cont’d) To select a channel Notes on using [the Number buttons]: • Enter channel numbers as a two-digit number for the quickest result. For example, to select channel 6, press [0] and [6]. If you only press [6], channel 6 will be selected after 2 seconds. You can only select channels 1 to 99. • You can select the external input mode “AV1”, “AV2”, “AV3” or “AV4”.
Getting started Before you start Setting the clock Clock Setting 5 In stop mode, press [SETUP]. Enter the date (day / month / year) using [Cursor K / L]. Press [Cursor B] to move the cursor to the next field. If you wish to go back to the previous field, press [Cursor {]. 2 Select “Clock” using [Cursor K / L], then press [ENTER]. 3 “Clock Setting” appears, then press [ENTER]. OPEN/CLOSE ZOOM TIMER PROG. A .@/: DEF 1 2 3 GHI JKL MNO 4 5 6 PQRS 6 ABC TUV PROG.
Getting started Selecting the On-Screen Display (OSD) language 1 4 In stop mode, press [SETUP]. Select the appropriate OSD language using [Cursor K / L], then press [ENTER]. 2 Select “Display” using [Cursor K / L], then press [ENTER]. OPERATE OPEN/CLOSE ZOOM TIMER PROG. A .@/: Press [SETUP] to exit. DEF 1 2 3 GHI JKL MNO 4 5 6 PQRS 5 ABC TUV PROG.
Recording Type of discs Logo DVD-RW Attributes Disc format Video mode Functions Playing back, Limited recording, Limited editing VR mode Playing back, Recording, Original / Playlist editing Video mode Playing back, Limited recording, Limited editing 4.
Recording Information on DVD recording (cont’d) ver.1.2/ x4 CPRM compatible After finalising • After DVD-R discs are finalised: - A Title menu is created automatically. - Undo finalising is not possible. - Additional recording or editing is not possible. • After DVD-RW (Video mode) discs are finalised: - A Title menu is created automatically. - Undo finalising is possible. (See page 38.) - Additional recording or editing is possible if you undo finalise. (See page 38.
Recording Before you start Formatting a disc Choosing the recording format of a brand-new DVD-RW disc 1 5 OPERATE A Select “Video mode” or “VR mode” using [Cursor K / L], then press [ENTER]. .@/: 6 Select “Disc” using [Cursor K / L], then press [ENTER]. Disc menu will appear. DEF 1 2 3 JKL MNO 4 5 6 TUV PROG. WXYZ AUDIO 7 8 9 DISPLAY SPACE CLEAR SETUP TOP MENU MENU/LIST RETURN ENTER 1 6 0 7 K { Insert a brand-new disc. Formatting will start.
Recording Formatting a disc (cont’d) Setting Auto Chapter 3 The unit inserts a chapter mark periodically (every 10 minutes by default) during recording. Using the Auto Chapter menu, you can set this function off or change the time period. OPERATE A Select “Auto Chapter” using [Cursor K / L], then press [ENTER]. .@/: Auto Chapter OFF ABC DEF 1 2 3 GHI JKL MNO 4 5 6 PQRS TUV WXYZ 7 8 9 DISPLAY SPACE CLEAR SETUP TOP MENU MENU/LIST RETURN ENTER PROG.
Recording Before you start Formatting a disc (cont’d) Reformatting a disc manually 4 OPERATE A .@/: Format Start Note Video mode 2 3 JKL MNO 4 5 6 WXYZ AUDIO 7 8 9 DISPLAY SPACE CLEAR SETUP TOP MENU MENU/LIST RETURN ENTER 1 No K { B L A popup window will appear and prompt you to confirm. REC MODE RAPID PLAY REC/OTR 5 REV PLAY FWD h B g SKIP PAUSE SKIP H F G STOP CM SKIP C Select “Yes” using [Cursor K / L], then press [ENTER]. Formatting will start.
Recording Selecting the Sound mode This unit can receive bilingual broadcasts. • During reception of bilingual broadcasts You can switch between modes by pressing Display on the Mode Audio output TV screen [AUDIO] on the remote control. Each mode is indicated on the TV screen as follows.
Recording Follow the steps below to record a TV programme. 1 Before you start Basic recording 6 Select the desired channel to record using [PROG. K / L] or [the Number buttons]. P08 1 6 OPEN/CLOSE 2 4 ZOOM TIMER PROG. A .@/: ABC DEF 1 2 3 GHI JKL MNO 4 5 6 PQRS TUV PROG. WXYZ AUDIO 7 8 9 DISPLAY SPACE CLEAR SETUP TOP MENU MENU/LIST RETURN ENTER 0 2 Connections Press [ OPERATE] to turn on the unit.
Recording One-touch Timer Recording (OTR) This is a simple way to set the recording time in blocks of 30 minutes. Check that the disc you are recording onto has enough space remaining for the time you set. 4 Press [REC/OTR] repeatedly until the desired recording time (30 minutes to 8 hours) appears on the TV screen. One-touch Timer Recording will start. OPERATE OPEN/CLOSE ZOOM TIMER PROG. A .@/: DEF 1 2 3 GHI JKL MNO 4 5 6 PQRS 1 ABC TUV PROG.
Recording 4 Enter the time to start and to end using [Cursor K / L], then press [Cursor B]. OPERATE 8 Timer Programming Date 1. 01/01 Start End CH 12:00 --:-- P01 Mode 2. - - 3. - - - Select the channel number to record using [Cursor K / L], then press [Cursor B]. Date Timer Programming Start End CH 1 2 3 GHI JKL MNO PROG.
Recording Timer Recording (cont’d) Checking, cancelling, or correcting the timer programming information In the following example, No. 5 timer programming overlaps on No. 1 and No. 6 timer programmes. In such a case, you should correct the programme time to clear the overlap. Timer Programming Date 1. 01/01 Start End CH Mode 12:00 13:00 P01 XP 2. - - 3. - - - Overlap No.1 6 4. - - 5. 01/01 12:30 14:00 P02 SP 6. 01/01 13:45 21:00 P12 SEP 7. - - 8.
Recording Hints for Timer Recording PROG. 1 PROG. 2 Recording PROG. 1 Getting started Priority of overlapped settings The unit records programmes according to priority if the timer programmes overlap. If the starting time is same: If the recording time is partially overlapped: • The timer programming set first (PROG. 1) has • The timer programming with the earlier start priority. time (PROG. 2) has priority. PROG. 1 will start after PROG. 2 recording is completed.
Recording Satellite Link You can set the unit to start recording whenever it detects the video signal from the external tuner. Preparing for the Satellite Link Timer Recording: Preparation on the tuner • The external tuner should be equipped with some kind of timer function. Using timer function of the tuner, set it to be turned on when it comes to the time you want to start recording, and off when it comes to the time you want to finish recording. (Refer to the tuner’s manual on how to set the timer.
Recording Before you start Satellite Link (cont’d) Note Example 2 Example 1 Connections • If you have not set the clock, the clock setting window will appear at step 3. Follow to step 4 in “Clock Setting” on page 21. • You cannot set the End time for the Satellite Link Timer Recording on this unit. • Recording picture will be distorted if the copy protection signal is being detected during Satellite Link Timer Recording.
Recording DV dubbing (cont’d) When the DV camcorder is in Playback mode... 1 1 1 0:00:00 DVD-RW 1 Video mode 2 Control DV Audio Start Rec DVD Stereo1 DV AB-1234 0:00:00 SP 3 When the DV camcorder is not in Playback mode... 1 0:00:00 DVD-RW Video mode The menu changes according to what mode of DV Camcorder. Switch the mode on the DV Camcorder to Playback mode for the dubbing information.
Recording 4 Before recording from DV camcorder, see page 14 for connection instructions. 1 Select “DV” using [PROG. K / L]. 2 Select a recording mode using [REC MODE]. (See page 23.) 3 1 1 0:00:00 DVD-RW Video mode Control DV Audio Start Rec DVD Stereo1 DV AB-1234 0:00:00 3 MNO 4 5 6 PQRS TUV WXYZ 7 8 9 DISPLAY SPACE CLEAR SETUP TOP MENU MENU/LIST RETURN ENTER 6 Select “Start Rec” using [Cursor K / L], then press [ENTER]. The dubbing will start.
Recording Finalising discs You will need to finalise discs to play them back in other players. Finalising may take from several minutes up to an hour. (A disc recorded in Video mode can take up to 15 minutes. A disc recorded in VR mode can take up to 60 minutes.) A shorter recording period on the disc will require a longer time period for finalisation. Do not unplug the mains cable during finalisation. To cancel finalising... (DVD-RW only) Press [STOP C] during the finalising is in progress.
Recording Before you start Finalising the(cont’d) discs (cont’d) XXXX Auto finalise OPERATE A Select “Auto Finalise” using [Cursor K / L], then press [ENTER]. .@/: In stop mode, press [SETUP]. ABC DEF 1 2 3 GHI JKL MNO 4 5 6 PQRS TUV WXYZ PROG. AUDIO 7 8 9 DISPLAY SPACE CLEAR SETUP ON 0 OFF TOP MENU MENU/LIST RETURN ENTER Auto Finalise - Disc Full 1 OPEN/CLOSE ZOOM TIMER PROG.
Disc Playback Information on playing back DVDs Read the following information before you play back a DVD. Disc Playable discs DVD-Video You can play back all the discs listed on the right. Before attempting to play back a DVD, make sure it meets the requirements for Region Codes and Colour Systems as described in this section. Discs that bear any of the logos shown below will be played back correctly in this unit. Other disc types are not guaranteed to be played back.
Disc Playback Before you start Basic playback Hint for DVD playback The contents of a DVD are generally divided into titles. Titles are sometimes further subdivided into chapters. Start Rec. Stop/Start Stop Rec. Title 2 Chapter 1 Chapter 2 Chapter 3 Chapter 1 Chapter 2 Connections Title 1 Playing back a DVD-RW / DVD-R / DVD+RW / DVD+R disc 1 OPERATE 1 Playlist Press [ OPERATE] to turn on the unit. Turn on the TV and be sure to select the input to which the unit is connected. 1 2 2 4 8 A .
Disc Playback Basic playback (cont’d) Playing back a DVD-Video / CD / Video CD 1 Follow the steps 1 to 4 in “Playing back a DVD-RW / DVDR / DVD+RW / DVD+R disc” on page 41. If you are playing back a DVDVideo or a Video CD, a menu may appear. See pages 45-46 for details. CLEAR SETUP TOP MENU MENU/LIST RETURN DISPLAY SPACE ENTER 0 K { 3 B L REC MODE Press [STOP C] to stop playback.
Disc Playback • To exit the Picture CD 2 Press [Cursor K / L / { / B] thumbnail List, press to select a desired track to be [TOP MENU] again or press played back, then press [STOP C]. [PLAY B] or [ENTER]. An image will be played back Arrow icons mean the title list from the selected track and go includes a next or previous to the next one in turn. page. Press [Cursor { / B] in 3 Press [STOP C] to stop the direction of the icon you playback. wish to follow.
Disc Playback Basic playback (cont’d) It is recommended that files to be played back in this unit are recorded under the following specifications: [DivX®] • Official DivX® Certified product • Plays all versions of DivX® video (including DivX®6 ) with standard playback of DivX® media files • Maximum size of image : 720 x 480 @30fps 720 x 576 @25fps • Sampling frequency of audio: 8kHz-48kHz • Audio type : MPEG1 audio layer 3 (MP3), MPEG1 audio layer 2, Dolby Digital Hint for the purchased or rental Official D
Disc Playback AUTHORIZATION ERROR Getting started Please select the media to play back. This player is not authorized to play this video. Video Audio & Picture Please push ‘TOP MENU’. Recording Playing back discs using the Disc menu Press [MENU/LIST]. If the feature is not available, may appear on the TV screen. Select an item using [Cursor K / L / { / B], then press [ENTER]. OPEN/CLOSE ZOOM TIMER PROG. A .
Disc Playback Basic playback (cont’d) Playing back a disc using the Title menu The disc will start playing back at the title you selected. The following operations are available. [TOP MENU] button: Displays the DVD “Title Menu” which will vary between discs. [Cursor K / L / { / B] buttons: Move the cursor from item to item on the screen. [ENTER] button: Selects the currently highlighted menu option. [the Number buttons]: Selects a numbered menu option (available on certain discs).
Disc Playback Cancelling and Recalling the PBC function 3 (PBC OFF) Insert a Video CD. PQRS 1 In stop mode, press [SETUP]. 2 Select “CD Playback Mode” using [Cursor K / L], then press [ENTER]. Program Play PBC (Video CD only) ON Slide Show 5 sec. SETUP TOP MENU MENU/LIST RETURN ENTER 1 5 K { B 2 3 4 L Select “OFF” using [Cursor K / L], then press [ENTER].
Disc Playback Special playback (cont’d) Fast forward / Fast reverse 1 During playback, press [FWD D] or [REV E]. Each time you press [FWD D] or [REV E], the approximate speed will change as follows. Fast forward or fast reverse playback across titles (for DVDs) or tracks (for MP3) is not possible. x40 x20 x5 • For Audio CDs and MP3 files, approximate speed is fixed at x8 with sound. • For Video CDs, approximate forward speeds are x2, x8 and x16, and approximate reverse speeds are x2, x8 and x16.
Disc Playback Before you start Special playback (cont’d) Pause PQRS TUV WXYZ 7 8 9 DISPLAY SPACE CLEAR SETUP TOP MENU MENU/LIST RETURN ENTER AUDIO 0 1 During playback, press F 2 Press [PLAY B] to resume play- REC MODE REV h B g RAPID PLAY SKIP PAUSE SKIP H F G STOP CM SKIP PLAY REC/OTR FWD 2 1 C back. Rapid Play B B 1 During playback, press [RAPID PLAY]. 2 OPEN/CLOSE ZOOM TIMER PROG. A .
Disc Playback Special playback (cont’d) Step by step playback OPERATE 2 Press [SKIP H / G] repeatedly. Each time you press [SKIP G], playback will go forward one frame (or step) at a time with the sound muted. To go backward one frame (or step), press [SKIP H]. Press and hold [SKIP G] to continue going forward. To continue going backward, press and hold [SKIP H]. 1 During playback, press [PAUSE F]. 3 F Press [PLAY B] to resume playback. OPEN/CLOSE ZOOM TIMER PROG. A .
Disc Playback Before you start Special playback (cont’d) Zoom 3 OPERATE OPEN/CLOSE ZOOM TIMER PROG. 1 1 During playback, press [DISPLAY]. Press [ZOOM] during playback, and follow from step 3. A .@/: ABC Connections Select the desired zoom factor to zoom using [Cursor K / L], then press [ENTER]. The zoom area is displayed. DEF 1 2 3 GHI JKL MNO 4 5 6 PQRS TUV WXYZ 7 8 9 DISPLAY SPACE CLEAR SETUP TOP MENU MENU/LIST RETURN ENTER PROG.
Disc Playback Special playback (cont’d) Marker Setup Marker setup menu for Audio CD mode 1 0:00:00 Audio CD OPERATE OPEN/CLOSE ZOOM TIMER PROG. A 1 (PBC OFF) 2 3 You can assign a specific point on a disc to return later. 4 5 6 ------------- .@/: 1 During playback, press [DISPLAY]. 3 2 Select the icon using [Cursor { / B], then press [ENTER]. Marker setup menu for DVDVideo mode 1 1 0:00:00 1 2 3 4 5 6 DVD-Video ------------- DEF 1 2 3 GHI JKL MNO 4 5 6 PQRS 1 ABC TUV PROG.
Disc Playback Before you start Search Title / Chapter search Searching for a Title: 3 1 Using the [DISPLAY] button 1 2 1 1 2 3 GHI JKL MNO 4 5 6 TUV PQRS AUDIO 8 9 SPACE CLEAR SETUP TOP MENU MENU/LIST RETURN ENTER 0 K Press [Cursor { / B] to highlight the number displayed in the right side of the icon. Enter the desired chapter number to search for using [Cursor K / L] or [the Number buttons], then press [ENTER]. Chapter search will start. WXYZ 7 DISPLAY 3 4 PROG.
Disc Playback Search (cont’d) Direct Search OPERATE OPEN/CLOSE ZOOM TIMER PROG. You can search the desired track directly. A .@/: Using [the Number buttons] 1 1 During playback, if the display menu is not displayed, press [the Number buttons] to enter the desired track number. ABC DEF 1 2 3 GHI JKL MNO 4 5 6 PQRS TUV WXYZ PROG.
Disc Playback Before you start Repeat/Random/Programme playback / Slide Show Repeat playback (PBC OFF) During playback, press [DISPLAY]. 2 3 SPACE CLEAR SETUP TOP MENU MENU/LIST RETURN ENTER AUDIO 0 K 2 3 B L Note CLEAR SETUP TOP MENU MENU/LIST RETURN SPACE ENTER CD Playback Mode menu will appear. 1 2 3 K { B L CD Playback Mode Random Play In stop mode, press [SETUP]. 2 Select “Random Play” using [Cursor K / L], then press [ENTER]. Random playback will start.
Disc Playback Repeat/Random/Programme playback / Slide Show (cont’d) Programme playback OPERATE (PBC OFF) You can programme the disc to play back in your desired order. 1 3 A .@/: Select the desired track using [Cursor K / L], then press [ENTER] or [Cursor B]. Program Play Follow the steps 1 and 2 in “Random playback” on page 55. Select “Program Play” using [Cursor K / L], then press [ENTER].
Disc Playback DivX® VOD Playback menu will appear. PQRS TUV WXYZ 7 8 9 DISPLAY SPACE CLEAR SETUP TOP MENU MENU/LIST RETURN ENTER AUDIO 1 0 In stop mode, press [SETUP]. Video K Language { Parental Lock DivX® VOD REC MODE RAPID PLAY Select “DivX® VOD” using [Cursor K / L], then press [ENTER]. Your registration code will appear. DivX® VOD Select “Playback” using [Cursor K / L], then press [ENTER].
Disc Playback Selecting the format of audio and video (cont’d) Switching audio soundtrack 3 When playing back a DVD-Videos recorded with two or more soundtracks (often in different languages), you can switch among them during playback. When playing back DVD-RW discs recorded in VR mode, you can switch to main audio (L), sub audio (R) or a combination of both (L / R). When playing back Audio CDs, Video CDs or DivX® files, you can switch among the left, the right channel, and stereo.
Disc Playback Before you start Selecting the format of audio and video (cont’d) Switching camera angles 2 Select the icon using [Cursor { / B], then press [ENTER]. The angle will switch each time you press [ENTER]. 1 OPERATE OPEN/CLOSE ZOOM TIMER PROG. A .@/: 1 During playback, press [DISPLAY]. The angle icon appears when a switching camera angle is available. (Available only when the angle icon appears in bottom right on the TV screen.
Editing Information on disc editing You can edit a disc recorded using the PAL system. It is not possible to edit discs recorded using the NTSC system. Guide to a title list The title list enables you to check the titles recorded on a disc easily. You can choose a title to play back from the screen and easily edit the titles as you wish. The items on the title list are as follows. Press [TOP MENU].
Editing Before you start Information on disc editing (cont’d) Editing discs Type of title Item Page Deleting titles Editing title names Video Mode Adding or deleting chapter marks Setting pictures for thumbnails Deleting a part of a title 65-66 67 68-69 70 71 72 73 DVD-RW VR mode Original only Setting or releasing the title protection 74 DVD-RW Video mode only Setting or clearing all the chapter marks in one title 75 Getting started Dividing a title Combining titles Adding titles to a Playlis
Editing Editing discs Deleting titles Original 4 Playlist You can delete titles which you do not need anymore. Be advised that the titles once deleted cannot be brought back to the disc. Be sure to read “Notes for deleting titles” on page 61 before you delete the title. OPERATE Select “Title Delete” using [Cursor K / L], then press [ENTER]. Confirmation window will appear. A .
Editing Before you start Editing discs (cont’d) Editing title names Original 4 Playlist Select “Yes” using [Cursor K / L], then press [ENTER]. The name you edited becomes the title. OPERATE A .@/: Playlist - Edit Title Name 3 1 OPEN/CLOSE ZOOM TIMER PROG.
Editing Editing discs (cont’d) Guide to edit title name Original Playlist OPERATE OPEN/CLOSE ZOOM TIMER PROG. A 1 .@/: Select the desired character set using [Cursor K / L], then press [ENTER]. 2 2 ABC DEF 1 2 3 GHI JKL MNO 4 5 6 PQRS TUV WXYZ 7 8 9 DISPLAY SPACE CLEAR SETUP TOP MENU MENU/LIST RETURN ENTER PROG. AUDIO 0 Using the list below as a guide, press [the Number buttons] repeatedly until the desired letter appears.
Editing Before you start Editing discs (cont’d) Adding or deleting chapter marks Original Playlist 4 OPERATE Select “Add” or “Delete” accordingly using [Cursor K / L], then press [ENTER]. Confirmation window will appear. A .@/: ABC DEF 1 2 3 GHI JKL MNO 4 5 6 PQRS TUV WXYZ 7 8 9 DISPLAY SPACE CLEAR SETUP TOP MENU MENU/LIST RETURN ENTER PROG. AUDIO 0 Playlist - Chapter Mark - Add 3 OPEN/CLOSE ZOOM TIMER PROG. Connections You can add chapter marks to a title.
Editing Editing discs (cont’d) 5 6 Select “Yes” using [Cursor K / L], then press [ENTER]. Adding a chapter mark: If you select “Add” at step 4, a new chapter mark is created at the point you specified. Press [RETURN Playlist - Chapter Mark - Add 3 ]. OPERATE 7 OPEN/CLOSE ZOOM TIMER PROG. A Press [RETURN ] again and then [RETURN ] or [STOP C] to exit. Writing on the disc starts. It may take a while to write the data on a disc. .
Editing Before you start Editing discs (cont’d) Setting pictures for thumbnails Original Playlist 5 OPERATE Press [RETURN ] and then [RETURN ] or [STOP C] to exit. Writing on the disc starts. It may take a while to write the data on a disc. OPEN/CLOSE ZOOM TIMER PROG. A .
Editing Editing discs (cont’d) Deleting a part of a title Original Playlist You can delete a specific part of a title. Even when parts of title are deleted from the Playlist, the original title will remain as it is. Then use [SKIP H / G], [REV E], [FWD D], [PLAY B] and [PAUSE F] again to move to the end point, and press [ENTER].
Editing 6 Select “Delete” using [Cursor K / L], then press [ENTER]. Confirmation window will appear. Press [RETURN ] and then [RETURN ] or [STOP C] to exit. Writing on the disc starts. It may take a while to write the data on a disc. Playlist - Scene Delete 3 Yes OPERATE OPEN/CLOSE ZOOM TIMER PROG. A .@/: DEF 1 2 3 GHI JKL MNO 4 5 6 PQRS No ABC TUV PROG.
Editing Editing discs (cont’d) Dividing a title Playlist You can divide a title into two new titles. 1 Follow the steps 1 to 3 on page 62 to display the Edit menu. 5 OPERATE Press [RETURN ] or [STOP C] to exit. Writing on the disc starts. It may take a while to write the data on a disc. OPEN/CLOSE ZOOM TIMER PROG. A .@/: ABC DEF 1 2 3 GHI JKL MNO 4 5 6 PQRS TUV WXYZ 7 8 9 DISPLAY SPACE CLEAR SETUP TOP MENU MENU/LIST RETURN ENTER PROG.
Editing Before you start Editing discs (cont’d) Combining titles Playlist You can combine two titles into a single title. Follow the steps 1 to 3 on page 62 to display the Edit menu. OPERATE Select “Yes” using [Cursor s / B], then press [ENTER]. The two titles will combine into a single title. A .@/: Playlist - Title Combining 2 1 2 Yes 1 2 3 JKL MNO 4 5 6 PQRS TUV WXYZ 7 8 9 DISPLAY SPACE CLEAR SETUP TOP MENU MENU/LIST RETURN ENTER PROG.
Editing Editing discs (cont’d) Adding titles to a Playlist Playlist You can add a title to the Playlist as you wish. You can add up to 99 titles to a Playlist (as long as the total number of the Playlist does not exceed 999 chapters). 3 OPERATE Select the desired title using [Cursor K / L / s / B], then press [ENTER]. The added title will appear as the final title. A .@/: Playlist - Add New Title 1 1 Follow the step 1 on page 62 to display the Playlist.
Editing Before you start Editing discs (cont’d) Erasing all Playlist Playlist A Playlist can be deleted if it is no longer needed. Follow the step 1 on page 62 to display the Playlist. OPERATE Select “Yes” using [Cursor s / B], then press [ENTER]. “Are you sure?” will appear. Select “Yes” using [Cursor s / B] and then press [ENTER]. A .
Editing Editing discs (cont’d) Setting or releasing the title protection Original To prevent the accidental editing, or erasing of the titles, you can protect them in the Edit menu. You can cancel the title protection feature after it is applied. 1 Follow the steps 1 to 3 on page 62 to display the Edit menu. 3 OPERATE Confirm the indication “OFF ➔ ON”. Press [ENTER] again. • If the title is already protected, “ON ➔ OFF” will appear. If you press [ENTER], the title will be released from protection.
Editing Before you start Editing discs (cont’d) Setting or clearing all chapter marks in one title 1 2 Select “Chapter Mark” using [Cursor K / L], then press [ENTER]. Option window will appear. OPERATE Select “Yes” using [Cursor K / L], then press [ENTER]. Chapter marks are added. If you select “OFF” at step 3, all the chapter marks are erased. OPEN/CLOSE ZOOM TIMER PROG. A .
Changing the Setup menu Tour of the Setup menu The following table shows the items you can set and their default settings. Use the table as a reference for efficient operation. Setup 1. Language setting Pages 77-78 2. Display setting Pages 78-79 3. Audio setting Pages 79-81 Items (highlight is the default) Disc Menu Russian English German Contents Sets the disc menu language. Audio Original Russian English Sets the audio language. Subtitle OFF Russian English Sets the subtitle language.
Changing the Setup menu 1 OPERATE In stop mode, press [SETUP]. Before you start Language setting OPEN/CLOSE ZOOM TIMER PROG. A .@/: 2 Select “Playback” using [Cursor K / L], then press [ENTER]. Select “Language” using [Cursor K / L], then press [ENTER]. DEF 1 2 3 GHI JKL MNO PROG. 4 5 6 PQRS TUV WXYZ 7 8 9 DISPLAY SPACE CLEAR SETUP TOP MENU MENU/LIST RETURN ENTER AUDIO 0 4 1 K Select the desired item using [Cursor K / L], then press [ENTER].
Changing the Setup menu Language setting (cont’d) If “Other” is selected, enter the appropriate 4-digit code using [the Number buttons]. Refer to “Language code” on page 89. OPERATE OPEN/CLOSE ZOOM TIMER PROG. A When you finish entering the code, press [ENTER]. Language - Subtitle Code Input 4 7 4 .@/: DEF 1 2 3 GHI JKL MNO 4 5 6 PQRS - ABC TUV PROG. WXYZ AUDIO 7 8 9 DISPLAY SPACE CLEAR SETUP TOP MENU MENU/LIST RETURN ENTER 0 5 Press [SETUP] to exit.
Changing the Setup menu Screen Saver (Default: 10 minutes) Set the screen saver time delay. Select a setting using [Cursor K / L], then press [ENTER]. Your setting is activated. Screen Saver Display OSD Language English OFF Angle Icon ON 5 minutes Screen Saver 10 minutes 10 minutes FL Dimmer Bright 15 minutes Before you start Display setting (cont’d) Connections 30 minutes FL Dimmer (Default: Bright) Set the front panel display brightness.
Changing the Setup menu Audio setting (cont’d) PCM sampling (Default : 48kHz) Digital Out - PCM 48kHz 96kHz Select a setting using [Cursor K / L], then press [ENTER]. Your setting is activated. 48kHz: If your amplifier / decoder is NOT compatible with 96kHz PCM, select “48kHz”. Sound recorded at 96kHz is down sampled to 48kHz. 96kHz: If your amplifier / decoder is compatible with 96kHz PCM, select “96kHz”. Sound is sampled at 96kHz.
Changing the Setup menu Dynamic Range Control (Default: ON) Set to “ON” to make the dynamic range narrower. Audio - Dynamic Range Control Audio ON Digital Out Dynamic Range Control OFF ON CLEAR SETUP TOP MENU MENU/LIST RETURN DISPLAY SPACE ENTER 0 5 5 Connections Select a setting using [Cursor K / L], then press [ENTER]. Your setting is activated. The Dynamic Range Control function is effective only with analogue audio connection.
Changing the Setup menu Video setting (cont’d) TV System (Default: PAL) Set the TV system. Video Video - TV System Still Mode Auto PAL TV System PAL Auto Video Out SCART(RGB) Select the desired system setting using [Cursor K / L], then press [ENTER]. Note PAL: Auto: Outputs a modified PAL signal for viewing discs recorded with the NTSC system on a PAL system TV. Changes the video system (PAL / NTSC) automatically according to the format of the inserted disc.
Changing the Setup menu Some DVD-Videos feature a Parental Lock function. If the rating of the inserted disc exceeds the level you set, playback will stop. You must enter a password before the disc will be played back. This feature prevents your children from viewing inappropriate material. 1 A .@/: ABC DEF 1 2 3 GHI JKL MNO 4 5 6 PQRS 2 OPEN/CLOSE ZOOM TIMER PROG. TUV PROG.
Changing the Setup menu DVD-Videos Parental Lock level (cont’d) A password is not yet set Parental Lock Parental Lock Change Password? Yes Password Input No Yes - - - - Select “Yes” using [Cursor K / L], then enter a new password using [the Number buttons], then press [ENTER]. Your setting is activated. If you select “No”, proceed to step 4.
Others Before requesting service for this unit, check the table below for a possible cause of the problem you are experiencing. Some simple checks or a minor adjustment by you may eliminate the problem and restore correct operation. Symptom Power The power does not turn on. Picture There is no picture. • Check the mains cable is connected securely. • Check the breaker (in case of power failure). • Check if the Child Lock is activated. (See page 10.) Picture noise appears. • The disc is dirty or flawed.
Others Troubleshooting (cont’d) Symptom Playback The unit does not play back the disc. Remedy • No disc is inserted. • A blank disc is inserted. • The disc is upside down. Insert the disc with the labelled side facing up. • The disc is not correctly inserted. • The unit cannot play back certain discs (such as a CD-ROM). (See page 40.) • The region codes on the DVD-Video and the unit are not matched. (See page 40.) • Moisture has condensed inside the unit.
Others Symptom Remedy DV DV signal cannot be input. Certain functions of the unit cannot operate. • Some functions may not operate depending on the type of DVC. For example, if the DVC does not support slow playback mode, the slow playback function is disabled. • With AV5 (DV input), the disc display menu does not appear unless disc playback is executed. DV audio signal cannot be switched. • For recording with the DVC, the recording audio signal can be set to 12 bits or 16 bits.
Others Troubleshooting (cont’d) Error message Cause Solution Disc Error — Please eject the disc. — Playback feature may not be available on this Disc. • An unplayable disc is inserted in the unit. • The disc is upside down. • Insert a standard disc shown in “Playable discs”. (See page 40.) • Insert the disc with the labelled side facing up. Region Error — Please eject the disc. — Playback is not authorised in your region.
Others Changing the Setup menu Code 6467 6559 6553 6547 5350 6564 6554 6566 6660 6560 6550 6555 6565 6557 6558 6561 5165 6567 6569 6568 6658 6653 6647 6666 6651 6654 4861 6655 6661 6665 6664 6657 6669 6757 6764 6772 6855 6861 4971 6961 7054 5655 7161 7267 Editing Language Russian Samoan Sangho Sanskrit Scots Gaelic Serbian Serbo-Croatian Sesotho Setswana Shona Sindhi Singhalese Siswat Slovak Slovenian Somali Spanish Sundanese Swahili Swedish Tagalog Tajik Tamil Tatar Telugu Thai Tibetan Tigrinya Tonga T
Others Glossary Analogue audio An electrical signal that directly represents sound. In contrast, digital audio can also be an electrical signal, but is an indirect representation of sound. See also Digital audio. DTS (Digital Theater System) DTS is a Multi-channel surround sound system, but it is different from Dolby Digital. Both formats were developed by Digital Theater Systems, Inc. Aspect ratio The width of a TV screen relative to its height. Conventional TVs are 4:3 (i.e.
Others Before you start Specifications General DVD-Video, DVD-RW/-R, DVD+RW/+R, CD-DA, CD-RW/-R Power requirements 220–240V ~ ± 10%, 50Hz ± 0.5% Power consumption 25W (standby: 4.5W) Weight 2.
Downloaded From Disc-Player.
A. Information on Disposal for Users (private households) 1. In the European Union Attention: If you want to dispose of this equipment, please do not use the ordinary dust bin! Attention: Your product is marked with this symbol. It means that used electrical and electronic products should not be mixed with general household waste. There is a separate collection system for these products.
SHARP CORPORATION Printed in China Downloaded From Disc-Player.