MODEL HR-GB201 OPERATION MANUAL If you require any advice or assistance regarding your Sharp product, please visit our web-site www.sharp.co.uk/customersupport. Customers without Internet access may telephone 08705 274277 during office hours (or (01) 676 0648 if telephoning from Ireland). 0101 for UK (9JCG5230100042) Thank you for purchasing this SHARP product. For the best performance, read this manual carefully. It will guide you in operating your SHARP product.
Special Notes ! Warnings NOTES FOR USERS IN THE U.K. AND IRELAND SERVICE INFORMATION In the unlikely event of your equipment requiring repair, please use the supplied postage paid label to send your unit to the Sharp repair centre or contact the dealer or supplier from whom it was purchased. Where this is not possible, please visit our web-site www.sharp.co.uk/customersupport. Customers without internet access may telephone 08705 274277 during office hours (or (01) 676 0648 if telephoning from Ireland).
2 ! About SHARP Music Manager " When recording important selections, make a preliminary test to ensure that the desired material is properly recorded. " SHARP is not liable for damage or loss of your recording arising from malfunction of this unit. " At full volume, prolonged listening to a personal stereo may damage the user's hearing. This model complies with the law if used with the correct earphones (model number RPHOE0001YCKZ).
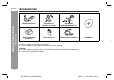
-Accessories- General Information HR-GB201 Accessories Remote Control x 1 Earphones x 1 (with the ear pads) AC Adaptor (9JCRADPA8000AF) x 1 Multi-link Station (Cradle) x 1 Travel Pouch x 1 USB Connection Cable x 1 CD-ROM x 1 Notes: ! Only the above accessories are included. ! The AC adaptor may be different from the one in the drawing. Warning: ! The AC adaptor supplied with the HR-GB201 must not be used with other equipment. ! Use only the supplied AC adaptor.
Contents " Voice Recording Controls and indicators . . . . . . . . . . . . . . . . . . . . . .3, 4 Precautions . . . . . . . . . . . . . . . . . . . . . . . . . . . . . . . . . .5 General notes . . . . . . . . . . . . . . . . . . . . . . . . . . . . . . . .6 Recording with the built-in microphone . . . . . . . . . 30 Playing recorded voice data . . . . . . . . . . . . . . . 31, 32 Advanced playback . . . . . . . . . . . . . . . . . . . . . . . . . .
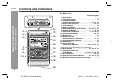
HR-GB201 Controls and indicators " Main unit -Controls and indicators- General Information 1 2 3 11 4 12 5 6 13 14 00 03 30 7 8 15 10 16 9 17 10 18 Reference page 1. Strap Eyelet 2. Line Input Socket . . . . . . . . . . . . . . . . . . . . . . . . 34 3. Earphone Output/ Remote Control Socket . . . . . . . . . . . . . 23, 31, 35 4. Data Format Indicator . . . . . . . . . . . . . . . . . 23, 33 5. Hold Indicator . . . . . . . . . . . . . . . . . . . . . . . . . . . 41 6. Battery Indicator .
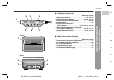
HR-GB201 2-6 " Remote control unit 4 Reference page 1. Earphone Socket . . . . . . . . . . . . . . . . . . . 23, 31, 35 2. Equaliser/Bass Button . . . . . . . . . . . 24, 26, 31, 36 3. Volume Up and Down Buttons . . . . . . . . . . . 24, 26 4. Hold Switch . . . . . . . . . . . . . . . . . . . . . . . . . . . . . 41 5. Play/Pause/Power On/ Enter Button . . . . . . . . . . . . . . 8, 23, 29, 31, 32, 36 6. Skip Up/Skip Down/Fast Forward/ Fast Reverse Buttons . . . . . . . . . . . . 23, 25, 31, 36 7.
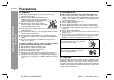
-Precautions- General Information HR-GB201 Precautions " Important " Storing the unit ! Do not wear your earphones when you are crossing streets or near traffic. ! Do not use your earphones whilst driving a motor vehicle, it may create a traffic hazard and may be illegal. Remember to obey all of the safety rules in your area. ! Do not play the unit at a high volume. Hearing experts advise against extended listening at high volume levels. Avoid using or leaving the unit in the following places.
General notes " Trademarks ! IBM and PC/AT are registered trademarks of International Business Machines Corporation. ! Macintosh is a trademark of Apple Computer, Inc., registered in the United States and other countries. ! Microsoft and Windows are registered trademarks of Microsoft Corporation in the United States and/or other countries. ! MMX and Pentium are trademarks or registered trademarks of Intel Corporation.
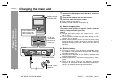
HR-GB201 Charging the main unit Battery charge indicator (red) 1 2 3 Connect the AC adaptor to the DC IN 5V socket on the cradle. Plug the AC adaptor into the wall socket. Place the main unit on the cradle. ! Press down the unit firmly. ! Battery charge indicator (red) lights up. Power Source -Charging the main unit- " About charging time Press down the unit with its front side facing toward you. Fit to the connection terminal of main unit The battery fully charges in approx.
3 HR-GB201 The remaining amount of battery level is shown by the battery indicator during operation. When the battery level is high When the battery level is very low 00 0 Hold down the button for 2 seconds or more. The startup screen apThen the display will look pears for a while. like a file browser. 0000 0000 " Battery replacement This product has a built-in battery. ! The capacity after 300 cycles is expected to be equal to or more than 80% of the rated capacity.
HR-GB201 System requirements The following hardware and software are required for installation.
Outline of SHARP Music Manager PC (SHARP Music Manager) HR-GB201 2-6 SHARP Music Manager is software that allows you to transfer audio data (MP3, WMA, or WAV files) to the main unit. You can manage the data and edit playlists. 8 1 Convert audio data (MP3, WMA, or WAV format) with Windows Media Player, etc. 2 3 Transfer audio data to a PC using Windows Media Player, etc. For details, refer to "HELP" of the software. Transfer the audio data to the unit (see page 17).
HR-GB201 Outline of SHARP Music Manager (continued) Software Installation -Outline of SHARP Music Manager- MP3 (MPEG-1 Audio Layer 3): MPEG is an international standard developed by Moving Picture Experts Group, a working group of ISO. Audio data can be compressed to about one-tenth to onetwelfth its original size. WMA (Windows Media Audio): WMA is an audio compression format developed by Microsoft, or a file encoded in this format. WAV (Wave Sound) file: WAV is an audio file widely used in Windows.
Installing SHARP Music Manager Insert the supplied CD-ROM into your CD-ROM drive. ! The "Software Installer" screen appears. 2-6 Click the "Next" button. Click the "Next" button. 8 ! When the installation is completed, the "Setup Complete" screen appears. 2 Click the "Install SMM" button. ! The "Welcome" screen appears. 3 Click the "Next" button. ! The "Choose Destination Location" screen appears. 7 Click the "Finish" button. ! Check the "Yes, Launch the program file." box.
HR-GB201 Connecting the unit to a PC Hard disk access indicator (green) -Connecting the unit to a PC- Transferring from PC Connect the unit to a PC to transfer audio data. To disconnect the unit, see "Disconnecting the unit" on page 14. Rear LINE OUT DSC IN PC USB connection cable 1 2 3 Turn on the unit (see page 8). Connect the AC adaptor to the DC IN 5V socket and place the unit on the cradle (see page 7). Connect the unit to a PC with a USB connection cable.
Disconnecting the unit HR-GB201 For details, refer to the operation manual for the PC. " Windows 2000 Professional " Windows 98 Second Edition 1 2 3 3 4 " Windows Millennium Edition 1 2 3 Click "Remove Hardware" on the taskbar. Click "USB Disk - Stop Drive". "USB Disk can now be safely removed" appears. Click the "OK" button and disconnect the USB connection cable from the PC. Click "Unplug or eject hardware" on the taskbar. Click "USB Mass Storage Device - Stop Drive".
HR-GB201 Starting SHARP Music Manager " How to start Transferring from PC -Starting SHARP Music Manager- From the "Start" menu, click "All Programs", "Sharp Music Manager", and then "SharpMusicManager". Folder tree and file list: ! The folder tree shows a structure of drives and folders. HR-GB201 appears as "SHARP" (drive name). ! When you select a drive or folder, the contents within are displayed in the file list.
4 Create new folders in a selected folder. *1 Open... Execute applications according to the file extension. Delete Delete a selected folder/file. Rename Change folder names. *2 Properties Display folder/file properties. Exit Exit SHARP Music Manager. (*1) You cannot create a new folder in the "Jukebox_Sys" folder on the "SHARP" drive. (*2) File names cannot be changed on SHARP Music Manager. Display all data or audio file only. Back Display the previous folder.
HR-GB201 Transferring audio data ! From PC to the unit You can transfer audio data (MP3, WMA or WAV format) to the unit. Connect the unit to a PC (see page 13). Start SHARP Music Manager. " The navigation window appears. -Transferring audio data- Transferring from PC 1 2 3 Caution: " Once transferred to the unit, audio data cannot be transferred back to the PC. Keep the original data on the PC. " To disconnect the unit from the PC, click the icon on the taskbar (see page 14).
HR-GB201 1 Start SHARP Music Manager. " The navigation window appears. 2 Select audio data in the "ENCODE" or "VOICE RECORD" folder on the "SHARP" drive, and click "Copy" on the "Edit" menu. 1 Start SHARP Music Manager. " The navigation window appears. 8 2 Select audio data to delete and click "Delete" on the "Edit" menu. " The "Confirm File Delete" window appears. 3 Click the "Yes" button. Caution: "Are you sure you want to send (file name) to the Recycle Bin?" appears.
HR-GB201 Editing playlists Create a playlist to play audio data in your desired order. Start SHARP Music Manager. ! The navigation window appears. 3 7 1 2 Connect the unit to a PC (see page 13). Click "Edit Playlist" on the "Tools" menu. ! The playlist edit window appears. -Editing playlists- Transferring from PC 6 Select audio data to add to the playlist. ! The data is added to the playlist. ! Select from MP3, WMA and WAV files. ! Only the audio data on the "SHARP" drive can be added.
HR-GB201 Click the "Save" button. ! The playlist is overwritten. ! To change the name, click the "Save As" button. ! Click the "Exit" button to exit without saving changes. Connect the unit to a PC (see page 13). Start SHARP Music Manager. ! The navigation window appears. Click "Edit Playlist" on the "Tools" menu. Click the "Open" button and select a desired playlist. ! The playlist edit window appears. ! Only files with the extension "m3u" can be selected. 5 Edit the playlist.
HR-GB201 Folder settings " Assigning folders " Organising folders Assign folders to open them quickly. 1 1 2 Click "Add To Favorites" on the "Favorites" menu. ! The "Add My Favorite" dialogue box appears. -Folder settings- Transferring from PC Start SHARP Music Manager. ! The navigation window appears. Click "Organize Favorites" on the "Favorites" menu. ! The "My Favorites" dialogue box appears. 2 Select a favourite name to organise from the "My Favorites" dialogue box.
Editing music information HR-GB201 2-6 5 8 1 2 Click "Update Music Info" on the "Tools" menu. ! The information is refreshed. Connect the unit to a PC (see page 13). Start SHARP Music Manager. ! The navigation window appears. 3 Click "Edit Music Info" on the "Tools" menu. ! The "Music Information Editor" dialogue box appears. Note: There is an entry limit for each information. Title: 30 characters Artist: 30 characters Album: 30 characters Genre: Select from the pull-down menu. 1 2 3 4 1. 2. 3.
HR-GB201 Playing transferred audio data 1 2 Attaching ear pads Turn on the unit (see page 8). Use the or button to select a folder or audio data and press the button. Ear pads are easy to tear. Handle carefully. 0002 0001 Playback starts when audio data is selected. Transferring from PC -Playing transferred audio data- Pull to cover. Left channel L Right channel 3 Observe the correct direction for the plug. Use the or button to select data to play and press the button. ! Playback starts.
HR-GB201 4 10 Normal ROCK CLASSIC USER U-BASS JAZZ " Equaliser The unit has five preset equaliser modes and one customisable equaliser mode: Normal, ROCK, CLASSIC, JAZZ, U-BASS and USER. Select a mode according to a music genre or your preference. " Customising "USER" mode 1 Hold down the MENU button for 2 seconds or more. ! You can also use the EQ/BASS button on the remote control. or button to select "SETUP", and button. Select "EQ/BASS" in the same way as step 2. 8 5 Press the MENU button.
HR-GB201 Advanced playback " Selecting audio data by information You can select audio data by title, artist name, etc. Use SHARP Music Manager to name audio data and edit other information (see page 22). " To locate the desired portion -Advanced playback- Transferring from PC 1 For fast forward: Press and hold down the button during playback. For fast reverse: Press and hold down the button during playback. Notes: ! Normal playback will resume when the or button is released.
HR-GB201 Audio data can be searched by name. 1 Hold down the MENU button for 2 seconds or more. ! You can also use the EQ/BASS button on the remote control. 2 Use the press the or button to select "SEARCH", and button. 00 30 10 ! You can specify up to the first 3 characters. ! In the search field, you can enter only characters used in data names. 4 Use the or button to select data to play and press the button. : Scroll down. : Scroll up. ! Playback starts.
HR-GB201 Advanced playback (continued) " Repeat play or random play -Advanced playback- Transferring from PC 3 Specify audio data to play in CLASS, and select REPEAT or RANDOM to play audio data repeatedly or in random order. 1 Hold down the MENU button for 2 seconds or more. ! You can also use the EQ/BASS button on the remote control. 2 Use the press the 4 5 Select "REPEAT" in the same way as step 2. Select "CLASS" in the same way as step 2.
HR-GB201 Select "REPEAT" or "RANDOM" in the same way as steps 4 and 5. REPEAT: OFF*: Normal playback ON: Repeat play Start playback (see page 23). ! Playback starts in the selected play mode. 8 ON Notes: ! In random play, the unit selects and plays data automatically. After playing all the data once, the unit stops automatically. ! Repeat play continues until the (stop) button is pressed. ! For normal operation cancel repeat play. ! When "ALL" is selected, playback starts from upper folders.
HR-GB201 Advanced playback (continued) " Adding bookmarks to audio data You can add bookmarks to your favourite audio data. You can play favourite audio data by adding bookmarks. Press the or button in the stop mode, and select audio data to add a bookmark to. 0003 0000 -Advanced playback- Transferring from PC 1 " To listen to the audio data in a playlist or audio data with bookmarks You can play bookmarked data or audio data in a playlist. For details on playlist, see page 19.
Recording with the built-in microphone HR-GB201 2-6 You can record voice data with the built-in microphone. Hold down the more. ! Recording starts. 8 REC button for 2 seconds or 00 00 03 To interrupt recording: Press the button. To resume recording, press the button again. To stop recording: Press the button. Notes: ! You can change the recording quality (see page 40).
HR-GB201 Playing recorded voice data 1 2 Attaching ear pads Ear pads are easy to tear. Handle carefully. Voice Recording -Playing recorded voice data- Pull to cover. Left channel Right channel Turn on the unit (see page 8). Hold down the MENU button for 2 seconds or more. ! You can also use the EQ/BASS button on the remote control. 3 Observe the correct direction for the plug. Use the or and press the 00 button to select "RECORD", button.
HR-GB201 2-6 " To interrupt playback Press the button. To resume playback, press the button again. 8 For further operations, see "Transferring from PC". Page To locate the desired portion . . . . . . . . . . . . . . . . . . 25 To locate the beginning of voice data . . . . . . . . . . . 25 (Refer to the procedure for audio data.) Repeat play or Random play . . . . . . . . . . . . . . . 27, 28 Voice Recording Press the button.
HR-GB201 Advanced playback 6 Press the button. ! The start point (A) is created. A 00 00 03 7 -Advanced playback- Voice Recording 10 " A - B repeat play You can play voice data repeatedly by specifying start and end points. 1 2 3 B Set "REPEAT" (steps 1 - 3, page 27). Use the or and press the button to select "REPEAT A-B", button. Use the or button to select "ON". OFF*: Normal playback ON: A - B repeat play. (*) indicates default setting. 4 Press the MENU button three times.
Recording from a CD player HR-GB201 2-6 " Playback sound-actuated recording Audio cable (commercially available) Music from CDs is recorded as MP3 files. The unit starts recording when a signal from LINE IN socket is detected (Synchronised recording). 1 2 3 8 Connect a CD player to the main unit. Turn on the unit (see page 8). Hold down the more. REC button for 2 seconds or 00 00 00 4 Begin playback on the CD player. ! Recording will begin automatically.
Playing recorded music data Recording from CD -Recording from a CD player/Playing recorded music data- HR-GB201 " To start recording from the desired point Attaching ear pads You can make recordings manually if you cancel the settings of synchro recording (see page 40). 1 2 3 4 5 Ear pads are easy to tear. Handle carefully. Connect a CD player to the main unit. Pull to cover. Turn on the unit (see page 8). Cancel the settings of synchro recording (see page 40). Begin playback on the CD player.
HR-GB201 2-6 " To interrupt playback Hold down the MENU button for 2 seconds or more. ! You can also use the EQ/BASS button on the remote control. 3 Use the or and press the button to select "RECORD", button. Press the button. To resume playback, press the button again. Press the button. You can set the main unit to turn off automatically after a period of inactivity (see "POWERDOWN" on page 40). For further operations, see "Transferring from PC".
HR-GB201 Transferring image data from a digital camera Advanced Features -Transferring image data from a digital camera- Connect a digital camera to the main unit to save image data. 1 2 3 4 5 Turn on the unit (see page 8). If connected, disconnect the USB connection cable from the cradle. Connect the AC adaptor to the DC IN 5V socket and place the unit on the cradle (see page 7). Connect the USB cable of the digital camera into the USB socket (A type). Turn on the digital camera.
HR-GB201 Press the button for 2 seconds or more. This unit will start saving the selected directory/file. 0000 0003 0 0 9 100 100 Unplug the USB cable when finished. Caution: ! It is recommended to use the AC adaptor when transferring data from a digital camera. Otherwise data on the unit may be corrupted when batteries run out. ! Do not disconnect the USB cable or remove the unit from the cradle whilst transferring data from a digital camera. Otherwise data on the unit may be corrupted.
HR-GB201 Changing default settings Advanced Features -Changing default settings- You can change the default settings of playback, recording, etc. 3 Select a menu in the same way as step 2. ! Example: "SYSTEM" is selected 4 Change the setting item in the same way as step 2. ! Example: "AUTO PLAY" is selected OFF 1 Hold down the MENU button for 2 seconds or more. ! You can also use the EQ/BASS button on the remote control. 2 Use the press the or button to select "SETUP", and button.
HR-GB201 AUTO PLAY OFF* ON POWERDOWN OFF* 10 - 100 SYNCHRONOUS OFF ON* ENCODER 64 - 320 (128*) VOICE 32 - 128 (64*) INITIALIZE NO* YES INFORMATION DISPLAY CONTRAST 0 - 10 (9*) BACKLIGHT OFF 5 - 20 (10*) ALWAYS SCROLL SPEED 1 - 16* TIME NORMAL* REVERSE LANGUAGE See page 41. REPEAT See pages 27 - 28 or 33. EQ/BASS See page 24. " SYSTEM 2-6 AUTO PLAY: The unit plays the last played audio data automatically. Auto play is disabled once you connect and disconnect the unit from a PC.
Hold function HR-GB201 " DISPLAY Advanced Features -Changing default settings/Hold function- CONTRAST: Adjust the display panel contrast. BACKLIGHT: OFF: Backlight remains off. 5 - 20: Backlight is illuminated for the set time (5 - 20 seconds). ALWAYS: Backlight remains on. The operation can be kept even if other buttons are accidentally pressed in a place such as a crowded train. Use either the unit or remote control to activate the hold function.
Listening to sound using the external equipment 3 4 5 Rear LINE OUT DSC IN PC 2-6 Turn on the unit (see page 8). If connected, disconnect the USB connection cable from the cradle. Connect the LINE OUT socket of the cradle to external equipment via an audio cable (commercially available). Connect the AC adaptor to the DC IN 5V socket and place the unit on the cradle (see page 7). Start playback (see pages 23, 31 and 36).
HR-GB201 Folder structure This unit can record approx. 5,000 songs (MP3 files encoded at 128 kbps, 4 minutes per data). The following is a recommended folder structure to access the desired audio data quickly. Folders on the unit Jukebox_Sys Display 0000 0004 Album name 1 -Folder structure- References Artist name 1 Audio data 1 Audio data 2 Audio data 3 0000 0004 Album name 2 Audio data 1 Audio data 2 Audio data 3 0012 0000 Artist name 2 43 HR-GB201 9JCG5230100042 04/5/18 HR-GB201_UK.
Error messages Troubleshooting ! SHARP Music Manager Many potential "problems" can be resolved by the owner without calling a service technician. If something seems to be wrong with this product, check the following before calling your authorised SHARP dealer or service centre. 2-6 The format of the playlist is When the format of the playincorrect list is incorrect. You cannot add audio data When adding audio data from another drive to the from other drives. playlist.
HR-GB201 Troubleshooting (continued) The battery charge indicator does not light even after charging. ! Is the AC adaptor properly connected? ! Is temperature extremely high or low? References -Troubleshooting- Voice recording is not possible. ! Is the unit connected with LINE IN socket. ! Is the unit in the hold mode? Music recording is not possible. ! Is the audio cable well inserted into the LINE IN socket of the unit? The battery runs out faster. ! The built-in battery is dead.
Maintenance HR-GB201 2-6 " Cleaning When the unit has condensation inside, the disk signals cannot be read, and the unit may not function properly. When the unit becomes dirty Clean it with a soft cloth. When the unit is excessively dirty, use a soft cloth dampened in water (external surfaces only). Clean the plugs and the connecting sockets. If the plugs or sockets are dirty, noise may be heard. Cleaning will prevent noise. To remove condensation: Leave the unit for approximately 1 hour.
HR-GB201 Specifications References -Specifications- As a part of our policy of continuous improvement, SHARP reserves the right to make design and specification changes for product improvement without prior notice. The performance specification figures indicated are nominal values of production units. There may be some deviations from these values in individual units. Power source: DC 5 V: AC adaptor (AC 100 - 240 V, 50/60 Hz, use with cradle) Power consumption: 0.
HR-GB201 2-6 MP3 320 kbps (Quality: BEST) MP3 256 kbps (Quality: HIGH) MP3 128 kbps (Quality: MID) MP3 96 kbps (Quality: FAIR) MP3 64 kbps (Quality: LOW) MP3 128 kbps (Quality: BEST) MP3 96 kbps (Quality: HIGH) MP3 64 kbps (Quality: MID) MP3 48 kbps (Quality: FAIR) MP3 32 kbps (Quality: LOW) Storage media: 20 GB hard disk drive (1.
TERMS OF GUARANTEE Subject to the terms listed below, Sharp Electronics (U.K.) Ltd. (hereinafter called “the Company”) guarantee to provide for the repair of, or at its option replace this Sharp Equipment, or any component thereof, (other than batteries), which is faulty or below standard, as a result of inferior workmanship or materials. The conditions of this guarantee are: 1.