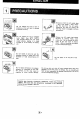
T Do not expose the unit to rain or moisture, @ This will result in damage 0 internal circuitry, Do not expose the unit 1o temperatures higher than 60°C {140°F), This includes leaving the unit Inside cased vehicles, placing it in direst sunlight or in the vicinity af heaters, ate. Do nat legato ar store the unit for extended periods in places with high humidity or high concentrations of dust.
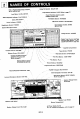
NAMES OF CONTROLS Side A Playback/Racording Indicator: , Dolby NR Switch: DOLBY NR PLAY SIDE-A REC i J ) _Tape Selector Switches: TAPE {Refer to pagan 7.} Laval Meter: LEVEL METER .
LRl 220-240V AC 110120V ey AC Supply Voltage Selector Be sure 10 check the voltage chatting of the voltage selector before connecting AC supply Read plug 1o the AC outlay, }¥ necessary, adjust the setting as follows: T Loosen the securing sower of the supply voltage selector. 2 Tide the panel right or ek, aquatic the correct voltage reading is Sean on either side, 3 secure the screw.
Battery Oherééinn (antimissile) ¥ Precautions for Battery Use Improper use of batteries may cause leakage or explosion, Therefore, sh serve the following precautions: (1} Correctly insert batteries with their polarity as indicated on the unit. (2} Avoid using 8 new battery and an old one together — when one battery needs 5o be replaced, change others at the same time. {3} Do nat use batteries of different kinds together.
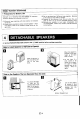
¥ Correlation Between Speakers and Unit Re moue the speaker leads from the lead oak, and then insert them into the EXT SP {right and left) terminals an the main body. #Connect the leads with the white stripe to the (S {black) terminals end the other leads to the () (red) terminals: Caution Do nat connect more than one speaker lead o #ach speaker terminal, Wuhan putting the speaker leads away, wind them around the chad holder and hang it onto tha lead hook.
RADIO OPERATION p BAND SELECTOR i . __TUNING ON/RADIO |1 O/ TAPE Slide the BAND SELECT TOR switch 10 the position, Set the POWER/FUNCTION switch to the ON/ RADIO position, Adjust the antenna to obtain the best reception. MONO STEREO With the BAND SELECTOR switch in the FM position, set the FM MODE. switch t0 the STEREO or MONO position. The STEREO position is select: ed to Hasten to FM stereo broadcasts (The FM STEREO indicator illuminates.): moats ral broadcasts can also be received.
# Use only well-known brands of tape. ®Use of C-120 {120 minutes) cassettes is not recommended, The extreme thinness af this tape may result in breakage or either problems. Broken tapes can easily become entangled in the drive mechanism, causing major damage.
CASSETTE PLA s Use this unit with the REVERSE SELECTOR switch kept in the“CONT ct=g " position, Continuous playback farm the side facing you Side “A”) to the other side (side “B") wil be repeated automatically. To playback both sides just once, set it to the “1 CYCLE D& position. 5 o This product is designed that playback always starts from tha ide facing you {side “A”) when the » PLAY button is pressed. [POWER] FUNCTION the POWER/FUNCTION switch to the O/ TAPE position.
PROGRAM Press tha < PROGRAM button. *
# Operate the PASS during playback. #During PASS operation, do not press the 4i» PROGRAM bitten, Dang so will release the PASS operation. For Side A Forward PASS PLAY CAREER PLAY FAST WIN. Press the »» FAST WIND button that js the same direction 25 the SIDE-A indicator. For Side A Reverse PASS LAY =% IR REC PLAY | FAST Press the +« FAST WIND button that is the opposite direction of the SIDE-A indicator.
EY RECORDING *When recording important selections, b sure to make a peer When recording, the unit stops automatically when the end of luminary test to ensure that the desired material is being the tape on side facing you {side “A"} is reached. In this case, properly recorded, the Auto Reverse function will not work. e The ALC (Automatic Level Comptroller.
Press the Il PAUSE button 1o release the pause function, and play the tape about five seconds. In order for the PASS to operate correctly, there must be 8 space of at least 4-second duration between each item on the g8 prig o 11 PAUSE button. tape. In order to edit space (non-signal space) on tapes, i the instruct low, N P follow the instructions below. & Removes the erasing pig from its casket. 7 Press the 1 PAUSE Burton at the end of the recording. .
R A i Microphone should have en. impedance of 400 ohms to 3k chins and be equipped with 2 3,5 mm diameter plug. T Connect the microphone plug to the EXT MIG socket. 2 86t the POWER/FUNCTION switch to the () /TAPE position. 3 Perform steps and seep B of “Re carding from the Built-in Radia™ on page 11. speakers or by recurring volume. . !f howling is occurred, the ALC circuit operates and the sound of a phonographic became small for a while, ®The sound recorded from the external microphone is monaural.
I the heads are used for @ long time, the heads will gradually become magnetized. {than the Head Becomes Magnetized o Treble tones may be lost and distortion may result during playback. o State distortion mey be recorded when recording. » Distortion and noises may be recorded on previously recorded music tapes. Any of the above may occur. Demagnetize the head with a commercially sod head demagnetize approximately once scary 30 hours of plying time.