MODEL BB-HC1 PAGE IN US CHAR E / GE e n o h tal P Digi OPER 1. 2. 3. 4.
FCC‑15.fm Page 1 Wednesday, April 24, 2002 10:08 AM WARNING - FCC Regulations state that any unauthorized changes or modifications to this equipment not expressly approved by the manufacturer could void the user’s authority to operate this equipment. Note: This equipment has been tested and found to comply with the limits for a Class B digital device, pursuant to Part 15 of the FCC Rules.
all.book Page 1 Wednesday, April 24, 2002 9:49 AM Introduction Welcome, and thank you for choosing a SHARP HZT2202B cordless handset! The HZT2202B allows you to make both analog and digital phone calls Cordless handset specifications Frequency 2.4 GHz (2.405 to 2.475 GHz) Dimensions Width: 1.8" (46 mm) Depth: 1.7" (42 mm) Height: 7.1" (180 mm) (not including antenna) Weight Approx. 0.3 lbs. (115 g) (without battery) Battery 3.
all.book Page 2 Wednesday, April 24, 2002 9:49 AM Unplug the base from the power outlet and telephone jack and consult a qualified service representative if any of the following situations occur: - Liquid has been spilled into the base or the base has been exposed to rain or water. - The base produces odors, smoke, or unusual noises. - The power cord is frayed or damaged. - The base has been dropped or the housing damaged.
all.book Page 3 Wednesday, April 24, 2002 9:49 AM Table of Contents A Look at the Operation Panel 4 1. Setting Up 6 Selecting a Location for the Base. . . . . . . . . . . . . . . . . . . . . . . . . . . . 6 Connecting the AC Adapter and Telephone Line Cord . . . . . . . . . . . 7 Installing and Charging the Battery . . . . . . . . . . . . . . . . . . . . . . . . . . 8 Volume Adjustment . . . . . . . . . . . . . . . . . . . . . . . . . . . . . . . . . . . . . 11 2.
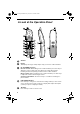
all.book Page 4 Wednesday, April 24, 2002 9:49 AM A Look at the Operation Panel 1 2 9 3 4 FUNCTION /FLASH REVIEW 5 6 7 UP ENTER SELECT LINE OFF TALK DOWN 1 2 ABC 3 DEF GHI 5 JKL 6 MNO PQRS 8 TUV 9 4 7 10 15 SEARCH 11 12 16 WXYZ 0 SHIFT 8 DIRECT DIAL PAUSE REDIAL ERASE HOLD 13 14 1 Antenna 2 Display This displays messages and prompts to help you use the cordless handset.
all.book Page 5 Wednesday, April 24, 2002 9:49 AM 6 REVIEW (left arrow) key Press the REVIEW key and then the UP or DOWN key to scroll through your most recently received calls (only available if you have Caller ID). This key can also be used to move the cursor left when entering or editing an auto-dial number or name. 7 Number keys Use these keys to dial numbers, and enter numbers and letters when storing auto-dial numbers.
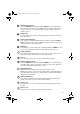
all.book Page 6 Wednesday, April 24, 2002 9:49 AM 1. Setting Up Selecting a Location for the Base To maximize the talking range of the cordless handset, we recommend installing the base in a high and central location away from obstructions such as walls. High and central location with no obstructions Keep the base away from other electrical appliances such as TVs, microwave ovens, computers, and other cordless phones. Do not place the base in direct sunlight.
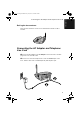
Page 7 Wednesday, April 24, 2002 9:49 AM Connecting the AC Adapter and Telephone Line Cord Raising the base antenna Raise the base antenna to ensure clear communication with the cordless handset. PAGE IN US CHAR E/ GE Connecting the AC Adapter and Telephone Line Cord ➊ Connect the AC adapter to the AC Adapter socket on the base, and then plug it into a 120-V, 60-Hz outlet.
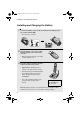
all.book Page 8 Wednesday, April 24, 2002 9:49 AM Installing and Charging the Battery Installing and Charging the Battery 1 Connect the battery connector þ (➊), and then place the battery pack in the cordless handset (➋). • Place the wires as shown. Red Black Red Black 2 Place the battery cover on the cordless handset, making sure it snaps firmly into place. • Make sure that the wires are not caught or pinched by the cover.
Page 9 Wednesday, April 24, 2002 9:49 AM Installing and Charging the Battery When the battery needs charging, LOW BATTERY will appear in the display and you will hear beeps during a phone conversation. Place the cordless handset in the base and let it charge. Note: If the battery is extremely low, nothing may appear in the display during the first several minutes that the cordless handset is in the base. The battery will begin to charge normally after several minutes.
all.book Page 10 Wednesday, April 24, 2002 9:49 AM Installing and Charging the Battery Connecting a headset You can connect a headset (purchased separately) to the headset jack. Remove the cap and insert the connector as shown. Setting the dial mode for the analog phone line The cordless handset is set to use tone dialing when you make a call on the analog phone line. If you are on a pulse dial line, you must set the cordless handset to use pulse dialing.
Page 11 Wednesday, April 24, 2002 9:49 AM Volume Adjustment Volume Adjustment You can adjust the volume of the receiver and ringer using the up and down arrow keys. Receiver volume 1 When talking on the cordless handset, press or until the display shows the desired volume level. Display: RECEIVER: HIGH RECEIVER: MIDDLE RECEIVER: LOW 11 1. Installation all.
all.book Page 12 Wednesday, April 24, 2002 9:49 AM Volume Adjustment Ringer 1 When the cordless handset is not being used for a phone call, press Display: RINGER: HIGH or until the display shows the desired ringer volume level. • The ringer will ring once at the selected RINGER: MIDDLE level. RINGER: LOW RINGER: OFF OK ? OK: PRESS ENTER 2 If you wish to turn off the ringer, press until “RINGER: OFF OK ?” appears and then press 12 ENTER .
all.book Page 13 Wednesday, April 24, 2002 9:49 AM 2. Using the Cordless Handset L1 (Line 1) is for calls over the analog line, and L2 (Line 2) is for calls over the digital line. The current line selection appears in the standby display. 2. Using the Handset Selecting the Line To change the line selection, SELECT LINE press before dialing.
all.book Page 14 Wednesday, April 24, 2002 9:49 AM Making a Phone Call OFF OFF TALK 1 Example: L2 is selected for a digital call Pick up the cordless handset. Check the display to make sure the desired L1 > L2 SELECT LINE line is selected. (Press to change the selection.) 2 Press 3 When you hear the dial tone, dial the number. TALK TALK . 1 2 ABC 3 DEF GHI 5 JKL 6 MNO PQRS 8 TUV 9 4 7 WXYZ 0 4 When you are ready to end the call, press OFF OFF .
all.book Page 15 Wednesday, April 24, 2002 9:49 AM Receiving a Phone Call Pre-set Dialing number first and then pressing Check the number in the display before pressing TALK TALK 2. Using the Handset You can also dial by entering the phone . . If there is a mistake, ERASE press HOLD to clear the mistake and then enter the correct digits. Note: If a pause is needed between any of the digits to access an outside line or a special service, press PAUSE REDIAL .
all.book Page 16 Wednesday, April 24, 2002 9:49 AM Using the DIRECT DIAL Key Using the DIRECT DIAL Key You can store a phone number in the DIRECT DIAL key. This allows you to dial the number by simply pressing the DIRECT DIAL key. ♦ Only one phone number can be stored in the DIRECT DIAL key. Storing a phone number in the DIRECT DIAL key FUNCTION /FLASH Display: 1 Press 2 Press ENTER . DIRECT # >ENTRY ERASE 3 Press ENTER .
all.book Page 17 Wednesday, April 24, 2002 9:49 AM Using the DIRECT DIAL Key Enter a name by pressing number keys for each letter as shown in the chart below. Up to 15 characters can be entered. (If you do not wish to enter a name, go directly to Step 7.
all.book Page 18 Wednesday, April 24, 2002 9:49 AM Using the Phone Book Dialing with the DIRECT DIAL key 1 Pick up the cordless handset and press SHIFT DIRECT DIAL . • The display shows the name and number stored in the DIRECT DIAL key. 2 Press TALK . • Dialing begins automatically. Note: You can also dial by pressing TALK first and then SHIFT DIRECT DIAL . Clearing the phone number in the DIRECT DIAL key 1 Press 2 Press FUNCTION /FLASH Display: and ENTER .
all.book Page 19 Wednesday, April 24, 2002 9:49 AM Using the Phone Book Enter the number (up to 16 digits) by pressing the number keys. (Note: A space cannot be entered.) ERASE • To clear a mistake, press . HOLD • If a pause is required between any of the digits to access a special service or an outside line, press . The pause appears as a hyphen (two PAUSE REDIAL seconds per pause). Several pauses can be entered in a row.
all.book Page 20 Wednesday, April 24, 2002 9:49 AM Using the Phone Book 6 Press 7 Return to Step 2 to store another number, or press ENTER . SEARCH DIAL UP/DOWN: SEARCH >: TEL # ENTRY OFF OFF to exit. Dialing a number in the phone book 1 Press 2 Press display. 3 Press SEARCH once. or TALK SEARCH DIAL UP/DOWN: SEARCH >: TEL # ENTRY until the number you wish to dial appears in the . • The number is automatically dialed.
all.book Page 21 Wednesday, April 24, 2002 9:49 AM Using the Phone Book 4 Press the number keys to enter the new number. HOLD 2. Using the Handset ERASE • To clear a mistake, press . If a pause is required between any of the digits to access a special service or an outside line, press PAUSE REDIAL . • If you do not wish to change the number, go directly to Step 5. 5 Press 6 Press the number keys to enter the new name (see Step 5 on page 19). ENTER .
all.book Page 22 Wednesday, April 24, 2002 9:49 AM Using the Phone Book ERASE 3 Press HOLD . 4 Press ENTER . 5 Press OFF OFF The selected number and name appear here ERASE? 000-0000 XXXXX SEARCH DIAL UP/DOWN: SEARCH >: TEL # ENTRY to exit. Deleting all numbers from the phone book If needed, you can delete all numbers from the phone book. 22 FUNCTION /FLASH Display: 1 Press 2 Press ENTER . PRESS ENTER KEY TO ERASE LPB 3 Press ENTER . ERASED once and once. >INIT.
all.book Page 23 Wednesday, April 24, 2002 9:49 AM Redial Redial 1 Press . REDIAL • Check the display to make sure the number that appears is the number you wish to dial. (If the wrong number appears, press 2 Press OFF OFF to clear it.) . The number is automatically dialed. TALK Note: You can also redial by pressing TALK first and then REDIAL . Note that this method does not allow you to check the number before dialing begins.
all.book Page 24 Wednesday, April 24, 2002 9:49 AM Locating the Cordless Handset Locating the Cordless Handset If you misplace the cordless handset, press the PAGE key on the base. The cordless handset will make a ringing sound to help you to locate it.
all.book Page 25 Wednesday, April 24, 2002 9:49 AM 3. Caller ID (Requires Subscription to Service) If you subscribe to a Caller ID service, you can have the cordless handset display the name and number of the caller when you receive a call. Important: subscribe separately for both the analog line and the digital line. ♦ Your cordless handset may not be compatible with some caller ID services. Turning on Caller ID 1 Press 2 Press 3 Press FUNCTION /FLASH ENTER Display: once and once.
all.book Page 26 Wednesday, April 24, 2002 9:49 AM Caller ID 7 Press ENTER . How Caller ID operates When you receive a call, the name of the caller will appear by the line (L1 or L2) in the cordless handset display, beginning just before the second ring. The information will continue to be displayed until the line is disconnected. To display the number in addition to the name, press ENTER . Note: Some caller ID services may not provide the name of the caller.
all.book Page 27 Wednesday, April 24, 2002 9:49 AM Caller ID Viewing your received calls If you subscribe to a Caller ID service, the cordless handset will keep information on the most recent 30 calls you have received. You can view this information, which consists of the date and time the call was received and the name and number of the caller, in the cordless handset’s display. You can automatically dial a number when it appears in the display.
all.book Page 28 Wednesday, April 24, 2002 9:49 AM Caller ID Erasing all of your received calls Follow these steps to erase all of your received calls. 1 Press REVIEW Display: . REVIEW DIAL UP/DOWN: REVIEW HOLD: ALL ERASE REVIEW DIAL ERASE ALL? PRESS ENTER KEY ERASE 2 Press HOLD . 3 Press ENTER . • To cancel, press 28 OFF OFF .
all.book Page 29 Wednesday, April 24, 2002 9:49 AM 4. Maintenance and Troubleshooting Replacing the Cordless Handset Battery Like any other battery, the rechargeable battery will eventually wear out. The battery can normally be used for about two years, although this will vary depending on the conditions of use.
all.book Page 30 Wednesday, April 24, 2002 9:49 AM Replacing the Cordless Handset Battery 4 Place the battery cover on the cordless handset, making sure it snaps firmly into place. 5 Place the cordless handset in the charger with the dial pad facing forward. • Let the new battery charge for at least 10 hours. PAGE IN CHA USE / RGE Battery disposal The battery pack contains a Nickel Metal Hydride battery. The battery must be disposed of properly.
all.book Page 31 Wednesday, April 24, 2002 9:49 AM Problems and Solutions Problems and Solutions If you have any problems with your cordless handset, first refer to the following troubleshooting guide. If you cannot solve the problem, call Sharp's Customer Assistance Center at 1-877-794-8675. Solution The cordless handset does not operate and nothing appears in the display. • Make sure the battery is properly connected inside the cordless handset (see page 8). Calls cannot be made or received.
all.book Page 32 Wednesday, April 24, 2002 9:49 AM Problems and Solutions You hear noise or interference during a call. • Make sure the base antenna is fully upright (see page 8). • Other electrical appliances may cause interference. Move away from any electrical appliances. • Move closer to the base. Note that large metal objects, metal structures, and thick walls between the base and cordless handset will reduce the talking range. If needed, try moving the base to a different location.
all.book Page 33 Wednesday, April 24, 2002 9:49 AM Display Messages Display Messages CHARGING The cordless handset is in the base and the battery is charging. HOLD A call has been placed on hold by pressing the HOLD key. To resume the call, press the HOLD key again. IN CHARGER The cordless handset is in the base and is fully charged (the cordless handset can be left in the base without damaging the battery). LOW BATTERY The cordless handset battery is low.
all.