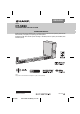
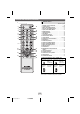
ENGLISH MODEL HT-SB60 SOUND BAR HOME THEATER SYSTEM OPERATION MANUAL Thank you for purchasing this SHARP product. To obtain the best performance from this product, please read this manual carefully. It will guide you in operating your SHARP product. HT-SB60 Sound Bar Home Theater system consisting of HT-SB60 (sound bar system) and CP-SW60 (active subwoofer system). 3D AUDIO TREBLE BASS Note: This product is recommended for flat panel TV (LED, LCD and plasma).
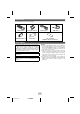
Accessories IO BA SS TR EB LE AUD 3 D The following accessories are included. Remote Control Subwoofer Stand x 2 Wall Mount Angle x 2 Pattern Paper Audio Cable x 1 HDMI Cable x 1 “AA” size battery (UM/SUM-3, R6, HP-7 or similar) x 1 Special Notes Warning: ● When the ON/STAND-BY button is set at STAND-BY position, mains voltage is still present inside the unit. When the ON/STAND-BY button is set at STAND-BY position, the unit may be brought into operation by the timer mode or remote control.
Precautions ● Do not remove the outer cover, as this may result General ● Please ensure that the equipment is positioned in a well-ventilated area and ensure that there is at least 10 cm of free space along the sides, top and back of the equipment. ● 10 cm 10 cm 10 cm 10 cm ● ● 10 cm 10 cm ● ● in electric shock. Refer internal service to your local SHARP service facility.
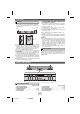
Controls and indicators (continued) Display 1 Subwoofer FRONT VIEW 2 DIGITAL REAR VIEW 1 3 3 DIGITAL 2 Reference Page 1. Dolby Digital Indicator . . . . . . . . . . . . . . . . . . . . . 12 2. DTS Indicator . . . . . . . . . . . . . . . . . . . . . . . . . . . . 12 3. Muting Indicator . . . . . . . . . . . . . . . . . . . . . . . . . . 11 4 PAIRING AC INPUT 5 Reference page 1. Power/Pairing Indicator . . . . . . . . . . . . . . . . . . . 10 2. Bass Reflect Duct 3. Woofer 4. Pairing button . .
Controls and indicators (continued) Remote Control 1 Reference page 1. Remote Control Transmitter. . . . . . . . . . . . . . . . 10 2. TV ARC Button. . . . . . . . . . . . . . . . . . . . . . . . . 8, 12 3. Music (Sound Mode) Button. . . . . . . . . . . . . . . . 11 4. Cinema (Sound Mode) Button . . . . . . . . . . . . . . 11 5. Sport (Sound Mode) Button . . . . . . . . . . . . . . . . 11 6. BYPASS Button . . . . . . . . . . . . . . . . . . . . . . . . . . 11 7. 3D AUDIO Button. . . . . . . . . . . . . .
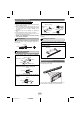
Sound bar preparation To mount the sound bar on the wall 4 Screw the wall mount angle to the wall as shown in Caution: ● Be very careful to prevent the sound bar 3.6 kg from falling when mounting on the wall. ● Before mounting, check the wall strength. (Do not put on the veneer plaster or whitewashed wall. The sound bar may fall.) If unsure, consult a qualified service technician. ● Mounting screws are not supplied. Use appropriate ones. ● Check all wall mount angle screws for looseness.
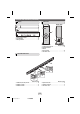
Placing the system Notes: Installation image: ● As the sound from the system is omni-directional, you can place the sound bar anywhere you like. However, it is recommended to place it as close to the TV as possible. ● The front panel of the sound bar is not removable. TV Caution: ● Do not change the installation direction when the sound bar is turned on. ● Do not stand or sit on the sound bar and subwoofer as you may be injured. Placing the stand Place the stand as shown.
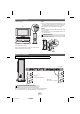
System connections (continued) HDMI Connection Caution: Turn off all other equipment before making this connection. The illustration below shows the flows of the signals. Audio and Video signal DVD/Blu-ray TV Digital tuner 1. Method 1 This connection is for HDMI TV with ARC (Audio Return Channel). TV To HDMI (TV ARC) input terminal DVD, Blu-ray disc player or similar To HDMI output terminal To HDMI input terminal Sound Bar To HDMI OUT (TV ARC) output terminal 2.
Audio connections to TVs, DVD players, VCRs, etc. Other connection (without HDMI) The illustration below shows the flows of audio and video signals. Audio signal Video signal TV DVD/Blu-ray Disc Player Digital tuner, etc. Notes: ● Refer to the operation manual of the equipment to be connected. ● Fully insert the plugs to avoid fuzzy pictures or noises. ● Connecting via this method may disable TV internal speakers.
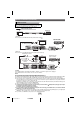
Remote control General control Battery installation 1 Open the battery cover. 2 Insert the supplied battery according to the terminal indicated in the battery compartment. When inserting or removing the battery, push it towards the battery terminals. 3 Close the battery cover. Caution: ● Remove the battery if the sound bar will not be used for a long period of time. This will prevent potential damage due to battery leakage. ● Do not use rechargeable battery (nickel-cadmium battery, etc.).
General control (continued) ● When pairing is successful: Muting On sound bar: “PAIRING” disappears. On subwoofer: indicator turns blue. The volume is muted temporarily when pressing the (MUTE) button on the remote control. Press again to restore the volume. Note: When the sound bar is turned off and back on again, muting is cancelled. Subwoofer Sound Bar Sound Mode PAIRING Notes: ● If a device such as microwave oven, wireless LAN card, Bluetooth device or any other device that uses the same 2.
General control (continued) General control (continued) Press the 3D AUDIO button repeatedly to select: Speaker output selection (HDMI connection) 3D AUDIO 1 : Sound effect that emphasizes 3D sound. Press and hold (MUTE) button on the remote control until “TV SPEAKER” or “SB SPEAKER” appears on the display to toggle sound output between this sound bar or TV. 3D AUDIO 2 : Sound effect that maintains the 3D sound and improve vocal clarity.
Troubleshooting chart Many potential problems can be resolved by the owner without calling a service technician. If something is wrong with this product, check the following before calling your authorised SHARP dealer or service centre. Symptom ● Wireless connection cannot be established. General Symptom ● No sound is heard. Possible cause ● ● ● The sound from subwoofer is not well balanced. ● Power turns off suddenly.
Specifications Maintenance Cleaning the cabinet Periodically wipe the cabinet with a soft cloth. Caution: ● Do not use chemicals for cleaning (petrol, paint thinner, etc.). It may damage the cabinet finish. ● Do not apply oil to the inside of each component. It may cause malfunctions. As part of our policy of continuous improvement, SHARP reserves the right to make design and specification changes for product improvement without prior notice.
For Australia and New Zealand customers FOR LOCATION ENQUIRIES WITHIN AUSTRALIA REGARDING YOUR LOCAL SHARP APPROVED SERVICE CENTRE VISIT OUR WEBSITE AT www.sharp.net.au OR CALL SHARP CUSTOMER CARE 1300 135 022 (LOCAL CALL COSTS APPLY WITHIN AUSTRALIA) SHARP CORPORATION OF AUSTRALIA PTY LTD FOR LOCATION ENQUIRIES WITHIN NEW ZEALAND REGARDING YOUR LOCAL SHARP APPROVED SERVICE CENTRE VISIT OUR WEBSITE AT www.sharp.net.
WARRANTY Consumer Electronic Products Congratulations on Your Purchase! This Sharp product is warranted against faults in material and manufacture for the period as stated in the table below. If service is required during the warranty period, please contact your nearest Sharp Approved Service Centre. These repairs would be carried out at no charge to the owner, subject to the conditions specified herein.