Home Appliances Air Purifier “Plasmacluster” and “Device of a cluster of grapes” are trademarks of Sharp Corporation.
Before operating your new air purifier, please read the following The air purifier draws in room air through the air intake, circulates it through a Pre-Filter, a Deodorizing Filter and a HEPA Filter inside the unit, and then discharges it through the air outlet. The HEPA Filter can remove 99.97% of dust particles as small as 0.3 microns that pass through the filter and also helps absorb odours. The Deodorizing Filter gradually absorbs odours as they pass through the filter.
FEATURES A Unique Combination of Air Treatment Technologies Triple Filtration System + Plasmacluster + Humidification TRAPS DUST* Pre-Filter traps dust and other large airborne particles. DECREASES ODOURS ENGLISH ENGLISH CONTENTS IMPORTANT SAFETY INSTRUCTIONS...... E-2 PART NAMES............................................... E-6 PREPARATION............................................. E-8 OPERATION................................................
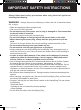
IMPORTANT SAFETY INSTRUCTIONS Always follow basic safety precautions when using electrical appliances, including the following: WARNING – Always observe the following to reduce the risk of electrical shock, fire, or injury: • Read all instructions before using the unit. • Use only a 220-240 volt outlet. • Do not use the unit if the power cord or plug is damaged or if the connection to the wall outlet is loosened. • Periodically remove dust from the power plug.
ENGLISH • Replace the water in the Humidifying Tray daily with fresh tap water, and regularly clean it (Ref. E-14 and E-15). When the unit is not in use, dispose of the water in the Humidifying Tray. Leaving water in the Humidifying Tray can cause mold, bacteria, and bad odours. In rare cases, such bacteria can be a health hazard.
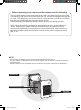
IMPORTANT SAFETY INSTRUCTIONS • Before moving the unit, make sure it is not operating, and remove the Humidifying Tray while holding the side handle of the unit. • When removing / reattaching the Humidifying Tray, be careful not to get your fingers caught inside the unit. • When moving the unit, use the handles on both sides. Do not move the unit when it is in operation. • Do not block the air intake or air outlet.
ENGLISH A. Information on Disposal for Users (private households) 1. In the European Union Attention: Your product is marked with this symbol. It means that used electrical and electronic products should not be mixed with general household waste. There is a separate collection system for these products.
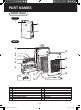
PART NAMES FRONT / BACK FRONT 1 2 3 BACK BACK 4 13 5 6 14 7 8 9 15 10 1 2 3 4 5 6 7 8 16 11 12 (Plug shape varies by country.) 9 10 11 12 13 14 15 16 Operation Panel / Display (Ref.E-5) Handle (2 Locations) Main Unit Air Outlet Filter Frame Humidifying Filter Float (in Filter Frame) Tray Handle Humidifying Tray Float HEPA Filter Deodorizing Filter Sensor Filter / Sensor (internal) Back Panel (Pre-Filter) Air lnlet Power Cord / Plug E-6 KC-F32EU_OM_WEST.
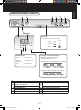
6 7 5 4 3 2 1 ENGLISH OPERATION PANEL / DISPLAY Display Dust Sign Indicates the air purify level 3 colours. Green Clean Orange Red Impure 8 9 Humidify Light Humidity / Temperature monitor Green................. Humidify ON Indicates the approximate humidity / temperature level in the room. Green................. Unit needs water (Flashing) Temperature 0 to 50ºC is displayed at 1ºC-intervals. Off ......................
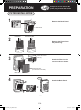
PREPARATION PREPARATION Always sure removethe the Always bebe sure totoremove power plug from outlet. power plug from the the wallwall outlet. FILTER FILTER INSTALLATION INSTALLATION 1 Remove the Back Panel. Back Panel 2 HEPA filter Deodorizing filter Remove the Filters from the plastic bag. Place the surface with tag. 3 Install the Filters in the correct order as shown. Tag Deodorizing filter (The same on both sides.) HEPA filter 4 Click Install the Back Panel. E-6 E-8 KC-F32EU_OM_WEST.
ENGLISH REFILLING THE HUMIDIFYING TRAY Humidify air passed through by vaporizing water pumped up from Humidifying Tray. The unit can be used even without water in the Humidifying Tray. 1 Pull out the Humidifying Tray. Clean the Humidifying Tray if it becomes dirty or there is a noticeable odour. (Ref. E-14,E-15) 2 Fill the Humidifying Tray with tap water by method A or B . A FULL CAUTION • The Filter Frame is floated up when water is filled.
OPERATION START / STOP START STOP • Select the desired fan speed with . • Unless the power cord has been unplugged, the operation starts in the previous mode it was operated in. CLEAN ION SHOWER Releases high-density Plasmacluster ions and discharges strong air flow for 60 minutes. START NOTE • When the operation finishes, the unit will return to the prior operation mode. It is able to change the other mode during this mode. FAN SPEED Select the desired fan speed.
USEFUL FUNCTION ENGLISH LIGHT CONTROL You can set the front surface Indicators to OFF when the Indicator is too bright. ON OFF Press more than 3 seconds. Press more than 3 seconds. Plasmacluster Ion ON/OFF When Plasmacluster Ion is ON, the Plasmacluster Ion Indicator Light is on. (blue) OFF ON Press more than 3 seconds. NOTE Press more than 3 seconds. ON OFF Changing display (humidity / temperature) You can select either humidity or temperature at the time to be displayed.
USEFUL FUNCTION Off TIMER Select the length of time you want. The unit automatically stops once the selected time is reached. 1 hour 2 hours 4 hours 8 hours CANCELLATION NOTE • Pressing displays the remaining time. • To reset the operating time, press while the remaining time is being displayed. Auto RESTART If the unit is unplugged or if there is a power failure, the unit will resume operation with the previous settings after power is restored. The default setting is ON.
CARE AND MAINTENANCE MAINTENANCE CARE AND The filter Indicator Light will turn on after approximately 720 hours. (30 days × 24 hours =720 hours) This is a reminder to perform the maintenance described below. (Ref.E-13,E-14,E-15,E-16) After performing maintenance, reset the Filter Indicator. RESET (Press 3 sec.) Press more than 3 seconds. In case of using at the location where air pollution and odour are significant, maintain frequently even if Filter Indicator Light is not ON.
CARE CAREAND AND MAINTENANCE MAINTENANCE HUMIDIFYING HUMIDIFYINGFILTER FILTER/ /TRAY TRAY Odour occurrence may be suppressed when washing Humidifying Filter and Humidifying Tray with water carefully even if the Filter Indicator Light is not ON. Remove the Humidifying Filter from the Tray. Turn down Remove Pull up 1 Open Turn the handle down on the reverse side. CAUTION Remove the Filter Frame. Remove the Humidifying Filter.
How to remove the water scale Recommended descaling solutions • Citric acid (available at some drugstores) • 100% bottled lemon juice with no pulp. stir well! 2 1/ 2 cups of water 3 teaspoons 2 stir well! 3 cups of water NOTE 1/ 4 1. Soak in water with a descaling solution for about more 30 minutes. CAUTION • W hen using lemon juice as your descaling solution, allow for more soak time. 2. Rinse off the descaling solution with plenty of water.
CARE AND MAINTENACE UNIT Wipe with a dry, soft cloth. CAUTION • D o not use volatile fluids. Benzene paint thinner or polishing powder can damage the surface. • Do not use detergents. Detergent ingredients can damage the unit. CLEANING FILTERS Gently remove dust with an appropriate cleaning tool, such as a vacuum cleaner with the proper attachment. In case of using at the location where air pollution and odour are significant, maintain frequently even if Filter Indicator Light is not ON.
Always be sure to remove the power plug from the wall outlet. ENGLISH FILTER FILTER REPLACEMENT REPLACEMENT LIFE OF FILTERS Filter life varies depending on the room environment, usage conditions, and location of the unit. Lifespan of HEPA filter and Deodorizing filter and replacement suggestions are based on purifying a room in which 5 cigarettes are smoked per day and the unit's dust collection and deodorizing performance has declined to half the level of a new filter.
TROUBLESHOOTING TROUBLESHOOTING Before calling for service, review the troubleshooting chart below to make sure that the problem is not a unit malfunction. SYMPTOM REMEDY (the following are not due to a malfunction) Odour and smoke persists. •C heck the filters. If they appear to be extremely dirty, clean or replace them. (Ref. E-13,E-14,E-15,E-16,E-17) The Dust Sign light is green even when the air is not clean. • The air may have been dirty when the unit was plugged in.
220-240V 50-60Hz Power supply Fan Speed Adjustment MAX MED SLEEP Fan Speed (m /hour) 180 125 52 Rated Power (W) 27 12 4.1 3 CLEAN AIR CLEAN AIR &HUMIDIFY Noise Level (dBA) 48 38 21 Fan Speed (m3/hour) 180 125 52 Rated Power (W) 27 12 4.1 Noise Level (dBA) 48 38 21 Humidification (mL/hour)*1 350 280 140 Recommended Room Size (m2)*2 ~21 High density Plasmacluster ion recommended room size (m2)*3 ~17 Humidifying Tray Capacity (L) 1.
Bevor Sie Ihren neuen Luftreiniger benutzen, lesen Sie bitte Folgendes Der Luftreiniger zieht durch den Lufteinzug Raumluft ein, lässt sie durch einen Vorfilter, einen Deofilter und einen HEPA-Filter im Gerät fließen, und gibt sie dann durch den Luftauslass wieder in den Raum ab. Der HEPA-Filter kann 99,97 % der Staubpartikel, die den Filter passieren, mit einer Mindestgröße von 0,3 Mikron entfernen, und trägt dazu bei, Gerüche zu absorbieren.
DEUTSCH MERKMALE INHALT Eine einzigartige Kombination von Luftaufbereitungstechnologien Dreifach-Filtersystem + Plasmacluster + Befeuchtung BEZEICHNUNG DER BAUTEILE........ DE-6 FÄNGT STAUB AUF* Der Vorfilter fängt Staub und andere große Partikel aus der Luft auf. VERRINGERT GERÜCHE VORBEREITUNG....................................DE-8 BETRIEB................................................... DE-10 Deofilter absorbiert viele gewöhnliche Haushaltsgerüche. NÜTZLICHE FUNKTIONEN..................
WICHTIGE SICHERHEITSANWEISUNGEN B e i d e r Ve r w e n d u n g v o n E l e k t r o g e r ä t e n s o l l t e n g r u n d l e g e n d e Sicherheitsvorkehrungen befolgt werden, einschließlich der folgenden: WARNUNG – Um das Risiko von Elektroschocks, Feuer oder Verletzungen zu vermeiden: • Bitte lesen Sie alle Anweisungen sorgfältig durch, bevor Sie das Gerät benutzen. • Bitte nur an eine 220-240 Volt-Steckdose anschließen.
DEUTSCH • Wechseln Sie das Wasser im Befeuchtungsfach täglich mit frischem Leitungswasser aus dem Wasserhahn aus und reinigen Sie das Befeuchtungsfach regelmäßig (Ref. DE-14 und DE-15). Wenn das Gerät nicht benutzt wird, entsorgen Sie das Wasser im Befeuchtungsfach . Bleibt das Wasser im Befeuchtungsfach, können Schimmel, Bakterien und schlechte Gerüche entstehen. In seltenen Fällen können solche Bakterien ein Gesundheitsrisiko darstellen.
WICHTIGE SICHERHEITSANWEISUNGEN • Ehe Sie das Gerät bewegen, sollten Sie sicherherstellen, dass dieses nicht eingeschalten ist. Zudem sollten Sie das Befeuchtungsfach entfernen wenn Sie das Gerät an den Seitengriffen halten. • Wenn Sie das Befeuchtungsfach entfernen/erneut einsetzen, achten Sie bitte darauf nicht die Finger einzuklemmen. • Wenn Sie das Gerät tragen, halten Sie das Gerät an beiden Seitengriffen fest. Bewegen Sie das Gerät nicht, wenn es in Betrieb ist.
A. Entsorgungsinformationen (für Haushalte) Achtung: Ihr Produkt ist mit diesem Symbol gekennzeichnet. Dies bedeutet, dass Elektro-Altgeräte nicht mit dem allgemeinen Hausmüll vermischt werden dürfen. Es gibt ein separates Sammelsystem für diese Produkte. WENN SIE DAS GERÄT ENTSORGEN MÖCHTEN, TUN SIE DAS GERÄT WEDER IN DEN HAUSMÜLL NOCH IN EINEN KAMIN! Benutzte Elektrogeräte sollte immer GETRENNT entsorgt und wiederaufbereitet werden, gemäß den örtlichen Gesetzen.
BEZEICHNUNG DER BAUTEILE VORDERSEITE/RÜCKSEITE VORDERSEITE 1 2 3 BACK RÜCKSEITE 4 13 5 6 14 7 8 9 15 10 1 2 3 4 5 6 7 8 Bedienfeld/Anzeige (Ref. DE-5) Griff (2 Orte) Gerätekörper Luftauslass Filterrahmen Befeuchtungsfilter Schwimmer (im Filterrahmen) Fachgriff 16 11 12 (Steckerform unterscheidet sich je nach Land.
BEDIENFELD/ANZEIGE 5 4 3 2 1 DEUTSCH 6 7 Anzeige STAUBANZEIGE Zeigt die 3 Farben der Luftreinheitsstufe. Grün Sauber Orange Rot Unrein 8 9 Befeuchtungsleuchte Feuchtigkeit/Temperaturüberwachung Grün................... Befeuchtung EIN Zeigt das geschätzte Feuchtigkeits-/ Temperaturniveau im Raum. Grün................... Zu wenig Wasser (Blinkend) Temperatur 0 bis 50 ºC wird in 1-ºC-Intervallen angezeigt. Aus ....................
VORBEREITUNG PREPARATION Denken Sie dass Siethe den Always beimmer suredaran, to remove power from the wall outlet. Steckerplug aus der Wandsteckdose ziehen. FILTEREINBAU FILTER INSTALLATION 1 Hintere Abdeckung entfernen. Hintere Abdeckung 2 HEPA-Filter Deofilter Filter aus dem Plastikbeutel entnehmen. Platzieren Sie die Oberfläche mit dem Etikett. 3 Bauen Sie die Filter in der richtigen Reihenfolge ein, wie angegeben. Etikett Deofilter (Auf beiden Seiten gleich.
NACHFÜLLEN DES BEFEUCHTUNGSFACHS Ziehen Sie das Befeuchtungsfach heraus. VORSICHT Reinigen Sie das Befeuchtungsfach, wenn es verschmutzt ist oder Gerüche entstehen. (Lesen Sie dazu DE-14, DE-15) 2 A Befüllen Sie das Befeuchtungsfach mit Leitungswasser entsprechend der Anweisungen A oder B . VOLL VORSICHT • Der Filterrahmen schwimmt nach oben, wenn Wasser eingefüllt wird. • Wenn Sie das Befeuchtungsfach tragen, halten Sie es mit beiden Händen fest oder benutzen Sie den Fachgriff.
BETRIEB START/STOPP START STOPP • Wählen Sie mit die gewünschte Lüftergeschwindigkeit aus. • Solange das Stromkabel nicht ausgesteckt wurde, beginnt der Betrieb im vorherigen Betriebsmodus. IONENDUSCHE-REINIGUNG Stößt Plasmacluster-Ionen mit hoher Dichte und einem starken Luftfluss 60 Minuten aus. START HINWEIS • Wenn der Betrieb beendet ist, kehrt das Gerät in den vorherigen Betriebsmodus zurück. In diesem Modus kann das Gerät den anderen Modus ändern.
NÜTZLICHE FUNKTIONEN LICHTSTEUERUNG Sie können die Anzeigen auf der Vorderseite auf AUS stellen, wenn sie zu hell leuchten. AUS Länger als 3 Sekunden drücken. DEUTSCH EIN Länger als 3 Sekunden drücken. Plasmacluster-Ionen EIN/AUS Wenn „Plasmacluster-Ionen“ auf „EIN“ geschaltet ist, ist die Plasmacluster-Ionen-Anzeigeleuchte eingeschaltet. (blau) AUS EIN Länger als 3 Sekunden drücken. HINWEIS Länger als 3 Sekunden drücken.
NÜTZLICHE FUNKTIONEN AUS-ZEITSCHALTER Wählen Sie die gewünschte Zeitspanne aus. Das Gerät stoppt automatisch, sobald die ausgewählte Zeit erreicht ist. 1 Stunde 2 Stunden 4 Stunden 8 Stunden ABBRUCH HINWEIS • Das Drücken von zeigt die Restzeit an. • Um die Betriebszeit zurückzusetzen, drücken Sie , während die Restzeit angezeigt wird.
PFLEGE UND WARTUNG CARE AND MAINTENANCE Die Filteranzeigeleuchte schaltet sich nach etwa 720 Stunden ein. (30 Tage × 24 Stunden = 720 Stunden) Dies ist eine Erinnerung, um die unten beschriebene Wartung durchzuführen. (Vgl. DE-13, DE-14, DE-15, DE-16) PFLEGEINDEX RESET (Press 3 sec.) Länger als 3 Sekunden drücken.
PFLEGE UND WARTUNG CARE AND MAINTENANCE BEFEUCHTUNGSFILTER/FACH BEFEUCHTUNGSFILTER/FACH Das Auftreten von Gerüchen kann eingedämmt werden, wenn Sie den Befeuchtungsfilter und das Befeuchtungsfach sorgfältig mit Wasser reinigen, selbst wenn die Filter-Anzeigeleuchte nicht auf EIN geschaltet ist. Entfernen Sie den Befeuchtungsfilter aus dem Fach. Umklappen Nach oben ziehen Abnehmen 1 Öffnen Klappen Sie den Griff auf der Rückseite um. Entfernen Sie den Filterrahmen.
Denken Sie immer daran, dass Sie den Always be sure to remove the power plug Stecker aus der Wandsteckdose ziehen. from the wall outlet. Entfernung des Wasserkalks 1. In Wasser mit der Entkalkungslösung Empfohlene Entkalkungslösungen • Zitronensäure (erhältlich in einigen Drogerien) etwa 30 Minuten lang aufweichen lassen. • 100% Zitronensaft ohne Fruchtfleisch in Flaschen.
PFLEGE UND WARTUNG ANLAGE Mit einem trockenen und weichen Tuch abwischen. VORSICHT • K eine flüchtigen Flüssigkeiten verwenden. Benzin, Farbverdünner und Polierpulver usw. können die Oberfläche beschädigen. • Keine Reinigungsmittel verwenden. Die Inhaltsstoffe von Reinigungsmitteln können das Gerät beschädigen. REINIGEN DER FILTER Entfernen Sie den Staub vorsichtig mit einem geeigneten Reinigungswerkzeug wie einem Staubsauger mit geeignetem Zubehörteil.
Stellen Sie immer sicher, den Stecker aus der Wandsteckdose zu ziehen. FILTERWECHSEL FILTERWECHSEL Die Filterlebenszeit hängt von der Raumumgebung, der Verwendung und dem Aufstellungsort des Geräts ab. Die Lebenszeit des HEPA-Filters und des Deofilter und die Ersatzempfehlungen basieren auf der Reinigung eines Raums, in dem täglich 5 Zigaretten geraucht werden, und der Annahme, dass die Staubauffang- und Deoleistung auf die Hälfte der Werte eines neuen Filters gesunken sind.
TROUBLESHOOTING FEHLERBEHEBUNG Bevor Sie den Kundendienst anrufen, lesen Sie sich bitte zuerst die Tabelle „Fehlerbehebung“ durch, da das Problem möglicherweise keine Gerätefehlfunktion ist. PROBLEM LÖSUNG (folgende Punkte sind keine Fehlfunktion) Gerüche und Rauch sind weiterhin vorhanden. • Überprüfen Sie die Filter. Wenn Sie extrem schmutzig erscheinen, reinigen oder ersetzen Sie sie. (Vgl. DE-13, DE-14, DE-15, DE-16, DE-17) Die Staubanzeige leuchtet grün, selbst wenn die Luft nicht sauber ist.
TECHNISCHE ANGABEN 220-240 V 50-60 Hz Stromversorgung MAX MIT SCHLAFEN Lüftergeschwindigkeit (m /Stunde) 180 125 52 Nennleistung (W) 27 12 4,1 3 SAUBERE LUFT SAUBERE LUFT & BEFEUCHTUNG Geräuschpegel (dBA) 48 38 21 Lüftergeschwindigkeit (m3/Stunde) 180 125 52 Nennleistung (W) 27 12 4,1 Geräuschpegel (dBA) 48 38 21 Befeuchtung (mL/Stunde)*1 350 280 140 Empfohlene Raumgröße (m2)*2 ~21 Empfohlene Raumgröße für High Density Plasmacluster Ion (m2)*3 ~17 Befeuchtungsfach-Kapaz
Veuillez lire ces instructions avant d'utiliser votre nouveau purificateur d'air. Le purificateur d’air achemine l’air de la pièce par l’entrée d’air, le fait passer à l’intérieur de l’appareil par un pré-filtre, un filtre désodorisant et un filtre HEPA, puis l’air est évacué par la sortie d’air. Le filtre HEPA peut arrêter 99,97 % des particules de poussière, jusqu’à une taille de 0,3 microns, passant par le filtre tout en aidant à absorber les odeurs.
FRANÇAIS FONCTIONS TABLE DES MATIERES Combinaison unique de technologies de traitement de l'air Système triple de filtration + Plasmacluster + Humidification INSTRUCTIONS IMPORTANTES DE SÉCURITÉ....F-2 NOMENCLATURE.................................... F-6 CAPTE LA POUSSIÈRE* Le pré-filtre collecte la poussière et les autres grosses particules en suspension dans l’air. FONCTIONNEMENT............................... F-10 ABSORBE LES ODEURS FONCTION UTILES ................................
INSTRUCTIONS IMPORTANTES DE SÉCURITÉ Lorsque vous utilisez des appareils électriques, des précautions élémentaires de sécurité doivent être suivies, notamment les suivantes : AVERTISSEMENT – Suivez toujours les instructions suivantes pour réduire le risque d’électrocution, d’incendie ou de blessures corporelles : • Lisez toutes les instructions avant d'utiliser l'appareil. • Utilisez uniquement une prise 220-240 volt.
FRANÇAIS • Remplacez l’eau du bac d’humification avec de l’eau fraiche du robinet, et nettoyez-le régulièrement (Ref. F-14 et F-15). Lorsque l’appareil n’est pas utilisé, videz l’eau du bac d'humification. Laissez de l’eau dans le bac d'humification peut causer la formation de moisissure, de bactéries et de mauvaises odeurs. De telles bactéries peuvent causer un risque à la santé.
INSTRUCTIONS IMPORTANTES DE SÉCURITÉ • Avant de déplacer l'appareil, assurez-vous qu’il ne fonctionne pas et retirez le bac d'humification tout en tenant la poignée latérale de l’appareil. • Lorsque vous retirez ou remettez en place le bac d'humification, faites attention à ne pas vous coincer les doigts dans l’appareil. • Lorsque vous déplacez l’appareil, utilisez les poignées de chaque côté. Ne déplacez pas l’appareil lorsqu'il est en fonctionnement. • Ne bloquez pas l'entrée ou la sortie d'air.
A. Informations sur la mise au rebut pour les utilisateurs domestiques Attention : votre produit est marqué de ce symbole. Il indique que les produits électriques et électroniques usagés ne doivent pas être mélangés aux ordures domestiques. Il existe un système de collecte séparé pour ces produits. SI VOUS SOUHAITEZ METTRE CET ÉQUIPEMENT AU REBUT, N'UTILISEZ PAS UNE POUBELLE ORDINAIRE ET NE LE METTEZ PAS AU FEU.
NOMENCLATURE AVANT / ARRIÈRE AVANT 1 2 3 BACK ARRIÈRE 4 13 5 6 14 7 8 9 15 10 1 2 3 4 5 6 7 8 16 11 12 (La forme de la prise dépend du pays.) Panneau de commandes / affichage (Ref.
PANNEAU DE COMMANDES / AFFICHAGE 7 5 4 3 2 1 FRANÇAIS 6 Affichage Symbole de poussière Indique le niveau de pureté de l'air en 3 couleurs. Vert Propre Orange Rouge Sale 8 9 Voyant humidification Moniteur d’humidité et de température Vert .................... Humidification activée Indique le niveau approximatif d'humidité et de température de la pièce. Vert .................... L'appareil a besoin d’eau (Clignotant) La température entre 0 et 50ºC est indiquée par intervalle de 1ºC.
PREPARATION PRÉPARATION Assurez-vous toujours de débrancher Always be sure to remove the le power plug from the de wall outlet. cordon d'alimentation la prise murale. INSTALLATION DU FILTRE FILTER INSTALLATION 1 Retirez le panneau arrière. Panneau arrière 2 Filtre HEPA Filtre désodorisant Retirez les filtres du sac plastique. Placez le côté avec la languette vers l’extérieur. 3 Installez les filtres dans l'ordre correct tel qu'indiqué.
REMPLISSAGE DU BAC D’HUMIFICATION L’air humidifié passe à travers de la vapeur d'eau générée depuis le bac d'humification. L'appareil peut être utilisé sans eau dans le bac d'humification. 1 Retirez le bac d'humification. Nettoyez le bac d'humification s’il devient sale ou si une odeur notable s’en dégage. (Ref F-14, F-15) 2 Remplissez le bac d'humification avec de l’eau du robinet via la méthode A ou B . A PLEIN ATTENTION • Le cadre de filtre flotte lorsque le récipient d’eau est plein.
FONCTIONNEMENT DÉMARRAGE/ARRÊT DÉMARRAGE ARRÊT • Sélectionnez la vitesse de ventilation désirée avec . • Sauf si le cordon d'alimentation a été débranché, le fonctionnement reprend dans le mode précédemment utilisé. NETTOYAGE DE L'AIR ET DOUCHE D'IONS Libère des ions Plasmacluster à haute densité et émet un puissant courant d’air pendant 60 minutes. DÉMARRAGE REMARQUE • Lorsque l'opération est terminée, l’appareil retournera au mode de fonctionnement précédent.
FONCTIONS UTILES CONTRÔLE DE LA LUMINOSITÉ Vous pouvez régler l'indicateur avant sur ARRÊT lorsque l'indicateur est trop lumineux. Arrêt Pressez pendant plus de 3 secondes. Pressez pendant plus de 3 secondes. FRANÇAIS Marche IONS PLASMACLUSTER MARCHE/ARRÊT Lorsque les Ions Plasmacluster sont en marche, le voyant d'ions Plasmacluster s'allume (bleu). Arrêt Marche Pressez pendant plus de 3 secondes. REMARQUE Pressez pendant plus de 3 secondes.
FONCTIONS UTILES MINUTERIE D'ARRÊT Sélectionnez la durée que vous souhaitez. L'appareil démarre automatiquement une fois la durée sélectionnée atteinte. 1 heure 2 heures 4 heures 8 heures ANNULATION REMARQUE • Presser affiche le temps restant. • Pour réinitialiser la durée d’utilisation, pressez lorsque le temps restant est affiché.
ENTRETIEN ET MAINTENANCE CARE AND MAINTENANCE INDICATEUR DE FILTRE Le voyant indicateur de filtre s’allumera après environ 720 heures. (30 jours x 24 heures = 720 heures) Ceci est un rappel d’effectuer l’entretien décrit ci-dessous. (Ref. F-13, F-14, F-15, F-16) Pressez pendant plus de 3 secondes. Lorsque l’appareil est utilisé dans un emplacement présentant une pollution de l’air et des odeurs importantes, effectuez régulièrement l’entretien même si le voyant indicateur de filtre n'est pas allumé.
ENTRETIEN ET MAINTENANCE CARE AND MAINTENANCE FILTRE FILTRE/ /BAC BACD'HUMIDIFICATION D'HUMIDIFICATION La présence d’odeur peut être supprimée en lavant le filtre d'humification et le bac d'humification doucement avec de l’eau même si le voyant indicateur de filtre n’est pas allumé. Retirez le filtre d'humification du bac. Tourner vers la bas Retirer Tirer vers le haut 1 Espace libre Tournez la poignée vers la bas sur la face arrière. ATTENTION Retirez le cadre de filtre.
Assurez-vous toujours de débrancher le Always be sure to remove the power plug cordon d'alimentation de la prise murale. from the wall outlet. Comment enlever le tartre Solutions recommandées de détartrage • Acide citrique (disponible dans certains supermarchés ou boutiques de cuisine) • Jus de citron 100% sans pulpe en bouteille. mélangez bien! 3 cuillères à café 2 1/ 2 tasses d’eau 2 mélangez bien! 3 tasses d'eau REMARQUE 1/ 4 1.
ENTRETIEN ET MAINTENANCE APPAREIL Séchez avec un chiffon doux et sec. ATTENTION • N 'utilisez pas de fluides volatiles. Les diluants à base de benzène et poudres de polissage peuvent endommager la surface. • N'utilisez pas de détergents. Les ingrédients des détergents peuvent endommager l’appareil. NETTOYAGE DES FILTRES Retirez doucement la poussière avec un outil approprié de nettoyage, tel qu’un aspirateur avec un embout adapté.
Assurez-vous toujours de débrancher le cordon d'alimentation de la prise murale. REMPLACEMENT DE FILTRE DURÉE DE VIE DES FILTRES • Filtre HEPA • Filtre désodorisant • Filtre d'humidification FRANÇAIS Nous recommandons de remplacer le filtre plus fréquemment si l’appareil est utilisé dans des conditions beaucoup plus intenses (fumée, etc.) qu’un ménage normal.
TROUBLESHOOTING DÉPANNAGE Avant d'appeler le service d’entretien, référez-vous au diagramme de dépannage cidessous pour vous assurer que le problème n'est une panne de l’appareil. SYMPTÔMES SOLUTION (les problèmes ci-dessous ne sont pas dus à une panne) Les odeurs et la fumée persistent • Vérifiez les filtres. S’ils paraissent très sales, nettoyez ou remplacez-les. (Ref. F-13, F-14, F-15, F-16, F-17) Le voyant de poussière est vert même lorsque l’air n’est pas propre.
SPÉCIFICATIONS 220-240 V 50-60 Hz Alimentation électrique MAX MOYEN VEILLE Vitesse de ventilateur (m /heure) 180 125 52 Puissance nominale (W) 27 12 4,1 3 NETTOYAGE DE L'AIR NETTOYAGE DE L'AIR & HUMIDIFICATION Niveau de bruit (dBA) 48 38 21 Vitesse de ventilateur (m3/heure) 180 125 52 Puissance nominale (W) 27 12 4,1 Niveau de bruit (dBA) 48 38 21 Humidification (mL/heure)*1 350 280 140 Taille de pièce recommandée (m2)*2 ~21 Taille de pièce recommandée pour ions Plasmaclu
Lees de onderstaande informatie alvorens u uw nieuwe luchtreiniger in gebruik neemt De luchtreiniger neemt via de luchtinlaat de kamerlucht op, laat de lucht achtereenvolgens circuleren door een voorfilter, een geurfilter en een HEPA-filter en blaast de lucht dan via de luchtuitlaat weer de kamer in. De HEPA-filter verwijdert 99,97% van stofdeeltjes groter dan 0,3 micron die de filter passeren en helpt zo geuren absorberen. De geurfilter absorbeert geurtjes als deze door de filter gaan.
NEDERLANDS KENMERKEN INHOUD Een unieke combinatie van luchtbehandelingstechnologieën Drievoudig filtratiesysteem + Plasmacluster + Bevochtiging BELANGRIJKE VEILIGHEIDSINSTRUCTIES.. NL-2 NAMEN VAN DE ONDERDELEN............ NL-6 VANGT STOFDEELTJES OP* VOORBEREIDING...................................... NL-8 Het voorfilter vangt stofdeeltjes en andere grote luchtgedragen deeltjes op. BEDIENING................................................
BELANGRIJKE VEILIGHEIDSINSTRUCTIES Bij het gebruik van elektrische apparaten dient u altijd enkele fundamentele veiligheidsvoorschriften in acht te nemen, waaronder: WAARSCHUWING – Neem altijd het onderstaande in acht om het gevaar voor een elektrische schok, brand of lichamelijk letsel te voorkomen: • Lees alle instructies goed door voordat u de unit in gebruik neemt. • Gebruik uitsluitend een stopcontact van 220-240 volt.
OPMERKING – Wat u moet doen als de unit de radio- of tv-ontvangst verstoort NEDERLANDS • Vervang het water in de luchtbevochtigingsbak dagelijks door vers kraanwater en maak de luchtbevochtigingsbak regelmatig schoon (zie NL-14 en NL-15). Haal al het water uit de luchtbevochtigingsbak wanneer de luchtreiniger niet wordt gebruikt. Wanneer er water in de luchtbevochtigingsbak achterblijft, kan dit een voedingsbodem voor schimmels en bacteriën en een bron van kwalijke geuren vormen.
BELANGRIJKE VEILIGHEIDSINSTRUCTIES • Alvorens u de unit verplaatst, dient u ervoor te zorgen dat deze uit staat. Verwijder de luchtbevochtigingsbak terwijl u de handgreep aan de zijkant van de unit vasthoudt. • Als u de luchtbevochtigingsbak verwijdert/terug plaatst, wees dan voorzichtig dat uw vingers niet blijven steken in de unit. • Als u de unit verplaatst, gebruik dan de handgrepen aan weerszijden van de unit. Verplaats de unit niet als deze in gebruik is.
A. Informatie over afvalverwijdering voor gebruikers (particuliere huishoudens) Let op: Uw product is van dit symbool voorzien. Dit betekent dat afgedankte elektrische en elektronische apparatuur niet samen met het normale huisafval mogen worden weggegooid. Er bestaat een afzonderlijk inzamelingssysteem voor deze producten. GOOI DIT APPARAAT NIET MET HET NORMALE HUISAFVAL WEG EN VERBRAND HET OOK NIET IN DE KACHEL.
NAMEN VAN DE ONDERDELEN VOORZIJDE / ACHTERZIJDE VOORZIJDE 1 2 3 BACK Achterzijde 4 13 5 6 14 7 8 9 15 10 1 2 3 4 5 6 7 8 16 11 12 Bedieningspaneel / display (zie NL-5) Handgrepen (2 locaties) Hoofdunit Luchtuitlaat Filterframe Luchtbevochtigingsfilter Vlotter (in filterframe) Bakhandgreep (Stekkervorm varieert per land.
BEDIENINGSPANEEL / DISPLAY 6 7 5 4 3 2 1 Display Stofsymbool Groen NEDERLANDS Geeft de het luchtreinigingsniveau in 3 kleuren weer. Schoon Oranje Rood Vervuild 8 9 Lampje bevochtiging Bevochtigings- / temperatuurbewaking Groen................. Bevochtiging AAN Geeft bij benadering de luchtvochtigheid/ temperatuur in de ruimte aan. Groen.................. Unit heeft water nodig (Knippert) Een temperatuur van 0 tot 50ºC wordt weergegeven in intervallen van 1ºC. Uit ......................
VOORBEREIDING PREPARATION Trek altijd de stekker uit het Always be sure to remove the stopcontact. power plug from the wall outlet. FILTERINSTALLATIE FILTER INSTALLATION 1 Verwijder het achterpaneel. Achterpaneel 2 HEPA-filter Geurfilter Haal de filters uit de plastic zak. Plaats de zijde met het label naar u toe. 3 Installeer de filters in de juiste volgorde, zoals afgebeeld. Label Geurfilter (Hetzelfde aan beide zijden.) HEPA-filter 4 Klik Installeer het achterpaneel.
DE LUCHTONVOCHTIGINGSBAK BIJVULLEN De lucht wordt bevochtigd door water dat uit de luchtbevochtigingsbak omhoog wordt gepompt te vaporiseren. De unit kan zelfs gebruikt worden zonder dat er water in de luchtbevochtigingsbak zit. Trek de luchtbevochtigingsbak eruit. 1 Reinig de luchtbevochtigingsbak als deze vuil is geworden of als u duidelijk een geur ruikt. (Zie NL-14, NL-15) 2 Vul de luchtbevochtigingsbak met kraanwater aan de hand van methode A of B .
BEDIENING START / STOP START STOP • Kies de gewenste ventilatorsnelheid met . • Tenzij het stroomsnoer is losgekoppeld, begint de bediening in het vorige programma waarin hij is gebruikt. REINIGEN DOOR IONENDOUCHE Laat plasmaclusterionen met hoge dichtheid vrijkomen en voert gedurende 60 minuten een sterke luchtstroom af. START OPMERKING • Als de bediening voltooid is, keer de unit terug naar het vorige bedieningsprogramma.
NUTTIGE FUNCTIE BESTURING LAMPJES U kunt de indicatielampjes op de voorzijde UITzetten als deze te fel zijn. AAN UIT Gedurende meer dan 3 seconden indrukken. Gedurende meer dan 3 seconden indrukken. Plasmaclusterion AAN/UIT UIT AAN Gedurende meer dan 3 seconden indrukken. NEDERLANDS Als plasmaclusterionen AAN staat, is het plasmaclusterionlampje aan. (blauw) OPMERKING Gedurende meer dan 3 seconden indrukken.
NUTTIGE FUNCTIE Uit-TIMER Kies de tijdsduur. De unit stopt automatisch zodra de gekozen tijdsduur bereikt is. 1 uur 2 uur 4 uur 8 uur ANNULEREN OPMERKING • Door op te drukken, wordt de resterende tijd weergegeven. • Om de bedieningstijd te resetten, drukt u op terwijl de resterende tijd weergegeven wordt. Automatisch HERSTARTEN Als het stroomsnoer van de unit is losgekoppeld of als er een stroomstoring is, hervat de unit de werking met vorige instellingen zodra er stroom is.
VERZORGING EN ONDERHOUD CARE AND MAINTENANCE FILTERINDICATOR VERZORGINGSINDEX Na het uitvoeren van onderhoud, reset u de filterindicator. RESET (Press 3 sec.) Gedurende meer dan 3 seconden indrukken. Als u de unit gebruikt op een plaats met aanzienlijke lucht- en geurvervuiling, pleeg dan regelmatig onderhoud ook al is het filterindicatorlampje niet AAN.
VERZORGING EN ONDERHOUD CARE AND MAINTENANCE LUCHTBEVOCHTIGINGSFILTER/-BAK LUCHTBEVOCHTIGINGSFILTER/-BAK Geuren kunnen onderdrukt worden door de luchtbevochtigingsfilter en luchtbevochtigingsbak voorzichtig te spoelen met water, zelfs als het filterindicatorlampje niet AAN is. Verwijder de luchtbevochtigingsfilter uit de bak. Omlaag draaien Verwijderen Omhoog trekken 1 Openen Draai de handgreep omlaag aan de ommezijde. VOORZICHTIG Verwijder het filterframe. Verwijder de luchtbevochtigingsfilter.
Trek altijd de stekker uit het stopcontact. Always be sure to remove the power plug from the wall outlet. OPMERKING Ontkalkingsprocedure 1. Gedurende ongeveer ruim 30 minuten Aanbevolen ontkalkingsoplossingen • Citroenzuur (verkrijgbaar bij sommige drogisterijen) in water laten weken met een ontkalker. • 100% citroensap zonder vruchtvlees in een flesje. VOORZICHTIG goed roeren! • Als u citroensap als ontkalker gebruikt, laat het 3 theelepels 2 1/ 2 bekers dan langer weken. water 2.
VERZORGING EN ONDERHOUD UNIT Veeg deze af met een droge, zachte doek. VOORZICHTIG • Gebruik geen vluchtige vloeistoffen Benzine, verfverdunner of schuurpoeder kunnen het oppervlak beschadigen. • Gebruik geen schoonmaakmiddelen De ingrediënten van schoonmaakmiddelen kunnen de unit beschadigen. FILTERREINIGING Verwijder stof voorzichtig met een geschikt reinigingsgereedschap, zoals een stofzuiger met het juiste opzetstuk.
Trek de stekker altijd uit het stopcontact. FILTERVERVANGING LEVENSDUUR VAN FILTERS Ongeveer 2 jaar na opening Ongeveer 2 jaar na opening Ongeveer 5 jaar na opening Vervanging filtermodel Luchtbevochtigings- Gelieve contact op te nemen met uw dealer voor de aankoop van een vervangende filter.
TROUBLESHOOTING PROBLEEMOPLOSSING Voordat u contact opneemt met een reparateur, dient u onderstaande probleemoplossingstabel te raadplegen om u ervan te verzekeren dat het probleem geen defect van de unit is. PROBLEEM OPLOSSING (onderstaande zaken zijn niet te wijten aan een defect) Geur en rook houden aan. • Controleer de filters. Als deze extreem vuil zijn, reinig of vervang deze dan. (zie NL-13,NL-14,NL-15,NL-16,NL-17) Het stofsymboollampje is groen, zelfs terwijl de lucht niet schoon is.
SPECIFICATIES 220-240V 50-60Hz Stroomvoorziening Aanpassen ventilatorsnelheid MAX MED SLAAP Ventilatorsnelheid (m /uur) LUCHT REININominaal vermogen (W) GEN Geluidsniveau (dBA) 180 125 52 27 12 4,1 48 38 21 Ventilatorsnelheid (m3/uur) 180 125 52 27 12 4,1 48 38 21 280 140 3 LUCHT REININominaal vermogen (W) GEN &BEVOCHTI- Geluidsniveau (dBA) GING Bevochtiging (mL/uur)*1 350 Aanbevolen grootte van de ruimte (m2)*2 ~21 Plasmaclusterionen met hoge dichtheid aanbevolen grootte van
Prosimy o przeczytanie poniższych informacji przed włączeniem nowego oczyszczacza powietrza Oczyszczacz powietrza zasysa powietrze przez otwór wlotowy, przeprowadza je przez filtr wstępny, filtr pochłaniający zapachy oraz filtr HEPA, a następnie wydmuchuje je przez otwór wylotowy z powrotem do pomieszczenia. W trakcie przepływu powietrza przez oczyszczacz filtr HEPA usuwa 99,97% drobin kurzu o rozmiarach rzędu 0,3 mikrona, a także wspomaga pochłanianie zapachów.
POLSKI FUNKCJE SPIS TREŚCI Unikalne połączenie technologii oczyszczania powietrza Potrójny system filtrów + generator jonów Plasmacluster + nawilżacz ŚRODKI OSTROŻNOŚCI............................ PL-2 NAZWY CZĘŚCI......................................... PL-6 WYCHWYTUJE KURZ* Filtr wstępny wychwytuje kurz i inne duże unoszące się w powietrzu cząsteczki. PRZYGOTOWANIE DO PRACY............. PL-8 ZMNIEJSZA ILOŚĆ PRZYKRYCH ZAPACHÓW OBSŁUGA. ................................................
ŚRODKI OSTROŻNOŚCI Podczas korzystania z urządzeń elektrycznych należy przestrzegać podstawowych zasad bezpieczeństwa, do których należą, między innymi, następujące zalecenia: OSTRZEŻENIE – Należy zawsze przestrzegać podanych zaleceń, aby uniknąć porażenia prądem elektrycznym, pożaru lub obrażeń ciała: • Przed przystąpieniem do korzystania z urządzenia należy uważnie przeczytać niniejszą instrukcję. • Urządzenie należy podłączać wyłącznie do sieci o napięciu 220-240 V.
• Wodę w pojemniku nawilżacza należy codziennie wymieniać na świeżą wodę z kranu. Wnętrze pojemnika nawilżacza należy utrzymywać w czystości (patrz opis na stronach PL-14 i PL-15). Pozostawiając urządzenie na dłuższy czas bez użycia należy opróżnić pojemnik nawilżacza. Pozostawianie wody w pojemniku nawilżacza może powodować powstawanie pleśni, bakterii i przykrych zapachów. W rzadkich przypadkach bakterie te mogłyby być niebezpieczne dla zdrowia.
ŚRODKI OSTROŻNOŚCI • Przed przeniesieniem oczyszczacza należy upewnić się, że urządzenie nie pracuje, i wyjąć z niego pojemnik nawilżacza. Przenosząc należy trzymać za uchwyty po obu stronach. • Podczas demontażu/ponownego zamocowania pojemnika nawilżacza należy zachować ostrożność, aby nie przyciąć palców we wnętrzu urządzenia. • Przenosząc urządzenie należy trzymać za uchwyty po obu stronach. Nie wolno przenosić pracującego oczyszczacza. • Nie wolno blokować otworów wlotowych ani wylotowych.
A. Informacje dla użytkowników (prywatnych gospodarstw domowych) dotyczące usuwania odpadów Uwaga: Państwa produkt jest oznaczony tym symbolem. Oznacza on, że zużytych urządzeń elektrycznych i elektronicznych nie można łączyć ze zwykłymi odpadami z gospodarstw domowych. Dla tych produktów istnieje oddzielny system zbiórki odpadów.
NAZWY CZĘŚCI WIDOK OD PRZODU / OD TYŁU WIDOK OD PRZODU 1 2 3 BACK WIDOK OD TYŁU 4 13 5 6 14 7 8 9 15 10 16 11 12 (Kształty wtyczki zależą od kraju.
PANEL STEROWANIA / WYŚWIETLACZ 6 7 5 4 3 2 1 Wyświetlacz Wskaźnik kurzu Sygnalizuje poziom oczyszczenia powietrza w 3 kolorach. Czyste Zielony Pomarańczowy Czerwony POLSKI Zanieczyszczone 8 9 Wskaźnik trybu nawilżania Czujnik wilgotności/temperatury Zielony .................. tryb nawilżania włączony Wskazuje przybliżony poziom wilgotności/ temperatury w pomieszczeniu. Zielony ..................
Odłącz wtyczkę kabla Always be sure to remove the zasilającego od sieci power plug from the wall outlet. elektrycznej. PRZYGOTOWANIE DO PRACY PREPARATION INSTALACJA FILTRÓW FILTER INSTALLATION 1 Zdejmij panel tylny. Panel tylny 2 Filtr HEPA Filtr pochłaniający zapachy Wyjmij filtry z plastikowej torebki. Należy zainstalować stroną z etykietą na zewnątrz. 3 Etykieta Zainstaluj filtry w prawidłowej kolejności, jak pokazano na rysunku. Filtr pochłaniający zapachy (Obie strony są identyczne.
NAPEŁNIANIE POJEMNIKA NAWILŻACZA Nawilżane powietrze przechodzi przez parę wodną pobieraną z pojemnika nawilżacza. Z urządzenia można korzystać nawet bez napełnionego wodą pojemnika nawilżacza. 1 Wyciągnij pojemnik nawilżacza. Wyczyść pojemnik nawilżacza, jeśli zostanie zanieczyszczony lub występuje zauważalny zapach.
OBSŁUGA URUCHOMIENIE/ZATRZYMANIE URZĄDZENIA URUCHOMIENIE ZATRZYMANIE • Ustaw żądaną prędkość wentylatora przy pomocy przycisku . • Jeśli od poprzedniego użycia oczyszczacz nie był odłączany od sieci elektrycznej, uruchomi się w ostatnio wybranym trybie pracy. TRYB CLEAN ION SHOWER Urządzenie uwalnia do otoczenia jony Plasmacluster o wysokim stężeniu i emituje silny strumień powietrza przez 60 minut.
PRZYDATNE FUNKCJE REGULACJA JASNOŚCI WSKAŹNIKÓW Wskaźniki na panelu przednim można wyłączyć, jeśli świecą zbyt jasno. WŁ. WYŁ. Naciśnij i przytrzymaj przez 3 sekundy. Naciśnij i przytrzymaj przez 3 sekundy. Włączenie/wyłączenie trybu PLASMACLUSTER ION Jeśli tryb PLASMACLUSTER ION zostanie włączony, zaświeci się wskaźnik PLASMACLUSTER ION (niebieski). WYŁ. Naciśnij i przytrzymaj przez 3 sekundy. UWAGA Naciśnij i przytrzymaj przez 3 sekundy. WŁ. WYŁ. POLSKI WŁ.
PRZYDATNE FUNKCJE WYŁĄCZNIK CZASOWY Ustaw żądany czas. Po osiągnięciu ustawionego czasu urządzenie zostanie zatrzymane automatycznie. 1 godzina 2 godziny 4 godziny 8 godzin ANULOWANIE UWAGA • Naciśnięcie przycisku powoduje wyświetlenie pozostałego czasu. • Żeby zresetować czas pracy, naciśnij przycisk podczas wyświetlania pozostałego czasu.
CZYSZCZENIE I KONSERWACJA CARE AND MAINTENANCE WSKAŹNIK FILTRA WSKAZÓWKI DOTYCZĄCE CZYSZCZENIA I KONSERWACJI Filtr czujnika Urządzenie (patrz opis na stronie PL-16) RESET (Press 3 sec.) W przypadku korzystania z urządzenia w pomieszczeniu, w którym występuje znaczne zanieczyszczenie powietrza i utrzymuje się silny zapach należy częściej przeprowadzać konserwację filtra, nawet jeśli nie świeci się wskaźnik filtra.
CZYSZCZENIE I KONSERWACJA CARE AND MAINTENANCE FILTR NAWILŻAJĄCY / POJEMNIK NAWILŻACZA Zapachy można usunąć ostrożnie myjąc filtr nawilżający i pojemnik nawilżacza w wodzie, nawet jeśli nie świeci się wskaźnik filtra. Wymontuj filtr nawilżający z pojemnika. Odwróć Zdemontuj Pociągnij 1 Otwórz Opuść uchwyt do dołu na odwrotną stronę. OSTRZEŻENIE Zdejmij ramkę filtra. Wymontuj filtr nawilżający. • Krople wody mogą kapać z filtra nawilżającego i ramki filtra.
Odłącz wtyczkę kabla zasilającego be sure to remove the power plug odAlways sieci elektrycznej. from the wall outlet. Sposób usuwania kamienia kotłowego Zalecane sposoby usuwania kamienia • Kwasek cytrynowy (dostępny w sprzedaży) • 100% sok z cytryny bez miąższu. dobrze zamieszaj! 3 łyżeczki 2 1/ 2 szklanki wody dobrze zamieszaj! 2 3 szklanki wody UWAGA 1/ 4 1.
CZYSZCZENIE I KONSERWACJA URZĄDZENIE GŁÓWNE Używaj suchej, miękkiej ściereczki. OSTRZEŻENIE • N ie wolno stosować lotnych substancji. Benzyna, rozcieńczalnik czy proszki do szorowania mogą uszkodzić powierzchnię. • Nie wolno stosować detergentów. Detergenty mogłyby uszkodzić oczyszczacz powietrza. CZYSZCZENIE FILTRÓW Ostrożnie usuń kurz przy pomocy odkurzacza z odpowiednią nasadką.
Należy zawsze odłączyć wtyczkę kabla zasilającego od sieci elektrycznej. WYMIANA WYMIANA FILTRÓW FILTRÓW TRWAŁOŚĆ FILTRÓW Trwałość filtra zależy od warunków w miejscu eksploatacji, stopnia wykorzystania i sposobu ustawienia urządzenia.
TROUBLESHOOTING ROZWIĄZYWANIE PROBLEMÓW Zanim wezwiesz serwis zapoznaj się z poniższą tabelą, ponieważ problem może nie być wynikiem uszkodzenia oczyszczacza. OBJAW ROZWIĄZANIE (poniższe objawy nie oznaczają usterki) Utrzymuje się przykry zapach i dym. • Sprawdź filtry. Jeśli są silnie zanieczyszczone, wyczyść lub wymień je. (patrz opis na stronach PL-13, PL-14, PL-15, PL-16 i PL-17) Wskaźnik kurzu świeci na zielono, chociaż powietrze nie jest czyste.
DANE TECHNICZNE 220-240 V, 50-60Hz Zasilanie Ustawienie prędkości wentylatora MAX MED SLEEP Prędkość wentylatora (m /h) 180 125 52 Moc znamionowa (W) 27 12 4,1 3 Poziom szumów (dBA) 48 38 21 Prędkość wentylatora (m3/h) 180 125 52 27 12 4,1 48 38 21 280 140 Tryb oczyszMoc znamionowa (W) czania i nawilPoziom szumów (dBA) żania Nawilżanie (ml/godzinę)*1 350 Zalecana powierzchnia pomieszczenia (m2)*2 ~21 Zalecana powierzchnia pomieszczenia, w którym można uzyskać wysoką koncent
Lea la información siguiente antes de utilizar su nuevo purificador de aire. El purificador de aire capta el aire de la habitación a través de la entrada de aire, hace circular el aire a través de un filtro previo, un filtro desodorante y un filtro HEPA en el interior de la unidad, y luego descarga el aire a través de la salida de aire. El filtro HEPA puede eliminar el 99,97 % de las partículas de polvo que atraviesan el filtro, de un tamaño mínimo de 0,3 micras, y también ayuda a absorber los olores.
ESPAÑOL CARACTERÍSTICAS ÍNDICE Una combinación exclusiva de tecnologías de tratamiento del aire Sistema de triple filtrado + Plasmacluster + Humidificación INSTRUCCIONES IMPORTANTES DE SEGURIDAD... ES-2 DESIGNACIÓN DE LAS PIEZAS........... ES-6 ATRAPA EL POLVO* El filtro previo atrapa el polvo y otras partículas de gran tamaño suspendidas en el aire. PREPARACIÓN......................................... ES-8 REDUCE LOS OLORES FUNCIONAMIENTO................................
INSTRUCCIONES IMPORTANTES DE SEGURIDAD Respete siempre las precauciones básicas de seguridad cuando utilice electrodomésticos, incluidas las siguientes: ADVERTENCIA: Respete siempre las precauciones siguientes para reducir el riesgo de descarga eléctrica, incendios o lesiones: • Lea todas las instrucciones antes de utilizar la unidad. • Utilice únicamente una toma de 220-240 voltios.
• Cambie el agua de la bandeja de humidificación cada día, con agua del grifo, y limpie periódicamente la bandeja (consulte ES-14 y ES-15). Cuando la unidad no se esté utilizando, tire el agua de la bandeja de humidificación. Si deja agua en la bandeja de humidificación, pueden aparecer moho, bacterias y malos olores. Esas bacterias pueden suponer un riesgo para la salud en muy pocos casos.
INSTRUCCIONES IMPORTANTES DE SEGURIDAD • Antes de mover la unidad, asegúrese de que no esté en marcha y extraiga la bandeja de humidificación sujetando la unidad por el asa lateral. • Cuando vaya a extraer o vuelva a enganchar la bandeja de humidificación, asegúrese de que los dedos no queden atrapados dentro de la unidad. • Cuando vaya a mover la unidad, utilice las asas de los dos lados. No mueva la unidad mientras esté en marcha. • No bloquee la entrada ni la salida de aire.
A. Información sobre eliminación para particulares 1. En la Unión Europea Atención: Su producto está marcado con este símbolo, que significa que los productos eléctricos y electrónicos usados no deberían mezclarse con los residuos domésticos generales. Existe un sistema de recogida especial para estos productos. SI DESEA ELIMINAR ESTE EQUIPO, NO UTILICE EL CONTENEDOR DE BASURA NORMAL Y NO ECHE EL EQUIPO AL FUEGO.
DESIGNACIÓN DE LAS PIEZAS DELANTE/DETRÁS DELANTE 1 2 3 BACK DETRÁS 4 13 5 6 14 7 8 9 15 10 1 2 3 4 5 6 7 8 16 11 12 Panel de control/pantalla (Ref. ES-5) Asa (2 ubicaciones) Unidad principal Salida de aire Bastidor del filtro Filtro de humidificación Flotador (en el bastidor del filtro) Asa de la bandeja (La forma del enchufe varía según el país).
PANEL DE CONTROL/PANTALLA 6 7 5 4 3 2 1 Visualizador Señal de polvo Indica el nivel de pureza del aire en tres colores. Verde Limpio Naranja Rojo Impuro Luz de humidificación Verde ..................... Humidificación activada Verde ................. La unidad necesita agua (Parpadeo) Control de humedad/temperatura Indica el nivel aproximado de humedad o la temperatura de la habitación. La temperatura entre 0 y 50 °C se indica en intervalos de 1 °C. ESPAÑOL 8 9 Apagado ............
PREPARACIÓN PREPARATION Asegúrese de quitar el enchufe Always be sure to remove the de laplug toma de the pared. power from wall outlet. INSTALACIÓN DE LOS FILTROS FILTER INSTALLATION 1 Retire el panel trasero. Panel trasero 2 Filtro HEPA Filtro desodorante Extraiga los filtros de la bolsa de plástico. Colocar el lado con etiqueta hacia delante. 3 Instale los filtros en el orden correcto, tal como se indica. Etiqueta Filtro desodorante (el mismo para ambos lados).
RELLENO DE LA BANDEJA DE HUMIDIFICACIÓN El aire humidificado pasa mediante el agua de vaporización bombeado desde la bandeja de humidificación. La unidad se puede utilizar aunque no haya agua en la bandeja de humidificación. 1 Extraiga la bandeja de humidificación. Limpie la bandeja de humidificación si se ensucia o nota olor. (Ref. ES-14, ES-15) 2 Llene la bandeja de humidificación con agua del grifo con el método A o B .
FUNCIONAMIENTO INICIO/PARADA INICIO PARADA • Seleccione la velocidad del ventilador que desee con . • A menos que el cable de alimentación se haya desconectado, la operación se pone en marcha en el último modo utilizado. DUCHA DE IONES LIMPIOS Emite iones Plasmacluster de alta densidad y descarga un fuerte flujo de aire durante 60 minutos. INICIO NOTA • Una vez finalice la operación, la unidad volverá al modo de funcionamiento anterior. Durante este modo podrá cambiar a otro modo.
FUNCIONES ÚTILES CONTROL DE LUCES Puede desactivar los indicadores de la superficie delantera cuando sean demasiado brillantes. Encendido Apagado Pulse durante más de 3 segundos. Pulse durante más de 3 segundos. Ión Plasmacluster encendido/apagado Cuando el Ión Plasmacluster está activado, se enciende el indicador de Ión Plasmacluster (azul). Apagado Pulse durante más de 3 segundos. NOTA Pulse durante más de 3 segundos.
FUNCIONES ÚTILES TEMPORIZADOR DESACTIVADO Seleccione el tiempo que desee. La unidad se detendrá automáticamente en cuanto transcurra el tiempo seleccionado. 1 hora 2 horas 4 horas 8 horas CANCELACIÓN NOTA • Al pulsar se indica el tiempo restante. • Para restablecer el tiempo de funcionamiento, pulse restante.
LIMPIEZA MANTENIMIENTO CARE ANDYMAINTENANCE INDICADOR DEL FILTRO ÍNDICE DE LIMPIEZA Una vez realizado el mantenimiento, restablezca el indicador del filtro. Pulse durante más de 3 segundos. En caso de utilizar la unidad en un lugar donde la contaminación del aire y los olores son importantes, realice un mantenimiento frecuente aunque la luz del indicador del filtro no esté encendida. Filtro HEPA (consulte ES-16) Filtro desodorante (consulte ES-16) Sensor Filtro RESET (Press 3 sec.
LIMPIEZA Y MAINTENANCE MANTENIMIENTO CARE AND FILTRO/BANDEJA FILTRO/BANDEJADE DEHUMIDIFICACIÓN HUMIDIFICACIÓN La aparición de olores se puede evitar lavando el filtro y la bandeja de humidificación con agua, con cuidado, aunque la luz indicadora del filtro no se haya encendido. Extraiga el filtro de humidificación de la bandeja. Gire hacia abajo Extraiga Tire hacia arriba 1 Abra Gire hacia abajo el asa por el lado contrario. PRECAUCIÓN Extraiga el bastidor del filtro.
Asegúrese de quitar el enchufe de la toma de pared. Always be sure to remove the power plug from the wall outlet. NOTA Eliminación de la cal del agua Soluciones descalcificadoras recomendadas 1. Sumergir en agua con una solución • Ácido cítrico (disponible en algunas farmacias). descalcificadora durante unos 30 minutos. • Zumo de limón 100 % embotellado sin pulpa. PRECAUCIÓN Remueva bien.
LIMPIEZA Y MANTENIMIENTO UNIDAD Frote con un trapo seco y suave. PRECAUCIÓN • No utilice líquidos volátiles. Los disolventes de pintura con gasolina y el polvo de pulir pueden dañar la superficie. • No utilice detergentes. Los ingredientes de los detergentes pueden dañar la unidad. FILTROS DE LIMPIEZA Limpie el polvo con cuidado, con una herramienta de limpieza adecuada, como un aspirador que cuente con los accesorios adecuados.
Asegúrese de quitar el enchufe de la toma de pared. CAMBIO DE FILTRO VIDA ÚTIL DE LOS FILTROS La vida útil de los filtros varía según el entorno de la habitación, las condiciones de uso y la ubicación de la unidad. La vida útil del filtro HEPA y del filtro desodorante y las sugerencias de sustitución se basan en la purificación de una habitación en la que se fuman 5 cigarrillos al día y la recogida de polvo y la función desodorante se han reducido a la mitad del nivel de un filtro nuevo.
TROUBLESHOOTING RESOLUCIÓN DE PROBLEMAS Antes de avisar al servicio técnico, consulte la tabla de resolución de problemas que aparece a continuación para asegurarse de que el problema no sea una avería de la unidad. SÍNTOMA SOLUCIÓN (los casos siguientes no se deben a un mal funcionamiento) El olor y el humo persisten. • Compruebe los filtros.
ESPECIFICACIONES 220-240 V 50-60 Hz Fuente de alimentación MÁX.
Innan du använder din nya luftrenare, vänligen läs följande Luftrenaren suger in rumsluft från luftintaget, cirkulerar den genom ett förfilter, ett luktborttagande filter och ett HEPA-filter inuti enheten, släpper sedan ut luft genom luftutloppet. HEPA-filtret kan ta bort 99,97% av dammpartiklar så små som 0,3 mikrometer som passerar genom filtret och hjälper även till att absorbera lukter. Det luktborttagande filtret absorberar gradvis lukter när de passerar genom filtret.
SVENSKA FUNKTIONER En unik kombination av luftbehandlingsteknik Trefaldigt filtreringssystem + Plasmacluster + Luftfuktning INNEHÅLL VIKTIGA SÄKERHETSINSTRUKTIONER.SV-2 DELARNAS NAMN....................................SV-6 FÅNGAR UPP DAMM* Förfilter fångar upp damm och andra stora luftburna partiklar. FÖRBEREDELSE................................... SV-8 MINSKAR LUKT ANVÄNDNING. ........................................ SV-10 Luktborttagande filter absorberar många vanliga hushållslukter.
VIKTIGA SÄKERHETSFÖRESKRIFTER Följ alltid grundläggande säkerhetsåtgärder vid användning av elektriska apparater, inklusive följande: VARNING - Observera alltid följande för att minska risken för elektriska stötar, brand eller skada: • Läs alla instruktioner innan du använder enheten.. • Använd endast ett 220-240 V uttag. • Använd inte enheten om nätsladden eller kontakten är skadad eller anslutningen till vägguttaget är lossat. • Ta regelbundet bort damm från elkontakten.
• Byt vattnet i luftfuktarfacket dagligen med nytt kranvatten och rengör det regelbundet (Se SV-14 och SV-15). När enheten inte används, töm ur vattnet i luftfuktarfacket. Att lämna kvar vatten i luftfuktarfacket kan orsaka mögel, bakterier och dålig lukt. I sällsynta fall kan sådana bakterier vara en hälsorisk.
VIKTIGA SÄKERHETSFÖRESKRIFTER • Innan du flyttar enheten, se till att den inte är i drift och ta av luftfuktarfacket medan du håller i sidohandtaget på enheten. • Var försiktig så att du inte fastnar med fingrarna i enheten när du tar bort / sätter tillbaka luftfuktarfacket. • Använd handtagen på båda sidor när du flyttar enheten. Flytta inte enheten när den är i drift. • Blockera inte luftintaget eller luftutsläppet.
A. Information om återvinning för användare (privata hushåll) 1. I Europeiska unionen OBS: Produkten är märkt med den här symbolen. Det betyder att förbrukade elektriska och elektroniska produkter inte ska blandas med vanliga hushållssopor. Det finns ett separat insamlingssystem för dessa produkter.
DELARNAS NAMN FRAMSIDA / BAKSIDA FRAMSIDA 1 2 3 BACK BAKSIDA 4 13 5 6 14 7 8 9 15 10 1 2 3 4 5 6 7 8 Driftpanel / Display (Se SV-5) Handtag (2 platser) Huvudenhet Luftutsläpp Filterram Luftfuktarfilter Flottör (i filterram) Fackhandtag 16 11 12 (Kontaktformen varierar efter land.) 9 10 11 12 13 14 15 16 Luftfuktarfack Flottör HEPA-filter Luktborttagningsfilter Sensorfilter / Sensor (intern) Bakpanel (Förfilter) Luftintag Nätkabel / Kontakt SV-6 KC-F32EU_OM_WEST.
DRIFTPANEL / DISPLAY 6 7 5 4 3 2 1 Display Dammtecken Indikerar luftreningsnivå 3 färger. Grön Ren Orange Röd Oren 8 9 Luftfuktarlampa Luftfuktighet / Temperaturmonitor Grön Indikerar ungefärlig luftfuktighet / temperatur i rummet. Luftfuktning PÅ Grön................... Enheten behöver vatten (Blinkar) Temperatur 0 till 50ºC visas i 1ºC-intervaller. -1ºC eller mindre SVENSKA Släckt ................. Luftfuktning AV 51ºC eller mer Luftfuktighet 20 till 90% visas i 1%-intervaller.
PREPARATION FÖRBEREDELSE Se alltid att dra ur Always be till sure to remove the power plug from från the wall outlet. nätkontakten eluttaget. FILTERINSTALLATION FILTER INSTALLATION 1 Ta bort bakpanelen. Bakre panel 2 HEPA-filter Luktborttagningsfilter Ta ut filtren ur plastpåsen. Placera ytan med flik. 3 Montera filtren i rätt ordning enligt bilden. Flik Luktborttagningsfilter (Samma på båda sidor.) HEPA-filter 4 Klicka Montera bakpanelen. E-6 SV-8 KC-F32EU_OM_WEST.
PÅFYLLNING AV LUFTFUKTARFACKET Fuktad luft passerar genom förångning av vatten som pumpas upp från luftfuktarfacket. Enheten kan användas även utan vatten i luftfuktarfacket. 1 Dra ut luftfuktarfacket. Rengör luftfuktarfacket om det blir smutsigt eller det finns en märkbar lukt. (Se SV-14, SV-15) 2 Fyll luftfuktarfacket med kranvatten via metod A eller A FULL • Filterramen flyter upp när vattnet fylls på. • När du bär luftfuktarfacket, håll det med båda händerna eller håll i fackets handtag..
ANVÄNDNING START / STOPP START STOPP • Välj önskad fläkthastighet med . • Om nätsladden inte är urkopplad, börjar driften i föregående läge den drevs i. RENGÖR JONDUSCH Frigör högdensitets Plasmacluster-joner och släpper ut ett starkt luftflöde i 60 minuter. START OBS • När funktionen är klar kommer enheten att återgå till tidigare driftsläge. Det går att ändra det andra läget under detta läge. FLÄKTHASTIGHET Välj önskad fläkthastighet. OBS VILOLÄGE • Indikatorerna på framsidan släcks automatiskt.
ANVÄNDBAR FUNKTION LJUSKONTROLL Du kan ställa in den främre ytans indikatorer på AV när indikatorn är för ljus. PÅ AV Tryck mer än 3 sekunder. Tryck mer än 3 sekunder. Plasmacluster-jon PÅ/AV När Plasmacluster-jon är PÅ, är Plasmacluster-jon indikatorlampan tänd. (blå) AV PÅ Tryck mer än 3 sekunder. OBS Tryck mer än 3 sekunder.
ANVÄNDBAR FUNKTION AV TIMER Välj hur lång tid du vill. Enheten stannar automatiskt när den valda tiden har nåtts. 1 timme 2 timmar 4 timmar 8 timmar ANNULLERING OBS • Ett tryck på visar återstående tid. • För att återställa drifttiden trycker du på medan den återstående tiden visas. Automatisk OMSTART Om enheten är oansluten eller om det blir strömavbrott, kommer enheten att återuppta driften med de tidigare inställningarna när strömmen är återställd. Standardinställning är PÅ.
SKÖTSEL UNDERHÅLL CARE ANDOCH MAINTENANCE FILTERINDIKATOR Efter att ha utfört underhåll, återställ filterindikatorn. RESET (Press 3 sec.) Tryck mer än 3 sekunder. Vid användning på plats där luftföroreningar och lukt är signifikanta, underhåll ofta, även om filterindikatorlampan inte är PÅ. SKÖTSELINDEX HEPA-filter (Se SV-16) Deodoriseringsfilter (Se SV-16) Sensorfilter ENGLISH RESET (Press 3 sec.) Indikatorlampan tänds efter ca 720 timmar.
SKÖTSEL OCH UNDERHÅLL CARE AND MAINTENANCE LUFTFUKTARFILTER LUFTFUKTARFILTER/ /FACK FACK Luktförekomst kan dämpas vid tvättning av luktfuktarfilter och luftfuktarfack med vatten försiktigt även om filterindikatorlampan inte är PÅ. Ta bort luftfuktarfiltret från facket. Vänd ned Ta bort Dra upp 1 Öppna Vrid ned handtaget på baksidan. VARNING Ta bort filterramen. Ta bort luftfuktarfiltret. • Vattendroppar kan droppa från luftfuktarfiltret och filterramen.
Se alltid till att dra ur nätkontakten från Always be sure to remove the power plug eluttaget. from the wall outlet. Hur man tar bort kalk Rekommenderade avkalkningslösningar • Citronsyra (finns på vissa apotek) • 100% buteljerad citronsaft utan fruktkött. rör om väl! 3 teskedar 2 1/ 2 koppar vatten 2 3 koppar vatten OBS rör om väl! 1/ 4 1. Blötlägg i vatten med avkalkningslösning i mer än 30 minuter.
SKÖTSEL OCH UNDERHÅLL ENHET Torka med en torr, mjuk trasa. VARNING • A nvänd inte flyktiga vätskor. Bensen thinner eller polermedel kan skada ytan. • Använd inte rengöringsmedel. Rengöringsmedelingredienser kan skada enheten. RENGÖRA FILTER Ta försiktigt bort damm med ett lämpligt rengöringsverktyg, såsom en dammsugare med lämpligt tillbehör. Om du använder den på en plats där luftföroreningar och lukt är betydande, underhåll ofta även om filterindikatorn inte lyser.
Se alltid till att dra ur nätkontakten från eluttaget. FILTERBYTE FILTERBYTE FILTERS LIVSLÄNGD Filters livslängd varierar beroende på rumsmiljön, användningsförhållanden, och placering av enheten. Livslängd för HEPA-filter och deodoriserande filter och bytesförslag bygger på att rena ett rum där 5 cigaretter röks per dag och enhetens dammuppsamling och deodoriseringsprestanda har minskat till hälften av nivån för ett nytt filter.
TROUBLESHOOTING FELSÖKNING Innan du ringer efter service, granska felsökningstabellen nedan för att se till att problemet inte är ett enhetsfel. SYMPTOM ÅTGÄRD (följande är inte beroende på ett fel) Lukt och rök kvarstår. • Kontrollera filtren. Om de verkar vara extremt smutsiga, rengör eller byt ut dem. (Se SV-13, SV-14, SV-15, SV-16, SV-17) Dammsymbolen lyser grönt även när luften inte är ren. • Luften kan ha varit oren när enheten blev inkopplad.
SPECIFIKATIONER 220-240V 50-60Hz Strömförsörjning Justering av fläkthastighet MAX MED INSOMNING Fläkthastighet (m /timme) 180 125 52 Märkeffekt (W) 27 12 4,1 3 RENGÖR LUFT RENGÖR LUFT OCH FUKTA Bullernivå (dBA) 48 38 21 Fläkthastighet (m3/timme) 180 125 52 Märkeffekt (W) 27 12 4,1 Bullernivå (dBA) 48 38 21 Luftfuktning (mL/timme)*1 350 280 140 Rekommenderad rumsstorlek (m2)*2 ~21 Hög densitet Plasmacluster Jon rekommenderad rumsstorlek (m2)*3 ~17 Luftfuktarfack kapaci
Før du bruger din nye luftrenser, bedes du læse følgende Luftrenseren suger rummets luft ind gennem luftindtaget, lader den passere gennem et forfilter, et deodoriseringsfilter og et HEPA-filter inde i enheden, og blæser så luften ud igen gennem luftudtaget. HEPA-filteret kan fjerne 99,97 % af støvpartiklerne så små som 0,3 mikron, der passerer gennem filteret og hjælper også med til at absorbere lugte. Det vaskbare deodoriseringsfilter absorberer gradvist lugte, når de passerer gennem filtret.
DANSK FUNKTIONER Unik kombination af luftbehandlingsteknologier Tredobbelt filtreringssystem + Plasmacluster + befugtning FANGER STØV* INDHOLD VIGTIGE SIKKERHEDSINSTRUKTIONER..... DK-2 DELNAVNE.......................................................... DK-6 KLARGØRING.................................................... DK-8 Forfiltret fanger støv og andre store luftbårne partikler. DRIFT..................................................................
VIGTIGE SIKKERHEDSINSTRUKTIONER Følg altid de grundlæggende sikkerhedsforanstaltninger ved brug af elektriske apparater, herunder følgende: ADVARSEL – Følg altid nedenstående for at mindske risikoen for elektrisk stød, brand eller personskade: • Læs alle instruktioner, før du bruger enheden. • Brug kun en stikkontakt på 220-240 volt ~. • Brug ikke apparatet, hvis strømledningen eller -stikket er beskadiget, eller tilslutningen til stikkontakten er løs. • Fjern med jævne mellemrum støv fra strømstikket.
• Udskift dagligt vandet i befugtningsbakken med frisk vand fra hanen, og rengør den jævnligt (Ref. DK-14 og DK-15). Hæld vandet i befugtningsbakken ud, når enheden ikke er i brug. Hvis du lader vandet stå i befugtningsbakken, kan der dannes mug, bakterier og dårlig lugt. I sjældne tilfælde kan sådanne bakterier være en helbredsrisiko.
VIGTIGE SIKKERHEDSINSTRUKTIONER • Før enheden flyttes, skal du sørge for, at den er slukket og at du fjerner befugtningsbakken mens du holder i enhedens håndtag på siden. • Når du fjerner / genindsætter befugtningsbakken, skal du passe p ikke at få fingrene i klemme inde i enheden. • Når du flytter enheden, skal du bruge håndtagene på begge sider. Flyt ikke enheden, hvis den er i drift. • Undlad at blokere luftindtaget eller luftudtaget.
A. Oplysninger om bortskaffelse for brugere (private husholdninger) 1. I EU Bemærk: Dit produkt er markeret med dette symbol. Det betyder, at brugte elektriske og elektroniske produkter ikke må blandes med almindeligt husholdningsaffald. Der findes et separat indsamlingssystem for disse produkter. HVIS DU ØNSKER AT BORTSKAFFE DETTE UDSTYR, MÅ DU IKKE BRUGE DEN NORMALE AFFALDSSÆK, OG IKKE ANBRINGE DET I EN PEJS.
DELNAVNE FORSIDE/BAGSIDE FORSIDEN 1 2 3 BACK BAGSIDE 4 13 5 6 14 7 8 9 15 10 1 2 3 4 5 6 7 8 16 11 12 Betjeningspanel / Display (Ref. DK-5) Håndtag (2 placeringer) Hovedenhed Luftudtag Filterramme Befugtningsfilter Flyder (i filterramme) Bakkehåndtag (Stikkets form varierer efter landet.) 9 10 11 12 13 14 15 16 Befugtningsbakke Flyder HEPA-filter Deodoriseringsfilter Følerfilter / Føler (intern) Bagpanel (Forfilter) Luftindtag Strømledning/-stik DK-6 KC-F32EU_OM_WEST.
BETJENINGSPANEL / DISPLAY 6 7 5 4 3 2 1 Display Støvindikator Angiver de 3 niveauer for luftrensning. Grøn Ren Orange Rød Snavset 8 9 Befugtningslys Luftfugtighed / Termometer Grøn ..........................Befugtning slået til Angiver det omtrentlige luftfugtigheds / temperaturniveau i rummet. Grøn ..........................Enheden har behov for vand (Blinker) Temperaturer mellem 0 og 50 ºC vises med 1 ºC intervaller. Off..............................
KLARGØRING PREPARATION Sørg at tage strømstikAlways be altid sure for to remove the powerket plug the wall outlet. udfrom af stikkontakten. FILTERINSTALLATION FILTER INSTALLATION 1 Fjern bagpanelet. Bagpanel 2 HEPA-filter Deodoriseringsfilter Fjern filtrene fra plastikposen. Anbring overfladen med mærke. 3 Installer filtrene i den rigtige rækkefølge, som vist. Mærke Deodoriseringsfilter (Ens på begge sider.) HEPA-filter 4 Klik Installation af bagpanelet. E-6 DK-8 KC-F32EU_OM_WEST.
GENOPFYLDNING AF BEFUGTNINGSBAKKEN Befugtningsluft passerer forbi fordampet vand, der er pumpet op fra befugtningsbakken. Enheden kan benyttes selv uden vand i befugtningsbakken. 1 Træk befugtningsbakken ud. Rengør befugtningsbakken, hvis den bliver snavset, eller hvis der er en mærkbar lugt. (Ref. DK-14, DK-15) 2 Fyld befugtningsbakken med postevand efter metode A eller B . A FULD ADVARSEL • Filterrammen flyder, når vand påfyldes.
DRIFT START / STOP START STOP • Vælg den ønskede ventilatorhastighed med . • Medmindre strømledningen er taget ud, starter driften i den forrige tilstand, den blev betjent i. REN ION-BYGE Udsender Plasmacluster-ioner med høj densitet og udsender kraftig luftstrøm i 60 minutter. START BEMÆRK • Når handlingen er slut, vil enheden vende tilbage til den tidligere driftstilstand. Den er i stand til at ændre den anden tilstand under denne tilstand. VENTILATORHASTIGHED Vælg den ønskede ventilatorhastighed.
NYTTIG FUNKTION LYSKONTROL Du kan sætte de forreste overfladeindikatorer til SLUKKET, hvis indikatoren lyser for kraftigt. SLUKKET TÆNDT Tryk i mere end 3 sekunder. Tryk i mere end 3 sekunder. Plasmacluster-ion TÆND/SLUK Når Plasmacluster-ion er TÆNDT, lyser Plasmacluster ion-indikatorlampen (blåt). TÆNDT SLUKKET Tryk i mere end 3 sekunder. Tryk i mere end 3 sekunder.
NYTTIG FUNKTION Slukke-TIMER Vælg længden af det tidsrum, du ønsker. Enheden stopper automatisk, når den valgte tid er gået. 1 time 2 timer 4 timer 8 timer ANNULLERING BEMÆRK • Et tryk på viser resterende tid. • For at nulstille driftstiden skal du trykke på mens den resterende tid vises. Automatisk GENSTART Hvis apparatets stik er taget ud af stikkontakten, eller der er en strømafbrydelse, vil apparatet genstarte med de tidligere indstillinger, efter at strømforsyningen er retableret.
PLEJE OG VEDLIGEHOLDELSE CARE AND MAINTENANCE FILTERINDIKATOR Filterindikatorlyset vil blive tændt efter ca. 720 timer. (30 dage × 24 timer =720 timer) Dette er en påmindelse om at udføre vedligeholdelse, som beskrevet nedenfor. (Se DK-13, DK-14, DK-15, DK-16) Tryk i mere end 3 sekunder. Hvis den anvendes på et sted, hvor luftforurening og lugt er betydelig, kan du vedligeholde hyppigt, selv om filterindikatorlyset ikke er TÆNDT. PLEJEINDEKS HEPA-filter (Ref. DK-16) Deodoriseringsfilter (Ref.
PLEJE CARE OG ANDVEDLIGEHOLDELSE MAINTENANCE BEFUGTNINGSFILTER / BAKKE BEFUGTNINGSFILTER / BAKKE Lugtforekomst kan undertrykkes, hvis befugtningsfiltret og befugtningsbakken vaskes forsigtigt med vand, selv om filterindikatorlyset ikke er TÆNDT. Fjern befugtningsfiltret fra bakken. Hæld Fjern Træk op 1 Åbn Drej håndtaget nedad på bagsiden. ADVARSEL Fjern filterrammen. Fjern befugtningsfiltret. • Vanddråber kan dryppe fra befugtningsfiltret og filterrammen.
Sørg altid for at tage strømstikket ud af Always be sure to remove the power plug stikkontakten. from the wall outlet. Sådan fjernes kalk Anbefalede afkalkningsløsninger • Citronsyre (kan købes i visse supermarkeder) • 100 % citronsaft på flaske uden frugtkød. omrør grundigt! 3 teskeer 2 1/ 2 kopper vand 2 3 kopper vand omrør grundigt! 1/ 4 1. Læg det i blød i vand med afkalkningsmiddel i ca. 30 minutter.
PLEJE OG VEDLIGEHOLDELSE ENHED Tør af med en tør, blød klud. ADVARSEL • Brug ikke flygtige væsker. Benzen malingsfortynder eller poleringspulver kan beskadige overfladen. • Brug ikke rengøringsmidler. Rengøringsmidler kan beskadige enheden. RENGØRING AF FILTRE Fjern forsigtigt støv med et passende rengøringsværktøj, såsom en støvsuger med passende tilbehør.
Sørg altid for at tage strømstikket ud af stikkontakten. FILTERUDSKIFTNING FILTERUDSKIFTNING FILTRES LEVETID Filtrenes levetid afhænger af det lokale miljø, brugsbetingelser, og enhedens placering. Levetiden for HEPA-filtret og deodoriseringsfiltret, og udskiftningsforslagene er baseret på rensning af et rum, hvor der er røget 5 cigaretter om dagen, og enhedens støvopsamlings- og deodoriseringsevne er faldet til halvdelen af et nyt filters.
TROUBLESHOOTING FEJLFINDING Før du ringer efter service, bør du gennemse fejlfindingsdiagrammet nedenfor for at sikre dig, at problemet ikke er en funktionsfejl i apparatet. SYMPTOM AFHJÆLPNING (følgende er ikke pga. en funktionsfejl) Lugt og røg hænger ved. • Kontrollér filtrene. Hvis de synes meget snavsede, skal de rengøres eller udskiftes. (Ref. DK-13, DK-14, DK-15, DK-16, DK-17) Støvindikatorlyset er grønt, selv om luften ikke er ren.
SPECIFIKATIONER 220-240 V 50-60 Hz Strømforsyning Justering af ventilatorhastighed MAKS. MELL.
SHARP CORPORATION Manufacturer of this product is SHARP CORPORATION, 1 Takumi-cho, Sakai-ku, Sakai-shi, Osaka 590-8522, Japan and is in Europe represented by Sharp Electronics Europe Ltd., 4 Furzeground Way, Stockley Park Uxbridge, Middlesex, UB11 1EZ, UK. Importer of this product into the European Economic Area, except for Italy, is VESTEL UK, Waterside Drive, Langley, Berkshire, SL3 6EZ, Great Britain. In all cases of requests market surveillance authorities should contact Sharp Electronics Europe Ltd.