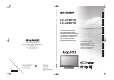
PIN Printed on environmentally friendly paper Auf ökologischem Papier gedruckt Imprimé sur papier écologique Stampato su carta ecologica Afgedrukt op ecologisch papier Impreso en papel ecológico Printed in Spain Gedruckt in Spanien Imprimé en Espagne Stampato in Spagna Gedrukt in Spanje Impreso en España 06P10-SP-NG 1 TINS-C723WJZZ DEUTSCH FRANÇAIS ITALIANO OPERATION MANUAL BEDIENUNGSANLEITUNG MODE D'EMPLOI MANUALE DI ISTRUZIONI GEBRUIKSAANWIJZING MANUAL DE MANEJO NEDERLANDS OPERATION MANUAL / BEDIE
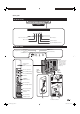
( ) : LC-37XD1E [ ] : LC-42XD1E : LC-37XD1E LC-42XD1E 540.0 540,0 (920.0 ) / [1031.0] (920, 0 ) / [1031,0] (99.9 ) / [95.9] (99, 9 ) / [95,9] (120.9) / [139.5] (120,9) / [139,5] SPECIAL NOTE FOR USERS IN THE U.K. The mains lead of this product is fitted with a non-rewireable (moulded) plug incorporating a 13A fuse. Should the or and of the same rating as above, fuse need to be replaced, a BSI or ASTA approved BS 1362 fuse marked which is also indicated on the pin face of the plug, must be used.
ENGLISH ENGLISH OPERATION MANUAL • The illustrations and on-screen displays in this operation manual are for explanation purposes and may vary slightly from the actual operations. • The examples used throughout this manual are based on the LC-42XD1E model. Contents Contents .........................................................................................1 Dear SHARP customer..................................................................2 Important Safety Precautions ...........................
Dear SHARP customer Thank you for your purchase of the SHARP LCD colour TV product. To ensure safety and many years of troublefree operation of your product, please read the Important Safety Precautions carefully before using this product. Important Safety Precautions • Cleaning—Unplug the AC cord from the AC outlet before cleaning the product. Use a damp cloth to clean the product. Do not use liquid cleaners or aerosol cleaners.
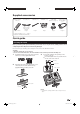
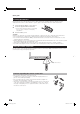
Supplied accessories Remote control unit (g1) Pages 6 and 7 AC cord (g1) Cable tie (g1) Stand unit (g1) Product shape varies in some countries. Page 4 Page 4 Page 3 Cable clamp 3 RCA to 15-pin (Small g1, Large g1) D-sub adapter (g1) Page 4 Page 10 • “AAA” size battery (g2)..........Page 6 • Operation manual (This publication) Quick guide Attaching the stand Before performing work spread cushioning over the base area to lay the TV on, making sure the area is completely flat.
Quick guide Setting the TV Place the TV close to the AC outlet, and keep the power plug within reach. Standard DIN45325 plug (IEC 169-2) 75 q coaxial cable Ferrite Core * Cable clamp (large) AC cord Product shape varies in some countries. Bundle the cables with the clamp. Cable tie Cable clamp (small) Bundle the AC cord with the clamp (small).
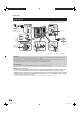
Quick guide TV (Front view) Remote control sensor OPC indicator OPC sensor SLEEP indicator B (Standby/On) indicator TV (Rear view) P (s/r) (Programme [channel] buttons) i (l/k) (Volume buttons) MENU button a (Power button) NOTE • Only if you use an active terrestrial antenna, select “yes (5V)” under “Supply voltage”.
Quick guide Inserting the batteries Before using the TV for the first time, insert two “AAA” size batteries (supplied). When the batteries become depleted and the remote control unit fails to operate, replace the batteries with new “AAA” size batteries. 1 2 Press and slide the battery cover to open it. 3 Close the battery cover. Insert two supplied “AAA” size batteries. • Place batteries with their terminals corresponding to the (e) and (f) indications in the battery compartment.
Quick guide Remote control unit 1 2 3 4 5 6 7 8 9 10 11 12 13 B (Standby/On) (Page 8) m (Teletext) TV: Display the analogue teletext. (Page 21) DTV: Select DTV data broadcasting and TELETEXT. (Page 32) k (Reveal hidden Teletext) (Pages 21 and 22) [ (Subtitle for Teletext) TV/External: Subtitle on/off. (Page 22) DTV: Display the subtitle selection screen. (Page 32) 3 (Freeze/Hold) (Page 22) 1 (Subpage) (Page 22) – Set the channel in TV and DTV mode. Enter the desired numbers or letters.
Quick guide Turning on the power Press a on the TV. Standby mode Press B on the remote control unit when the TV is on. • The TV enters standby mode and the image on the screen disappears. • The B indicator on the TV changes from green to red. • To completely turn off the power to the TV, unplug the AC cord from the AC outlet. However, do not unplug the AC cord unless otherwise instructed. Display status indicator Off Power off Red The TV is in standby mode. The TV is on.
Quick guide Channel selection using the station list (Analogue) Entering characters using the - buttons This section explains how to change/delete/ move/rename stations using the analogue Station List. If you are watching DTV, refer to the “Using the digital programme list” section. (Page 31) You can also select the desired channel from station list numeric buttons or P (r/s). instead of using 1 In analogue TV mode, press OK when no other menu screen is active.
Using external equipment Setting the input source To view external source images, select the input source using b on the remote control unit. (Page 19) INPUT SOURCE Connecting a DVD player TV DTV EXT1 EXT2 EXT3 NOTE EXT4 • The cables marked with * are EXT5 commercially available items. EXT6 • TV-OUT from EXT 1 outputs DTV image when DTV is selected as the input. Otherwise it constantly outputs analogue TV image. • MONITOR OUTPUT from EXT 2 outputs audio only when EXT 4, 5 and 6 is selected as the input.
Using external equipment Using AV Link function Connecting a decoder You can use the EXT 1 terminal when connecting a decoder and other audiovisual equipment. EXT 1 This TV incorporates four typical AV Link functions for smooth connections between the TV and other audiovisual equipment. One Touch Play While the TV is in standby mode, it automatically turns on and plays back the image from the audiovisual source (e.g. VCR, DVD).
Menu operations On-Screen Display Common operations 1 2 Example TV menu Picture Sound Connections 3 Current AV mode is shown here. (Page 19) SOFT Press MENU and the TV menu screen displays. Press c/d to select the desired menu, and then press OK. Press a/b to select the desired menu item. Press OK to proceed if necessary. TV menu Backlight 0 Contrast 3 Brightness -12 Colour 9 SOFT Tint 0 Backlight 0 Sharpness 3 Contrast 3 Colour temp.
TitleB Menu operations Picture menu Colour temp.* Various picture-related settings can be optimised. TV menu Adjust the colour temperature to give the best white image.
Menu operations Film mode Automatically detects a film-based source (originally encoded at 24/25 frames/second, depending on the vertical frequency), analyses it and then recreates each frame for film-like picture quality. Sound menu Various sound-related settings can be optimised. TV menu Connections Sound truD(R) SOFT “truD(R)” ensures you steady motion instead of edgy movements and juddering. It further improves the image quality by enhancing contrast and sharpness with advanced video algorithms.
Menu operations Connections menu HDMI setup HDMI (High-Definition Multimedia Interface) terminal selection. TV menu Connections Decoder Setup EXT 2 1 2 Input select HDMI setup Supply voltage Miscellaneous Decoder Make sure to select the terminal (EXT 1 or 2) to which the decoder is connected. NOTE • This setting will be reflected in the “Decoder stations” function under “Miscellaneous”. (Page 16) Input select Press c/d to select “Connections”, and then press OK.
Menu operations Setup menu Supply voltage Antennas with an integrated amplifier need a supply voltage on the antenna line. (Page 4) You can search for stations automatically or manually as well as set the menu language, time and date, child lock, on-screen displays, etc. AV-Link (EXT 2 only) With this function you can transfer the station data of the TV (such as station preset number/name/channel/ frequency) to the recorder if the recorder is set up for AV-Link.
Menu operations E Manual tune Use the manual tune option when receiving TV signal whose TV/Colour standard deviate from the one specified already. However, this requires detailed knowledge. 1 2 Press MENU and the TV menu screen displays. 3 Press a/b to select “Channels”, and then press OK. 4 Press a/b to select “Manual tune”, and then press OK. 5 Now enter the necessary setting parameters for each menu item. Press c/d to select “Setup”, and then press OK.
Menu operations Miscellaneous Geometry menu E No signal off When set to “Enable” the TV will automatically enter the standby mode if there is no signal input for 6 minutes. TV menu ->Setup Miscellaneous No signal off TV menu Channels Enable Child lock Disable On-screen displays Time and date NOTE • When a TV programme finishes, this function may not operate. • This function is not available in DTV mode.
Menu operations Other menu items INPUT SOURCE Some of the useful features can be directly called up by pressing assigned buttons on the remote control. AV mode 1 AV mode gives you five viewing options to choose from to best match the system environment, which can vary due to factors like room brightness, type of programme watched or the type of image input from external equipment.
Menu operations Wide modes You can select the picture size. Selectable picture size varies with the type of signal received. Basically, if you set Auto format to “on” in the Setup menu, the optimum Wide mode is automatically chosen for every broadcast. You can however, change the screen format manually as explained below. NOTE • Aside from manually changing the Wide modes as explained herein, the TV may detect and select the optimum Wide mode according to the signal received. 1 Press f.
Menu operations Analogue Teletext Using analogue teletext menu While in the analogue teletext mode, press MENU to display the Teletext Menu. What is Teletext? Teletext broadcasts pages of information and entertainment to specially equipped television sets. Your TV receives Teletext signals broadcast by a TV network, and decodes them into graphical format for viewing. News, weather and sports information, stock exchange prices and programme previews are among the many services available.
Menu operations Buttons for teletext operation Setup Buttons Description Menu Setup Newsflash Colour (Red/ Green/Yellow/ Blue) Reveal Sub-title pages Teletext subtitles with nomal size Character set Standard HiText yes Russian Greek E Sub-title pages Some stations provide teletext subtitles for the hearing impaired. For every station you can enter the teletext page on which subtitles can be found. The factory setting for all stations is page 150.
DTV menu operations DTV menu operation buttons Use the following buttons on the remote control unit to operate the DTV Menu. DTV On-Screen Display Example DTV MENU / Language 1 2 3 4 5 6 7 Select 1 2 3 [: m: Press to display the subtitle selection screen. Press to display TELETEXT or start the MHEG5 presentation, if available. : Aside from direct channel entry, each of the numeric buttons have a unique function assigned in the Programme Setup screen. DTV: Press to access DTV mode.
DTV menu operations Language About using the character set screen In some cases you may be prompted to enter characters. See below for details. Select language settings for audio (if a programme is broadcast in more than one language) and MHEG5 service. Press OK while the cursor is on “Language”. Sample Alpha Numerical Character Set screen 1 2 3 Select a desired language for each item. Alpha Numerical Character Set 1 2 FAV + ! ~ # $ % & ‘ ( ) * , - .
DTV menu operations Favourite Move To Assign services to 4 different favourite groups. Use this function to change the position of two selected services 1 2 Press a/b to select the desired service. 3 Press a/b to register the selected service to any of the 4 favourite groups (None, Fav 1 ... Fav 4) and then press OK. An icon displays indicating the favourite status. on the remote control. A selection box Press displays. 1 2 3 4 Press OK. Press on the remote control.
DTV menu operations Installation Select Use this function to jump to the specific service in one step. This is useful when there are many services displayed on screen to scroll through. 1 on the remote control. Now you can Press change the service number on the left side of the screen. 2 numeric Enter the number using buttons, and then press OK. The highlight moves to the selected service. Erase Erase the selected service(s) from the memory. 1 2 Press a/b to select the desired service.
DTV menu operations Carrier Setup System Setup This is provided for you to rename (label), erase, or rescan carriers. “Carrier” in this context refers to a service station that provides a set of individual services. 1 2 Press c/d to select “Installation”. Press a/b to select “Carrier Setup”, and then press OK. If you have already set the PIN, enter it here. If not, enter the factory preset PIN “1234”. Configure On-Screen Display and Child Lock settings.
DTV menu operations Software Upgrade Child Lock This function allows TV and Radio services to be restricted. It prevents children from watching violent or sexual scenes that may be harmful. 1 2 Press c/d to select “System Setup”. 3 If you have already set the PIN, enter it here. If not, enter the factory preset PIN “1234”. 4 Press c/d to select the desired age/rating (4 ...18/Universal/Parental/X-rated/None), and then press OK. Press a/b to select “Child Lock”, and then press OK.
DTV menu operations Common Interface Inserting a CA card Check the detailed information on the Common Interface module card in use. 1 Press OK while the cursor is on “Common Interface”. • The CI module name is displayed. CI Module Module Name IRDETO DTV MENU 2 3 A single DVB Common Interface (CI) will be implemented to allow adoption of a Conditional Access (CA) system by means of a plug-in CA module. Scrambled Broadcasting service can be routed via the CA system.
DTV menu operations About EPG 3 With the Electronic Programme Guide (EPG), you can check the schedule of DTV and Radio events, view detailed information about them, tune to an event currently on-air and set a timer for future events. General EPG screen 1 2 3 EPG 070 NOTE • Pressing p opens the EPG Description screen that provides more information about the selected event. Press p or END to exit.
DTV menu operations Viewing a service banner Using the ESG The Electronic Service Guide (ESG) is a simplified version of EPG, giving you only essential information of current events for faster access. 1 Press ESG. A service banner shows event names, start/end time of event, and other useful information. 1 Press p. Service banner • The ESG screen displays.
DTV menu operations Using the multi audio function Using the MHEG5 application (UK only) Change the audio mode and language for the currently viewed service. 1 Press 2 when no other menu screen is displayed. Some services bring you programmes with the MHEG (Multimedia and Hypermedia Expert Group) application encoded, letting you experience DTV interactively. When provided, the MHEG5 application will start when you press m. Multi Audio Sample MHEG5 screen Audio Mode S.
Appendix Troubleshooting Problem Possible Solution • No power. • Check if you pressed B on the remote control unit. If the indicator on the TV lights up red, press B. • Is the AC cord disconnected? • Check if you pressed a on the TV. • Unit cannot be operated. • External influences such as lightning, static electricity, etc., may cause improper operation. In this case, operate the unit after first turning the power off, or unplugging the AC cord and re-plugging it in after 1 or 2 minutes.
Appendix PC compatibility chart Horizontal Frequency Vertical Frequency VESA Standard 640 g 480 31.5 kHz 60 Hz ✔ SVGA 800 g 600 37.9 kHz 60 Hz ✔ 1024 g 768 48.4 kHz 60 Hz ✔ WXGA 1360 g 768 47.7 kHz 60 Hz ✔ SXGA 1280 g 1024 64.0 kHz 60 Hz ✔ Resolution VGA XGA Communication procedure Send the control commands from the PC via the RS232C connector. The TV operates according to the received command and sends a response message to the PC. Do not send multiple commands at the same time.
Appendix Commands CONTROL ITEM COMMAND CONTROL CONTENTS PARAMETER GEOMETRY POWER SETTING P O W R 0 _ _ _ POWER OFF INPUT SELECTION A I T V D _ _ _ _ TV (CHANNEL FIXED) I D T V _ _ _ _ I A V D * _ _ I A V D ? ? * CHANNEL INPUT SELECTION B AV MODE SELECTION VOLUME CONTROL ITEM CONTROL CONTENTS COMMAND PARAMETER H-POSITION AV (f10 – e10) * * * _ DTV (CHANNEL FIXED) H P O S ? ? ? ? AV (f10 – e10) PC (0 – 80) _ EXT1 – 6 (1 – 6) V P O S * * * _ V-POSITION A
Appendix Specifications Item 37o LCD COLOUR TV, Model: LC-37XD1E LCD panel 37o Advanced Super View & BLACK TFT LCD 42o LCD COLOUR TV, Model: LC-42XD1E 42o Advanced Super View Number of dots 6,220,800 dots (1920 g 1080 g 3 dots) Video Colour System PAL/SECAM/NTSC 3.58/NTSC 4.
A. Information on Disposal for Users (private households) 1. In the European Union Attention: If you want to dispose of this equipment, please do not use the ordinary dust bin! Used electrical and electronic equipment must be treated separately and in accordance with legislation that requires proper treatment, recovery and recycling of used electrical and electronic equipment.
Note 38 LC-42XD1E_gb_d.
( ) : LC-37XD1E [ ] : LC-42XD1E : LC-37XD1E LC-42XD1E 540.0 540,0 (920.0 ) / [1031.0] (920, 0 ) / [1031,0] (99.9 ) / [95.9] (99, 9 ) / [95,9] (120.9) / [139.5] (120,9) / [139,5] SPECIAL NOTE FOR USERS IN THE U.K. The mains lead of this product is fitted with a non-rewireable (moulded) plug incorporating a 13A fuse. Should the or and of the same rating as above, fuse need to be replaced, a BSI or ASTA approved BS 1362 fuse marked which is also indicated on the pin face of the plug, must be used.
PIN Printed on environmentally friendly paper Auf ökologischem Papier gedruckt Imprimé sur papier écologique Stampato su carta ecologica Afgedrukt op ecologisch papier Impreso en papel ecológico Printed in Spain Gedruckt in Spanien Imprimé en Espagne Stampato in Spagna Gedrukt in Spanje Impreso en España 06P10-SP-NG 1 TINS-C723WJZZ DEUTSCH FRANÇAIS ITALIANO OPERATION MANUAL BEDIENUNGSANLEITUNG MODE D'EMPLOI MANUALE DI ISTRUZIONI GEBRUIKSAANWIJZING MANUAL DE MANEJO NEDERLANDS OPERATION MANUAL / BEDIE