LCD Monitor LCD Farbmonitor Moniteur LCD Monitor LCD Monitor LCD LL-T1520 LL-T1620 OPERATION MANUAL BEDIENUNGSANLEITUNG MODE D’EMPLOI MANUALE D’USO MANUAL DE FUNCIONAMIENTO
Table of Contents / Inhaltsverzeichnis / Table des matières / Indice / Índice English . . . . . . . . . . . . . . . . . . . . . . . . . . . . . . . . . . . . . . . . . . . . . . . . . . . . . . . . . . . . . . . . . . . 3 Deutsch . . . . . . . . . . . . . . . . . . . . . . . . . . . . . . . . . . . . . . . . . . . . . . . . . . . . . . . . . . . . . . . . . 33 Français . . . . . . . . . . . . . . . . . . . . . . . . . . . . . . . . . . . . . . . . . . . . . . . . . . . . . . . . . . . . . . . . .
Deutsch Français Italiano Español English Notice for Users in the USA . . . . . . . . . . . . . . . . . . . . . . . . . . . . . . . . . . . . . . . . . . . . . . . . . . . . . . . . . . . . . 4 TCO '95/ '99 . . . . . . . . . . . . . . . . . . . . . . . . . . . . . . . . . . . . . . . . . . . . . . . . . . . . . . . . . . . . . . . . . . . . . . . . . 5 Notice for Users in Europe . . . . . . . . . . . . . . . . . . . . . . . . . . . . . . . . . . . . . . . . . . . . . . . . . . . . . . . . . . . . . .
Notice for Users in the USA FCC Statement WARNING – FCC Regulations state that any unauthorized changes or modifications to this equipment not expressly approved by the manufacturer could void the user's authority to operate this equipment. Note: This equipment has been tested and found to comply with the limits for a Class B digital device pursuant to Part 15 of the FCC Rules. These limits are designed to provide reasonable protection against harmful interference in a residential installation.
What does the environmenal labelling involve? The environmental demands has been developed by Svenska Naturskyddsforeningen (The Swedish Society for Nature Conservation). These demands impose restrictions on the presence and use of heavy metals, brominated and chlorinated flame retardants, CFCs (freons) and chlorinated solvents, among other things.
TCO Development SE-114 94 Stockholm, Sweden Fax: +46 8 782 92 07 Email (Internet): development@tco.se Current information regarding TCO’99 approved and labelled products may also be obtained via the Internet, using the address: http://www.tco-info.com/ Environmental requirements Flame retardants Flame retardants are present in printed circuit boards, cables, wires, casings and housings. Their purpose is to prevent, or at least to delay the spread of fire.
Dieses Gerät entspricht den Anforderungen der EG-Richtlinien 89/336/EWG und 73/23/EWG mit Änderung 93/68/EWG. Ce matériel répond aux exigences contenues dans les directives 89/336/CEE et 73/23/CEE modifiées par la directive 93/68/CEE. Dit apparaat voldoet aan de eisen van de richtlijnen 89/336/EEG en 73/23/EEG, gewijzigd door 93/68/ EEG. Deutsch This equipment complies with the requirements of Directives 89/336/EEC and 73/23/EEC as amended by 93/68/EEC.
Notice for Users in the UK FOR CUSTOMERS IN U.K. IMPORTANT The wires in this mains lead are coloured in accordance with the following code : GREEN-AND-YELLOW : Earth BLUE : Neutral BROWN : Live As the colours of the wires in the mains lead of this apparatus may not correspond with the coloured markings identifying the terminals in your plug proceed as follows.
Location - Do not use the monitor where ventilation is poor, where there is a lot of dust, where humidity is high, or where the monitor may come into contact with oil or steam, as this could lead to fire. - Ensure that the monitor does not come into contact with water or other fluids. Ensure that no objects such as paper clips or pins enter the monitor as this could lead to fire or electric shock. - Do not place the monitor on top of unstable objects or in unsafe places.
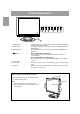
Product description 1. INPUT button . . . . . . . . . . . . . . To switch between the signal’s input terminals. (Analogue RGB input terminal ↔ DVI-I input terminal) 2. MENU button . . . . . . . . . . . . . . . This button is used to pop-up, select and close the OSD (On Screen Display) Menu. 3. SELECT button . . . . . . . . . . . . . This button is used to select menu options when the OSD Menu is displayed. 4. buttons . . . . . . . . . . . . . . .
Español English 8. DVI-I input terminal . . . . . . . . . . The computer’s digital RGB output terminal or analogue RGB output terminal can be connected here. - The monitor can be connected to the following computers that have a DVI standard output terminal (DVI-D24 pin or DVI-I29 pin) for digital connection. (Note that the display may not appear correctly, depending on the connected computer.
Connecting the monitor and turning the monitor on and off CAUTION! Connecting the monitor to a computer - When connecting, ensure that both the monitor and computer are switched off. - Be careful not to overly bend the cable or add extension cords as this could lead to a malfunction. Connecting using accessory analog signal cable Connect the accessory analog signal cable to the analog RGB input terminal of the display, and the analog RGB output terminal of the computer.
Connecting the monitor and turning the monitor on and off When connecting to an analog RGB output terminal: - Use an analog signal cable (model name: NLC02E). When the accessory audio cable is connected to the audio output terminal of the computer, the sound of the connected computer is output from the display speakers. You can also use the headphone jack of the display.
Connecting the monitor and turning the monitor on and off 3.Turn on the computer. Connecting the monitor to a power source Turn on the computer power supply. Press power button Power terminal When a signal is input from the computer, the power LED lights up green, and the screen is displayed (After power is turned on, it may take a little time until the screen is displayed.) - If the input terminal to which the computer is connected has not been selected, the screen will not be displayed.
Connecting the monitor and turning the monitor on and off English Turning the power off Press power button Français Turn the computer off Deutsch 1. Turn the computer off. 2. Press the monitor's POWER button. The Power LED will disappear. English Español Italiano If the monitor will not be used for a long time, turn off the main power switch of the monitor, and remove the power plug from the outlet.
Adjusting the screen display and speaker volume For analog signal 1. First perform an automatic adjustment. (p. 18) 2. Perform manual adjustment where necessary. (p. 19) For digital signal The monitor can generally be used without adjustment. If necessary perform manual adjustment. (p. 22) Adjustment lock function By disabling the control buttons (i.e. setting the lock) any attempted changes to adjusted values will be voided. 1. Turn off the monitor power. 2.
Adjusting the screen display and speaker volume English Adjusting the speaker volume VOLUME BRIGHT Deutsch Carry out the commands without the On Screen Display (OSD) Menu displayed. If the OSD Menu is displayed, press the MENU button (several times may be required) and begin when the OSD Menu has disappeared. 1. Without the OSD Menu being displayed, push the or the button. 11 31 SELECT [ SELECT ] Français 2. Check that "VOLUME" is selected.
Adjusting the screen display (When using an analog signal) How to Adjust Automatic screen adjustment 1.Press the MENU button. The ADJUSTMENT Menu will be displayed. Options in the ADJUSTMENT Menu can be adjusted automatically (CLOCK, PHASE, H-POS VPOS). ADJUSTMENT MANUAL Notes: - When setting up this monitor for the first time or after having changed an aspect of the current system, perform an automatic screen adjustment before use.
CLOCK The figure below demonstrates how to adjust so that vertical flicker noise is not emitted. ( buttons) Adjustments can be made using On Screen Display (OSD) Menu provided. If you are using Windows, open the Adjustment Pattern on the accompanying Utility Disk. (p. 18) If your system is not Windows, you can not use the Adjustment Pattern. Therefore display an image that makes the entire screen light and adjust it through checking visually its actual tone.
Adjusting the screen display (When using an analog signal) GAIN CONTROL Menu COLOR CONTROL Menu GAIN CONTROL COLOR CONTROL MANUAL AUTO BLACK LEVEL CONTRAST INPUT-1 1024 x 768 COLOR MODE WHITE BALANCE HUE SATURATION 50 18 ANALOG V : 60Hz INPUT-1 1024 x 768 H : 48.4kHz MANUAL: Individual menu options are manually adjusted. AUTO: Every menu option is automatically adjusted using the Auto Gain Control* function. sRGB STD VIVID 0 0 ANALOG V : 60Hz H : 48.
Adjusting the screen display (When using an analog signal) COOL ... Color tone bluer than standard • ......... Color tone slightly bluer than standard STD ...... Color tone standard setting • ......... Color tone slightly redder than standard WARM .. Color tone redder than standard USER R-CONTRAST ..... button for blue-green button for red G-CONTRAST ..... button for purple button for green B-CONTRAST ..... button for yellow button for blue H : 48.
Adjusting the screen display (When using a digital signal) Adjustments can be made using On Screen Display (OSD) Menu provided. COLOR CONTROL Menu COLOR CONTROL COLOR MODE WHITE BALANCE HUE SATURATION On Screen Display for adjustment If you are using Windows, open the Adjustment Pattern on the accompanying Utility Disk. (p. 18) If your system is not Windows, you can not use the Adjustment Pattern.
Adjusting the screen display (When using a digital signal) COOL ... Color tone bluer than standard • ......... Color tone slightly bluer than standard STD ...... Color tone standard setting • ......... Color tone slightly redder than standard WARM .. Color tone redder than standard USER R-CONTRAST ..... button for blue-green button for red G-CONTRAST ..... button for purple button for green B-CONTRAST ..... button for yellow button for blue English H : 48.
Monitor care and repair Monitor care Troubleshooting Always remove the plug from the AC outlet when cleaning the monitor. If you think the monitor may be faulty, please check the following points before taking it to be repaired. If afterwards it still does not work, please contact the shop where you purchased the monitor or your nearest Sharp authorized Service Center. Cabinet and control panel section Use a soft dry cloth to lightly wipe away any grime from the cabinet and control panel.
Specifications LL-T1520 LL-T1620 Diagonal 38cm Advanced Super-V and Anti-Glare Low Reflection TFT LCD module Displayable colors (max.) Approx. 16.77 million color (8 bit) SXGA, 1,280 x 1,024 pixel Brightness (max.) 250 cd/m2 300 cd/m2 Dot pitch 0.297(H) x 0.297 (V)mm 0.248(H) x 0.248 (V)mm Contrast ratio 400 : 1 Angle of visibility Left-right 170°; Up-down 170° Screen display size Horizontal 304.1 x Vertical 228.1 mm Video signal Analog: Analog RGB (0.
Specifications Relevant signal timings Hsync Display mode VESA 640 x 480 800 x 600 1024 x 768 1152 x 864 1280 x 960 1280 x 1024 US text Power Macintosh series 720 x 400 640 x 480 832 x 624 1024 x 768 1152 x 870 1280 x 1024 Sun Ultra series 1024 x 768 1152 x 900 1280 x 1024 31.5kHz 37.9kHz 37.5kHz 35.1kHz 37.9kHz 48.1kHz 46.9kHz 48.4kHz 56.5kHz 60.0kHz 67.5kHz 60.0kHz 64.0kHz 80.0kHz 31.5kHz 35.0kHz 49.7kHz 60.2kHz 68.7kHz 64.0kHz 80.0kHz 48.3kHz 53.6kHz 56.6kHz 61.8kHz 71.
Specifications 2 TMDS data 2+ 17 TMDS data 0- 3 TMDS data 2/4 shield 18 TMDS data 0+ 4 N.C. 19 TMDS data 0/5 shield 5 N.C. 20 N.C. 6 DDC clock 21 N.C. 7 DDC data 22 TMDS clock shield 8 Analogue vertically synchronised signal 23 TMDS clock + 9 TMDS data 1- 24 TMDS clock - 10 TMDS data 1+ C1 Analogue red image signal 11 TMDS data 1/3 shield C2 Analogue green image signal 12 N.C. C3 Analogue blue image signal 13 N.C.
Installing set-up information and the ICC profile (For Windows) Depending on the computer or OS, it may be necessary to use the computer to operate the installation of monitor set-up information etc. If so, follow the steps below to install the monitor set-up information. (Depending on the type of computer or OS, command names and methods may differ. Please follow the computer’s own operation manual while reading this.
Installing set-up information and the ICC profile (For Windows) If the "Add New Hardware Wizard" has not appeared: 1. Place the Utility Disk in the computer's A drive. 2. Click on the [Start] button. From [Settings], choose [Control Panel]. 3. Double click on [Display]. 4. Click on [Settings], [Advanced] and [Monitor]. 5. In [Options], check [Automatically detect Plug & Play monitors] and click on [Change]. 6. Check [Specify the location of the driver [Advanced]] and click [Next]. 7.
Installing set-up information and the ICC profile (For Windows) For WindowsXP Installing the ICC profile Installing the monitor’s ICC profile. (If the set-up information has already been installed, so too has the profile, and there is no need to install it.) This explanation assumes that the floppy disk drive is "A drive". 1. Place the Utility Disk in the computer’s A drive. 2. Click on the [Start] button. From [Settings], choose [Control Panel]. 3. Double click on [Display]. 4.
Information about the ColorSync profile (For MacOS) Français Deutsch English About the ColorSync profile ColorSync is the Apple Corporation's color management system and is a function that enables color resolution to be realized when used with a compatible application. A ColorSync profile describes the color characteristics of the LCD monitor. Notes: - This monitor's ColorSync profile works with MacOS8.5 or above.
Instructions for attaching a VESA compliant arm An arm or stand based on the VESA standard (commercially available) can be attached to the monitor. Procurement of the arm or stand is at the customer's discretion. Notes: - The stand is specially made for use with this monitor. Once having removed the stand, never attempt to attach it to another device. - Once having removed the screws, store them together with the stand and if the stand is ever re-attached be sure to use the original screws.
Deutsch Français Italiano Español 34 35 37 38 38 39 40 42 42 44 44 44 45 45 46 46 46 46 47 48 48 49 52 54 54 54 54 55 58 61 62 English Hinweis für Benutzer in den USA . . . . . . . . . . . . . . . . . . . . . . . . . . . . . . . . . . . . . . . . . . . . . . . . . . . . . . . . TCO'95/'99 . . . . . . . . . . . . . . . . . . . . . . . . . . . . . . . . . . . . . . . . . . . . . . . . . . . . . . . . . . . . . . . . . . . . . . . . . Hinweis für Benutzer in Europa . . . . . . . . . . . . . . . . . . . . .
Hinweis für Benutzer in den USA FCC-Hinweis ACHTUNG – Änderungen oder Modifikationen an diesem Gerät, die nicht ausdrücklich vom Hersteller genehmigt wurden, können laut FCC-Richtlinie zum Erlöschen der Betriebsberechtigung führen. Hinweis: Dieses Gerät wurde geprüft und entspricht den Grenzwerten für digitale Geräte der Klasse B gemäß Teil 15 der FCC-Richtlinien. Diese Grenzwerte dienen dem ausreichenden Schutz gegen Störungen bei einer Installation in Wohnbereichen.
English Deutsch Warum haben wir Computer mit Umweltkennzeichnung? In vielen Ländern dient die Kennzeichnung mit Umweltzeichen als Anreiz für die Fertigung und Bereitstellung umweltverträglicher Konsumgüter und Dienste. Das Hauptproblem im Zusammenhang mit Computern und anderen elektronischen Geräten besteht darin, dass umweltschädliche Stoffe in den Produkten enthalten sind und auch während der Fertigung eingesetzt werden.
TCO Development SE-114 94 Stockholm, Sweden Fax: +46 8 782 92 07 Email (Internet): development@tco.se Aktuelle Informationen zu Produkten mit TCO’99-Zulassung und -Kennzeichnung erhalten Sie auch im Internet unter folgender Adresse: http://www.tco-info.com/ Umweltanforderungen Flammschutzmittel Flammschutzmittel kommen in Platinen, Kabeln, Drähten, Verkleidungen und Gehäusen vor. Sie sollen die Ausbreitung eines Brandes verhindern oder zumindest verzögern.
Dieses Gerät entspricht den Anforderungen der EG-Richtlinien 89/336/EWG und 73/23/EWG mit Änderung 93/68/EWG. Ce matériel répond aux exigences contenues dans les directives 89/336/CEE et 73/23/CEE modifiées par la directive 93/68/CEE. Dit apparaat voldoet aan de eisen van de richtlijnen 89/336/EEG en 73/23/EEG, gewijzigd door 93/68/ EEG. Deutsch This equipment complies with the requirements of Directives 89/336/EEC and 73/23/EEC as amended by 93/68/EEC.
Hinweis für Benutzer in GB FÜR KUNDEN IN GB WICHTIG Die Drähte in diesem Netzkabel sind nach folgendem Code farbig gekennzeichnet: GRÜN/GELB : Masse BLAU : Nulleiter BRAUN : Stromführend Da die Farben der Drähte im Netzkabel dieses Gerätes möglicherweise nicht den Farbkennzeichnungen der Anschlüsse in Ihrem Stecker entsprechen, müssen Sie folgendermaßen vorgehen.
Aufstellort - Verwenden Sie den Monitor nicht an schlecht belüfteten Orten mit hoher Staubentwicklung, hoher Luftfeuchtigkeit oder an Orten, an denen der Monitor mit Öl oder Dampf in Kontakt kommen könnte, da dies ein Brandrisiko birgt. - Achten Sie darauf, daß der Monitor nicht mit Wasser oder anderen Flüssigkeiten in Berührung kommt. Achten Sie darauf, daß keinerlei Gegenstände, beispielsweise Büroklammern oder sonstige spitze Gegenstände, in den Monitor gesteckt werden.
Produktbeschreibung 1. Taste INPUT ................................ Für die Umschaltung zwischen den Signaleingangsanschlüssen. (Analogen RGB-Eingangsanschluß ↔ DVI-I-Eingangsanschluß) 2. Taste MENU ................................ Mit dieser Taste öffnen, wählen und schließen Sie das OSD (On screen Display) -Menü. 3. Taste SELECT ............................ Mit dieser Taste wählen Sie die Menüoptionen aus, wenn das OSDMenü angezeigt wird. 4. Tasten ..................................
Español English 8. DVI-I-Eingangsanschluß ............. Der digitale RGB-Ausgangsanschluß oder der analoge RGBAusgangsanschluß des Computers kann hier angeschlossen werden. - Der Monitor kann an die folgenden Computer angeschlossen werden, die einen DVI-Standard-Ausgangsanschluß (DVI-D 24polig oder DVI-I 29polig) für eine digitale Verbindung haben. (Bitte beachten Sie, dass abhängig vom angeschlossenen Computer die Wiedergabe nicht korrekt sein kann.
Anschließen des Monitors und Einund Ausschalten des Monitors - Bevor Sie den Monitor anschließen, müssen Sie den Monitor und den Computer ausschalten. - Achten Sie darauf, daß Sie das Kabel nicht überdehnen, und schließen Sie kein Verlängerungskabel an, da dies Funktionsstörungen hervorrufen kann. 3.Die Abdeckung wieder anbringen. Vorsichtig vorgehen, damit die Kabel nicht eingeklemmt werden. Unterbringung der Kabel Wenn notwendig, können die Kabel im Ständer untergebracht werden. 1.
Das separat erhältliche kabel verbindet den DVI-IEingangsanschluß des s und den digitalen oder analogen RGB- Ausgangsanschluß des Computers. Anschluss an einen digitalen RGBAusgangsanschluß: - Ein Digitalsignalkabel verwenden (Modellbezeichnung: NL-C01E) - Der Monitor kann an die folgenden Computer angeschlossen werden, die einen DVI-StandardAusgangsanschluß (DVI-D 24polig oder DVI-I 29polig) für eine digitale Verbindung haben.
Anschließen des Monitors und Ein- und Ausschalten des Monitors Anschluss von Kopfhörern (im Handel Einschalten des Monitors erhältlich) 1.Den Monitor mit dem Hauptschalter einschalten. Kopfhörer (im Handel erhältlich) können angeschlossen werden. Kopfhöreranschluß Kopfhörer Hauptschalter Hinweis: - Wenn Kopfhörer angeschlossen sind, ertönt aus den Lautsprechern des Monitors kein Klang. - Beim Aus- und Einschalten des Monitors mit dem Hauptschalter sollten Sie mindestens fünf Sekunden warten.
Anschließen des Monitors und Ein- und Ausschalten des Monitors English Umschalten zwischen Eingangsanschlüssen Mit der Taste INPUT schalten Sie die Signaleingangsanschlüsse um. Analogen RGB-Eingangsanschluß Français Deutsch INPUT-1 INPUT DVI-I-Eingangsanschluß (digital) DVI-I-Eingangsanschluß (analog) INPUT-2 Italiano INPUT-2 Español Ausschalten des Monitors Schalten Sie den Computer aus English 1. Schalten Sie den Computer aus. 2.
Einstellen der Bildschirmanzeige und der Lautsprecher-Lautstärke Analogsignal 1. Führen Sie zunächst eine automatische Einstellung durch. (S. 48) 2. Führen Sie bei Bedarf eine manuelle Einstellung durch. (S. 49) Digitalsignal Der Monitor kann in der Regel ohne Einstellung verwendet werden. Führen Sie bei Bedarf eine manuelle Einstellung durch. (S. 52) Einstellsperrfunktion Wenn Sie die Steuertasten deaktivieren (d. h. die Sperre setzen), können keine Werte eingestellt werden. 1.
Einstellen der Bildschirmanzeige und der Lautsprecher-Lautstärke der Lautsprecher- English Einstellen Lautstärke 11 31 SELECT [ SELECT ] Français VOLUME BRIGHT Deutsch Führen Sie die Befehle aus, wenn kein OSD-Menü angezeigt wird. Wenn das OSD-Menü angezeigt wird, drücken Sie die Taste MENU (bei Bedarf mehrmals), und beginnen Sie mit der Einstellung, nachdem das OSD-Menü ausgeblendet wurde. 1. Wenn das OSD-Menü nicht angezeigt wird, drücken Sie die Taste oder die Taste . Italiano 2.
Einstellen der Bildschirmanzeige (bei Verwendung eines Analogsignals) Einstellen Automatische Bildschirmeinstellung 1. Drücken Sie die Taste MENU. Das Menü ADJUSTMENT wird angezeigt. Die Optionen im Menü ADJUSTMENT können automatisch eingestellt werden (CLOCK, PHASE, H-POS, V-POS). ADJUSTMENT MANUAL Hinweis: - Wenn Sie den Monitor zum ersten Mal einrichten oder eine Komponente des bestehenden Systems geändert haben, führen Sie vor der Verwendung eine automatische Bildschirmeinstellung durch.
Einstellen der Bildschirmanzeige (bei Verwendung eines Analogsignals) Deutsch ) Français CLOCK Die untenstehende Abbildung zeigt, welche Einstellung vorgenommen werden muß, um vertikales Flimmern zu verhindern. (Tasten Vertikales Flimmern Einstellen PHASE Die untenstehende Abbildung zeigt, welche Einstellung vorgenommen werden muß, um horizontales Flimmern zu verhindern. (Tasten Hinweis: - Die Einstellungen unter PHASE dürfen erst erfolgen, nachdem CLOCK korrekt eingestellt wurde. 1.
Einstellen der Bildschirmanzeige (bei Verwendung eines Analogsignals) Menü GAIN CONTROL COLOR CONTROL Menu GAIN CONTROL COLOR CONTROL MANUAL AUTO BLACK LEVEL CONTRAST INPUT-1 1024 x 768 COLOR MODE WHITE BALANCE HUE SATURATION 50 18 ANALOG V : 60Hz INPUT-1 1024 x 768 H : 48.4kHz sRGB STD VIVID 0 0 ANALOG V : 60Hz H : 48.4kHz Hinweise: - So wählen Sie eine Menüoption: Taste SELECT - So gelangen Sie zum nächsten Menü: Taste MENU MANUAL: Einzelne Menüoptionen werden manuell eingestellt.
Einstellen der Bildschirmanzeige (bei Verwendung eines Analogsignals) - Wenn USER ausgewählt wird, werden die Einstellwerte für [R-CONTRAST], [GCONTRAST] und [B-CONTRAST] angezeigt, damit die Feineinstellung vorgenommen werden kann. - Wählen Sie [R-CONTRAST], [G-CONTRAST] und [B-CONTRAST] mit der Taste SELECT aus. - Nach Abschluß der Einstellung: Taste MENU HUE Der Farbton kann eingestellt werden.
Einstellen der Bildschirmanzeige (bei Verwendung eines Digitalsignals) Die Einstellungen können über das OSD-Menü vorgenommen werden. COLOR CONTROL Menu COLOR CONTROL COLOR MODE WHITE BALANCE HUE SATURATION OSD für die Einstellung Wenn Sie mit Windows arbeiten, öffnen Sie das Einstellmuster auf der mitgelieferten Utility Disk. (S. 48) Falls Ihr System nicht unter Windows arbeitet, können Sie das Einstellmuster nicht verwenden.
Einstellen der Bildschirmanzeige (bei Verwendung eines Digitalsignals) - Wählen Sie [COOL], [·], [STD], [·], [WARM] oder [USER] mit den Tasten aus. - Wenn USER ausgewählt wird, werden die Einstellwerte für [R-CONTRAST], [GCONTRAST] und [B-CONTRAST] angezeigt, damit die Feineinstellung vorgenommen werden kann. - Wählen Sie [R-CONTRAST], [G-CONTRAST] und [B-CONTRAST] mit der Taste SELECT aus.
Pflege des Monitors und Reparaturen Pflege des Monitors Die Leuchtstoffröhren des Monitors weisen eine begrenzte Lebensdauer auf. - Wenn der Bildschirm dunkler wird, ständig flimmert oder überhaupt nicht mehr leuchtet, muß die Leuchtstoffröhre evtl. erneuert werden. Wenden Sie sich an das Geschäft, in dem Sie den Monitor gekauft haben, oder an das nächste autorisierte SharpKundendienstzentrum. (Nehmen Sie diesen Austausch niemals selber vor.
Technische Daten LL-T1520 LL-T1620 Diagonale 38 cm TFT-LCD-Modul mit erweiterter Super-V und Antireflexbeschichtung Anzeigbare Farben (max.) ca. 16,77 Millionen Farben (8 Bit) SXGA, 1.280 x 1.024 Bildpunkte Helligkeit (max.
Technische Daten Relevante Signaltakte Anzeigemodus 640 x 480 VESA 800 x 600 1024 x 768 1152 x 864 1280 x 960 1280 x 1024 US-Text Power Macintosh-Serie 720 x 400 640 x 480 832 x 624 1024 x 768 1152 x 870 1280 x 1024 Sun Ultra-Serie 1024 x 768 1152 x 900 1280 x 1024 Hsync Vsync Punktfrequenz 31.5kHz 37.9kHz 37.5kHz 35.1kHz 37.9kHz 48.1kHz 46.9kHz 48.4kHz 56.5kHz 60.0kHz 67.5kHz 60.0kHz 64.0kHz 80.0kHz 31.5kHz 35.0kHz 49.7kHz 60.2kHz 68.7kHz 64.0kHz 80.0kHz 48.3kHz 53.6kHz 56.6kHz 61.8kHz 71.
Nr. Funktion Nr.
Installieren der Setup-Informationen und des ICC-Profils (Für Windows) Je nach dem verwendeten Computer oder Betriebssystem muß die Installation der MonitorSetup-Informationen usw. eventuell über den Computer erfolgen. Führen Sie in diesem Fall die unten beschriebenen Schritte zum Installieren der Monitor-Setup-Informationen aus. (Je nach dem verwendeten Computertyp oder Betriebssystem können die Befehlsnamen und Verfahren von den hier beschriebenen abweichen.
Wenn der "Add new Hardware Wizard" nicht angezeigt wird: 1. Legen Sie die Utility Disk in Laufwerk A des Computers ein. 2. Klicken Sie auf die Schaltfläche [Start]. Wählen Sie unter [Settings] die Option [Control Panel]. 3. Doppelklicken Sie auf [Display]. 4. Klicken Sie auf [Settings], [Advanced] und [Monitor]. 5. Aktiveren Sie unter [Options] [Automatically detect Plug & Play monitors], und klicken Sie auf [Change]. 6.
Installieren der Setup-Informationen und des ICC-Profils (Für Windows) Für Windows XP Installieren des ICC-Profils Installieren des Monitor-ICC-Profils (Wenn die Setup-Informationen bereits installiert wurden, ist auch das Profil bereits installiert. Es braucht dann nicht mehr extra installiert zu werden.) Bei dieser Beschreibung wird als Laufwerksbuchstabe für das Diskettenlaufwerk "Laufwerk A" angenommen.
Informationen zum Profil ColorSync (Für MacOS) Français Deutsch English Informationen zum Profil ColorSync ColorSync ist das Farbverwaltungssystem der Apple Corporation. Damit erkennt das System die Farbauflösung bei Verwendung mit einer kompatiblen Anwendung. Ein ColorSync-Profil beschreibt die Farbeigenschaften des LCDMonitors. Hinweise: - Das ColorSync-Profil dieses Monitors kann zusammen mit MacOS8.5 oder höher eingesetzt werden.
Anweisungen zum Anbringen eines VESAkompatiblen Monitorarms Ein Arm oder Fuß basierend auf dem VESAStandard (im Handel erhältlich) kann am Monitor angebracht werden. Der Arm oder Fuß muß vom Kunden gesondert erworben werden. Hinweise: - Der Fuß ist nur für diesen Monitor bestimmt, verwenden Sie ihn für keine anderen Geräte oder nutzen Sie ihn auf keine andere Weise.
Deutsch Français Italiano Español 64 65 67 68 68 69 70 72 72 74 74 74 75 75 76 76 76 76 77 78 78 79 82 84 84 84 84 85 88 91 92 English Avis aux utilisateurs américains . . . . . . . . . . . . . . . . . . . . . . . . . . . . . . . . . . . . . . . . . . . . . . . . . . . . . . . . . TCO'95/'99 . . . . . . . . . . . . . . . . . . . . . . . . . . . . . . . . . . . . . . . . . . . . . . . . . . . . . . . . . . . . . . . . . . . . . . . . . Avis aux utilisateurs européens . . . . . . . . . . . . . . . . . . .
Avis aux utilisateurs américains Déclaration FCC AVERTISSEMENT – La réglementation FCC stipule que toute modification/changement non autorisé(e) apporté(e) à cet équipement et non expressément approuvé(e) par le fabricant peut annuler la capacité de l'utilisateur à se servir dudit équipement. Remarque : Cet équipement a été testé et jugé conforme aux limites d'un appareil numérique de Classe B, conformément à la section 15 de la réglementation FCC.
Qu’implique la labellisation environnementale ? Les exigences environnementales ont été développées par Svenska Naturskyddsforeningen (Société suédoise pour la protection de la nature). Ces exigences imposent des restrictions à la présence et à l’usage de métaux lourds, de retardateurs de flamme au brome et au chlore, des CFC (fréons) et des solvants chlorés - parmi d’autres choses.
TCO Development SE-114 94 Stockholm, Sweden Fax : +46 8 782 92 07 Email (Internet) : development@tco.se Les informations actualisées relatives aux produits agréés et labellisés TCO’99 peuvent également être obtenues via Internet, à l’adresse : http://www.tco-info.com/ Exigences environnementales Retardateurs de flamme Les retardateurs de flamme sont présents dans les cartes à circuits imprimés, les câbles , les fils, les boîtiers et enceintes closes.
Dieses Gerät entspricht den Anforderungen der EG-Richtlinien 89/336/EWG und 73/23/EWG mit Änderung 93/68/EWG. Ce matériel répond aux exigences contenues dans les directives 89/336/CEE et 73/23/CEE modifiées par la directive 93/68/CEE. Dit apparaat voldoet aan de eisen van de richtlijnen 89/336/EEG en 73/23/EEG, gewijzigd door 93/68/ EEG. Deutsch This equipment complies with the requirements of Directives 89/336/EEC and 73/23/EEC as amended by 93/68/EEC.
Avis aux utilisateurs britanniques Destiné aux clients britanniques IMPORTANT Les fils du câble d'alimentation portent le code de couleurs suivant : VERT/JAUNE : Terre BLEU : Neutre MARRON : Phase Étant donné que les fils du câble d'alimentation de cet appareil peuvent ne pas correspondre aux marques colorées identifiant les bornes de votre prise, veuillez procéder de la manière suivante.
Lieu d’installation - Ne pas utiliser le moniteur dans un endroit faiblement ventilé, poussiéreux, relativement humide, ou encore là où il est susceptible d’entrer en contact avec de l’huile ou de la vapeur car cela pourrait provoquer un début d’incendie. - S’assurer que le moniteur ne va pas entrer en contact avec de l’eau ou d’autres fluides.
Description du produit 1. Bouton INPUT . . . . . . . . . . . . . . Pour passer d’une borne d’entrée du signal à l’autre. (Borne d’entrée du RVB analogique ↔ Borne d’entrée DVI-I) 2. Bouton MENU . . . . . . . . . . . . . . Ce bouton est utilisé pour faire apparaître, sélectionner et refermer le menu OSD (On Screen Display). 3. Bouton SELECT . . . . . . . . . . . . Ce bouton est utilisé pour sélectionné les options du menu lorsque le menu OSD est affiché à l’écran du moniteur. 4. boutons . . . . . . . . . .
Español English 8. Borne d’entrée DVI-I . . . . . . . . . La borne de sortie numérique RVB ou la borne de sortie analogique RVB de l’ordinateur peut être raccordée ici. - Pour la connexion numérique , le moniteur peut être connecté aux ordinateurs suivants possédant une borne de sortie DVI standard (DVI-D24 broches ou DVI-I29 broches). (Notez que l'affichage peut ne pas apparaître correctement selon l'ordinateur connecté.
Raccordement, activation et désactivation du moniteur Attention : - Lors du raccordement, s’assurer que l’alimentation tant du moniteur que de l’ordinateur est désactivée. - Ne pas courber le câble de manière excessive ni y ajouter de rallonge car cela peut provoquer un dysfonctionnement.
2.Presser simultanément les boutons et , ainsi que le bouton d’alimentation (c’est-à-dire allumer le moniteur). MAC DIGITAL ON [ MENU ] 3. Définir le paramètre sur "ON" avec les boutons . - Ne pas régler sur [ON] si vous n’utilisez pas d’adaptateur ADC-DVI Belkin; cela risque de perturber l’affichage. 4. Presser le bouton MENU. Cette opération clôt la configuration.
Raccordement, activation et désactivation du moniteur Raccordement d'un casque d'écoute Activation de l’alimentation (en vente dans le commerce) 1. Activer la source d’alimentation principale du moniteur. Un casque d'écoute (en vente dans le commerce) peut être raccordé. Casque audio Fiche pour casque audio Interrupteur principal - Pour allumer et éteindre avec l’interrupteur principal, toujours laisser un intervalle d’au moins 5 secondes.
Raccordement, activation et désactivation du moniteur English Inversion entre les bornes d’entrée Utiliser le bouton INPUT pour basculer entre les bornes d’entrée. Borne d’entrée RVB analogique Français Deutsch INPUT-1 INPUT Borne d’entrée DVI-I (Numérique) INPUT-2 Italiano INPUT-2 Borne d’entrée DVI-I (Analogique) Español Désactivation de l’alimentation 1. Mettre l’ordinateur hors tension. 2. Presser le bouton d’alimentation du moniteur.
Réglage de l’image au moniteur et volume des haut-parleurs Pour le signal analogique 1. Effectuer tout d’abord un réglage automatique. (p. 78) 2. Effectuer au besoin un réglage manuel. (p. 79) Pour le signal numérique Le moniteur peut généralement être utilisé sans réglage. Effectuer au besoin un réglage manuel. (p. 82) Fonction de verrouillage des réglages En désactivant les boutons de commande (c’est-àdire en les verrouillant), toute tentative de modification des valeurs sera vaine. 1.
Réglage de l’image au moniteur et volume des haut-parleurs English Réglage du volume des haut-parleurs VOLUME BRIGHT Deutsch Opérer les commandes sans que le menu du moniteur actif (OSD) ne soit affiché. Si le menu OSD est affiché, presser le bouton MENU (plusieurs fois si nécessaire) et commencer la procédure lorsque le menu a disparu. 1. Sans que le menu OSD ne soit affiché, presser le bouton ou le bouton . 11 31 SELECT [ SELECT ] Français 2. S'assurer que "VOLUME" est sélectionné.
Réglage de l’image du moniteur (lors de l’utilisation d’un signal analogique) Comment procéder aux réglages Réglage automatique de l'image 1. Presser le bouton MENU. Le menu ADJUSTMENT s'affiche. Les options CLOCK,PHASE,H-POS,V-POS du menu ADJUSTMENT peuvent être ajustées automatiquement.
Si l’on se trouve sous un environnement Windows, ouvrir le Modèle de réglage se trouvant sur le disque utilitaire. (p. 78) Si le système utilisé ne se trouve pas sous un environnement Windows, il est impossible d’utiliser le Modèle de Réglage. C’est pourquoi il s’agit d’afficher une image rendant la totalité de l’écran clair et de régler celui-ci en inspectant visuellement sa nuance réelle.
Réglage de l’image du moniteur (lors de l’utilisation d’un signal analogique) Menu GAIN CONTROL Menu COLOR CONTROL GAIN CONTROL COLOR CONTROL MANUAL AUTO BLACK LEVEL CONTRAST INPUT-1 1024 x 768 COLOR MODE WHITE BALANCE HUE SATURATION 50 18 ANALOG V : 60Hz INPUT-1 1024 x 768 H : 48.4kHz MANUEL: Les options individuelles du menu sont réglées manuellement. AUTO : Chaque option du menu est automatiquement réglée via la fonction de Auto Gain Control*. sRGB STD VIVID 0 0 ANALOG V : 60Hz H : 48.
COOL ... Nuance de couleur plus bleutée que la couleur standard • ......... Nuance de couleur légèrement plus bleutée que la couleur standard STD ...... Paramètre standard de nuance de couleurs • .......... Nuance de couleur légèrement plus rougeâtre que la couleur standard WARM .. Nuance de couleur plus rougeâtre que la couleur standard USER R-CONTRAST ..... bouton pour le bleu-vert bouton pour le rouge G-CONTRAST ..... bouton pour le violet bouton pour le vert B-CONTRAST .....
Réglage de l'image du moniteur (lors de l’utilisation d’un signal numérique) Des réglages peuvent être effectués au moyen du menu interactif (OSD) proposé. Menu COLOR CONTROL COLOR CONTROL COLOR MODE WHITE BALANCE HUE SATURATION Affichage à l’écran pour le réglage Si l’on se trouve sous un environnement Windows, ouvrir le Modèle de réglage se trouvant sur le disque utilitaire. (p. 78) Si le système utilisé ne se trouve pas sous un environnement Windows, il est impossible d’utiliser le Modèle de Réglage.
Réglage de l'image du moniteur (lors de l’utilisation d’un signal numérique) Remarques : - En ce qui concerne les paramètres autres que les [STD], toutes les graduations ne peuvent pas être affichées. Pour afficher toutes les graduations, définir le paramètre sur [STD]. - Utiliser les boutons pour sélectionner [COOL], [·], [STD], [·], [WARM] ou [USER].
Entretien et réparation du moniteur Entretien du moniteur Les lampes de rétroéclairage du moniteur ont une durée de vie limitée. - Si l’écran du moniteur s’assombrit, s’il scintille constamment ou ne s’éclaire plus, il peut s’avérer nécessaire de remplacer la lampe de rétroéclairage. Se renseigner auprès du revendeur ou du mainteneur agréé Sharp le plus proche. (Ne jamais tenter d’effectuer ce remplacement soi-même.
Caractéristiques techniques LL-T1520 LL-T1620 Diagonale 38cm Module TFT à cristaux liquides Super V avancé et anti éblouissement, anti reflet XGA 1.024 X 768 pixels Couleurs affichables (max.) Environ 16,77 millions de couleurs (8 bits) SXGA 1.280 X 1.024 pixels Luminosité (max.
Caractéristiques techniques Fréquences des signaux Mode affichage VESA 640 x 480 800 x 600 1024 x 768 1152 x 864 1280 x 960 1280 x 1024 Saisie de texte US Série Macintosh 720 x 400 640 x 480 832 x 624 1024 x 768 1152 x 870 1280 x 1024 Série Sun Ultra 1024 x 768 1152 x 900 1280 x 1024 Hsync 31.5kHz 37.9kHz 37.5kHz 35.1kHz 37.9kHz 48.1kHz 46.9kHz 48.4kHz 56.5kHz 60.0kHz 67.5kHz 60.0kHz 64.0kHz 80.0kHz 31.5kHz 35.0kHz 49.7kHz 60.2kHz 68.7kHz 64.0kHz 80.0kHz 48.3kHz 53.6kHz 56.6kHz 61.8kHz 71.
N° 1 Fonction TMDS données 2- N° Fonction 16 Détection de surchauffe de la prise 2 TMDS données 2+ 17 TMDS données 0- 3 Ecran TMDS data 2/4 18 TMDS données 0+ 4 N.C. 19 Ecran TMDS data 0/5 5 N.C. 20 N.C. 6 DDC horloge 21 N.C.
Installation des fichiers relatifs au paramétrage du moniteur et au profil ICC (Pour Windows) En fonction du type d’ordinateur ou du système d’exploitation, il peut parfois s’avérer nécessaire d’utiliser l’ordinateur pour consulter les paramètres relatifs à la configuration du moniteur. Si c’est le cas, il convient de procéder comme suit pour installer sur l’ordinateur les fichiers relatifs à la configuration du moniteur.
Si la boîte de dialogue "Add New Hardware Wizard" est apparue : 1. Placer la disque utilitaire (fournie) dans le lecteur A de l’ordinateur. 2. Cocher la case [Specify the location of the driver [Advanced]] et cliquer [Next]. 3. Cocher la case [Display a list of all the drivers in a specific location, so you can select the driver you want.], ensuite cliquer sur [Next]. 4. Lorsque [Models] apparaît, cliquer sur [Have disk], et s’assurer que [Copy manufacturer´s files from:] est [A:] et cliquer sur [OK]. 5.
Installation des fichiers relatifs au paramétrage du moniteur et au profil ICC (Pour Windows) Pour Windows XP Installation du profile ICC Installation du profile ICC du moniteur (Si l’information relative à l’installation a déjà été installée, alors le profile l’a été également, et il n’est donc plus nécessaire de l’installer.) Les explications qui suivent considèrent que le lecteur de disquettes est le "lecteur A". 1. Placer la disque utilitaire dans le lecteur A de l’ordinateur. 2.
Informations sur le profil ColorSync (Pour MacOS) Français Deutsch English A propos du profile ColorSync ColorSync est le système de gestion des couleurs de Apple Corporation et est une fonction qui permet de d’optimiser l’affichage des couleurs lors d’une utilisation avec une application compatible. Un profil ColorSync décrit les caractéristiques de couleur du moniteur LCD. Remarques : - Le profil ColorSync de ce moniteur fonctionne sous MacOS8.5 ou version ultérieure.
Instructions relatives à l’installation d’un bras conforme VESA Un bras ou un support conforme à la norme VESA (en vente dans le commerce) peut servir de support au moniteur. L’acquisition du bras ou du support est laissée à l’appréciation du client. Remarques : - Le support est conçu spécifiquement pour ce moniteur, ne pas l'utiliser pour un autre équipement ou à d'autres fins.
Deutsch Français Italiano Español English Avviso per gli utenti negli the USA . . . . . . . . . . . . . . . . . . . . . . . . . . . . . . . . . . . . . . . . . . . . . . . . . . . . . . . 94 TCO '95/ '99 . . . . . . . . . . . . . . . . . . . . . . . . . . . . . . . . . . . . . . . . . . . . . . . . . . . . . . . . . . . . . . . . . . . . . . . . 95 Avviso per gli utenti in Europa . . . . . . . . . . . . . . . . . . . . . . . . . . . . . . . . . . . . . . . . . . . . . . . . . . . . . . . . . .
Avviso per gli utenti negli the USA Dichiarazione FCC AVVERTIMENTO – I regolamenti FCC stabiliscono che qualsiasi cambiamento o modifica, apportati a quest'apparecchio senza l'espressa approvazione del fabbricante, possono invalidare la facoltà dell'utente di mettere in funzione questo apparecchio. Nota : Questo apparecchio è stato sottoposto a prova e si è constatato che esso rientra nei limiti stabiliti per un dispositivo digitale di classe B in conformità alla Parte 15 dei regolamenti FCC.
Cosa comporta il riconoscimento in campo ambientale? Le domande per la salvaguardia dell’ambiente sono state sviluppate da Svenska Naturskyddsforeningen (La società svedese per la salvaguardia della natura). Queste domande impongono restrizioni alla presenza e all’uso di metalli pesanti, sostanze ignifughe al bromo e cloruro, solventi clorurati CFC (freon) e i solventi clorurati, per citarne una parte.
TCO Development SE-114 94 Stockholm, Sweden Fax: +46 8 782 92 07 Email (Internet): Development@tco.se È possibile inoltre ricevere via Internet le informazioni relative ai prodotti approvati e dotati di marchio TCO’99 usando l’indirizzo: http://www.tco-info.com/ Requisiti ambientali Additivi ignifughi Gli additivi ignifughi sono presenti in circuiti stampati, cavi, fili, rivestimenti e alloggiamenti. Il loro scopo consiste nel prevenire o almeno ritardare l’espandersi delle fiamme.
This equipment complies with the requirements of Directives 89/336/EEC and 73/23/EEC as amended by 93/68/EEC. Dieses Gerät entspricht den Anforderungen der EG-Richtlinien 89/336/EWG und 73/23/EWG mit Änderung 93/68/EWG. English Avviso per gli utenti in Europa Dette udstyr overholder kravene i direktiv nr. 89/336/EEC og 73/23/EEC med tillæg nr. 93/68/EEC. Quest' apparecchio è conforme ai requisiti delle direttive 89/336/EEC e 73/23/EEC, come emendata dalla direttiva 93/68/EEC.
Avviso per gli utenti nel Regno Unito PER CLIENTI NEL REGNO UNITO IMPORTANTE I conduttori in questo cavo di collegamento alla rete sono colorati conformemente al seguente codice: VERDE E GIALLO : Terra BLU : Neutro MARRONE : Sotto tensione Dato che i colori dei conduttori nel cavo rete di quest'apparecchiatura potrebbero non corrispondere ai contrassegni colorati che identificano i terminali nella vostra spina, procedete come segue.
Note - Il cavo segnale digitali (DVI-D24 pin – DVI-D24 pin) va acquistato separatamente. (nome del modello: NL-C01E) - Il cavo segnale analogico (DVI-I29 pin – D-sub 15 pin) va acquistato separatamente. (nome del modello: NL-C02E) - Vi si suggerisce di conservare il cartone per il caso in cui risulti necessario trasportare il monitor. - La Sharp Corporation è proprietaria dei diritti d’autore per i programmi del dischetto delle utilità. Non riproducetelo senza averne il permesso.
Descrizione del prodotto 1. Tasto INPUT ................................ Per commutare tra i terminali di ingresso del segnale. (Terminale di ingresso RGB analogico ↔ terminale di ingresso DVI-I) 2. Tasto MENU ................................ Questo tasto si usa per visualizzare, selezionare e chiudere il menu OSD (On Screen Display). 3. Tasto SELECT ............................ Questo tasto si usa per selezionare delle opzioni di menu, quando il menu OSD è visualizzato. 4. tasti ..........................
Español English 8. Terminale di ingresso DVI-I ........ Qui si possono collegare il terminale di uscita RGB digitale oppure il terminale di uscita RGB analogico del computer. - Il monitor può essere collegato ai seguenti computer dotati di un terminale d'uscita standard DVI (DVI-D24 pin o DVI-I29 pin) per collegamento digitale. (Notare che la visualizzazione potrebbe non apparire correttamente, a seconda del computer collegato.) LL-T1520: i computer che possono assicurare un'uscita XGA.
Collegamento del monitor ed accensione e spegnimento del monitor ATTENZIONE: - Quando eseguite i collegamenti, assicuratevi che sia il monitor che il computer siano spenti. - Fate attenzione a non piegare eccessivamente il cavo oppure nell'aggiungere dei cavi di prolunga, in quanto ciò potrebbe dare luogo a disturbi al funzionamento. Contenitore per il cavo - Se reinserire il coperchio al suo posto non è facile, non sforzare. Controllare che non ci siano cavi rimasti incastrati.
OFF ON OK [ MENU ] 3.Impostare su "ON" usando i tasti . - Non impostare su [ON] se non si sta usando un adattatore Belkin ADC-DVI, in quanto potrebbe determinare una visualizzazione non corretta. 4. Premete il tasto MENU. A questo punto l’impostazione è completata.
Collegamento del monitor ed accensione e spegnimento del monitor Collegamento di una cuffia (da Accensione acquistare in commercio) 1.Posizionate su acceso l’interruttore principale rete del monitor. La cuffia (da acquistare in commercio) può essere collegata. Terminale per le cuffia Cuffia Interruttore principale rete Note: - Quando le cuffia sono collegate, non è possibile sentire nessun suono dagli altoparlanti del monitor.
Commutare tra i terminali di ingresso Utilizzate il pulsante INPUT per commutare tra i terminali di ingresso del segnale. Terminale di ingresso RGB analogico Deutsch INPUT-1 Terminale di ingresso DVI-I (analogico) INPUT-2 Italiano INPUT-2 Français INPUT Terminale di ingresso DVI-I (digitale) English Collegamento del monitor ed accensione e spegnimento del monitor Español Spegnimento 1. Spegnete il computer. 2. Premete il tasto di alimentazione del monitor.
Regolazione della visualizzazione sullo schermo e volume dell’altoparlante Per il segnale analogico 1. Prima di tutto eseguite una regolazione automatica. (p. 108) 2. Eseguite la regolazione manuale, se necessario. (p. 109) Per il segnale digitale Di solito si può utilizzare il monitor senza regolarlo. Se necessario, eseguite la regolazione manuale. (p.
Regolazione della visualizzazione sullo schermo e volume dell’altoparlante English Regolazione del volume dell’altoparlante SELECT [ SELECT ] 2. Controllare che "VOLUME" sia selezionato. Se non è selezionato, premere il tasto SELECT e selezionare "VOLUME". 3. Eseguite la regolazione, premendo il tasto (diminuisce) oppure il tasto (aumenta). English Español Nota: - L’On Screen display per la regolazione scompare alcuni secondi dopo l’ultima operazione.
Regolazione della visualizzazione sullo schermo (quando si usa un segnale analogico) Regolazione automatica dello schermo Le opzioni nel menu ADJUSTMENT si possono regolare automaticamente (CLOCK, PHASE (FASE) , H-POS, V-POS). Come eseguire la regolazione 1. Premete il tasto MENU. Il menu ADJUSTMENT verrà visualizzato.
Regolazione della visualizzazione sullo schermo Se usate Windows, aprite il monoscopio sul Disco delle Utilità accluso. (p. 108) Se il vostro sistema non è Windows, non potete usare il monoscopio. Visualizzate quindi un’immagine che rende l’intero schermo chiaro e regolatelo con un controllo visivo della sua tonalità effettiva. Questo capitolo fornisce la procedura di regolazione dello schermo mediante il monoscopio (per Windows) Come eseguire la regolazione 1. Premete il tasto MENU.
Regolazione della visualizzazione sullo schermo (quando si usa un segnale analogico) Menu GAIN CONTROL Menu COLOR CONTLOR GAIN CONTROL COLOR CONTROL MANUAL AUTO BLACK LEVEL CONTRAST INPUT-1 1024 x 768 50 18 ANALOG V : 60Hz INPUT-1 1024 x 768 H : 48.4kHz MANUAL: le singole opzioni del menu vengono regolate manualmente. AUTO: ogni opzione del menu viene regolata automaticamente, utilizzando la funzione Auto Gain Control*. Note: - Premete il tasto per selezionare [AUTO].
Regolazione della visualizzazione sullo schermo (quando si usa un segnale analogico) HUE La tonalità cromatica può essere regolata. (tasti ) SATURATION La saturazione del colore può essere regolata. (tasti ) Al valore minimo, lo schermo appare in bianco e nero. ANALOG V : 60Hz H : 48.4kHz Note: - A seconda della risoluzione del segnale di input, anche se si possono selezionare delle opzioni di menu, il display potrebbe non cambiare.
Regolazione della visualizzazione sullo schermo (quando si usa un segnale digitale) Le regolazioni si possono fare mediante il menu On Screen Display (OSD) fornito. Menu COLOR CONTLOR COLOR CONTROL On Screen Display per la regolazione Se usate Windows, aprite il monoscopio sul Disco delle Utilità accluso. (p. 108) Se il vostro sistema non è Windows, non potete usare il monoscopio.
Regolazione della visualizzazione sullo schermo (quando si usa un segnale digitale) HUE La tonalità cromatica può essere regolata. (tasti ) SATURATION La saturazione del colore può essere regolata. (tasti ) Al valore minimo, lo schermo appare in bianco e nero. DIGITAL V : 60Hz English H : 48.4kHz Note: - A seconda della risoluzione del segnale di input, anche se si possono selezionare delle opzioni di menu, il display potrebbe non cambiare.
Cura e riparazione del monitor Cura del monitor I tubi fluorescenti del monitor hanno una durata di vita utile limitata. - Se lo schermo diventa più scuro, sfarfalla costantemente oppure non si accende, potrebbe essere necessario sostituire l’unità tubo fluorescente. Per favore informatevi presso il negozio, dal quale avete acquistato il monitor oppure dal Centro del Servizio Tecnico Assistenza Clienti della Sharp più vicino a voi. (Non tentate mai di eseguire la sostituzione da voi.
Specifiche LL-T1520 LL-T1620 Diagonale 38cm Modulo TFT LCD Super-V ed anti abbagliamento a bassa riflessione perfezionato XGA, 1,024 x 768 pixel Colori visualizzabili (max.) Circa. 16.77 milioni di colori (8 bit) SXGA, 1,280 x 1,024 pixel Luminosità (max.) 250 cd/m2 300 cd/m2 Dimensione dei pixel 0.297(H) x 0.297 (V)mm 0.248(H) x 0.
Specifiche Sincronizzazioni rilevanti del segnale Modalità di visualizzazione Sincronismo Sincronismo VESA 640 x 480 800 x 600 1024 x 768 1152 x 864 1280 x 960 1280 x 1024 Testo US Serie Power Macintosh 720 x 400 640 x 480 832 x 624 1024 x 768 1152 x 870 1280 x 1024 Serie Sun Ultra 1024 x 768 1152 x 900 1280 x 1024 orizzontale verticale Frequenza punti 31.5kHz 37.9kHz 37.5kHz 35.1kHz 37.9kHz 48.1kHz 46.9kHz 48.4kHz 56.5kHz 60.0kHz 67.5kHz 60.0kHz 64.0kHz 80.0kHz 31.5kHz 35.0kHz 49.7kHz 60.
Funzione N° Funzione 1 Dati TMDS 2- 16 Rilevamento Hot plug 2 Dati TMDS 2+ 17 Dati TMDS 0- 3 Dati TMDS schermo 2/4 18 Dati TMDS 0+ N.C. 19 Dati TMDS schermo 0/5 5 N.C. 20 N.C. 6 Clock DDC 21 N.C. 7 Dati DDC 22 Clock TMDS schermo 8 Segnale analogico sincronizzato verticalmente 23 Clock TMDS + 9 Dati TMDS 1- 24 Clock TMDS - 10 Dati TMDS 1+ C1 11 Dati TMDS schermo 1/3 C2 12 N.C. C3 13 N.C.
Installazione delle informazioni per il setup e del profilo ICC (Per Windows) A seconda del computer oppure del sistema operativo può essere necessario usare il computer per eseguire l'installazione delle informazioni di setup del monitor, ecc. In questo caso, seguite i passi indicati sotto per installare le informazioni di setup del monitor. (A seconda del tipo di computer oppure del sistema operativo, i nomi dei comandi ed i metodi possono essere differenti.
Installazione delle informazioni per il setup e del profilo ICC (Per Windows) Se la schermata "Add new Hardware Wizard" non è apparsa: 1. Inserite il Disco delle Utilità nel drive A del computer. 2. Fate clic sul pulsante [Start]. Da [Settings], scegliete [Control Panel]. 3. Fate doppio clic su [Display]. 4. Fate clic su [Settings], [Advanced] e [Monitor]. 5. In [Options], spuntate [Automatically detect Plug & Play monitors] e fate clic su [Change]. 6.
Installazione delle informazioni per il setup e del profilo ICC (Per Windows) Per WindowsXP SInstallazione delle informazioni di setup del monitor in WindowsXP, e impostazione del profilo ICC del monitor come valore predeterminato. I messaggi di Windows, citati nelle istruzioni per l´uso che seguono, si basano sulla versione inglese di Windows. In questa spiegazione si parte dall'ipotesi che l'unità per dischetti floppy sia "A". 1. Inserite il Disco delle Utilità nel drive A del computer. 2.
Informazioni sul profilo ColorSync (Per MacOS) 1. Inserite il Disco delle Utilità (fornito) nell'unità per dischetti floppy del computer. 2. Copiate il profilo da usare dalla cartella Mac nel Disco delle Utilità alla cartella del profilo ColorSync, che si trova nella cartella del sistema. 3. Utilizzando il ColorSync sul Pannello di controllo, selezionate il profilo da usare. 121 Italiano Español Note: - Un drive per dischetti floppy è necessario.
Istruzioni per collegare un braccio compatibile VESA E’ possibile collegare al monitor un braccio oppure un supporto basati sullo standard VESA (da acquistare in commercio). L’acquisto del braccio oppure del supporto è a discrezione del cliente. Note: - Il supporto è progettato appositamente per questo monitor, non usatelo per altri apparecchi e scopi.
Deutsch Français Italiano Español 124 125 127 128 128 129 130 132 132 134 134 134 135 135 136 136 136 136 137 138 138 139 142 144 144 144 144 145 148 151 152 English Nota para usuarios en EE.UU. . . . . . . . . . . . . . . . . . . . . . . . . . . . . . . . . . . . . . . . . . . . . . . . . . . . . . . . . . TCO’95/'99 . . . . . . . . . . . . . . . . . . . . . . . . . . . . . . . . . . . . . . . . . . . . . . . . . . . . . . . . . . . . . . . . . . . . . . . . Nota para usuarios en Europa . . . . . . . .
Nota para usuarios en EE.UU. Certificación FCC PRECAUCIÓN - Las regulaciones FCC determinan que cualquier cambio o modificación introducida en el presente equipo no autorizada expresamente por la marca puede conducir a la anulación del permiso de uso del mismo. Nota: Este equipo ha sido comprobado y cumple los valores límites para equipos digitales de la Categoría B conforme a la Sección 15 de las normas FCC.
¿Qué significado tiene el distintivo medioambiental? Las exigencias medioambientales han sido desarrolladas por Svenska Naturskyddsforeningen (Asociación Sueca para la Conservación de la Naturaleza). Estas exigencias imponen, entre otras, restricciones en la presencia y en el uso de metales pesados, productos antiinflamantes con base de bromuro y cloro, CFCs (freones) y disolventes clorados.
TCO Development SE-114 94 Stockholm, Suecia Fax: +46 8 782 92 07 Email (Internet): development@tco.se Vía Internet, usando la dirección http://www.tco-info.com/ también se puede obtener información actualizada sobre los productos aprobados y homologados por TCO’99. Requisitos medioambientales Productos antiinflamantes Los productos antiinflamantes se encuentran en las tarjetas de circuitos impresos, cables, hilos, cajas y carcasas.
Dieses Gerät entspricht den Anforderungen der EG-Richtlinien 89/336/EWG und 73/23/EWG mit Änderung 93/68/EWG. Ce matériel répond aux exigences contenues dans les directives 89/336/CEE et 73/23/CEE modifiées par la directive 93/68/CEE. Dit apparaat voldoet aan de eisen van de richtlijnen 89/336/EEG en 73/23/EEG, gewijzigd door 93/68/ EEG. Deutsch This equipment complies with the requirements of Directives 89/336/EEC and 73/23/EEC as amended by 93/68/EEC.
Nota para usuarios en el Reino Unido PARA CLIENTES EN EL REINO UNIDO IMPORTANTE Los colores de los conductores en este cable de alimentación están definidos conforme al siguiente código: VERDE Y AMARILLO : Tierra AZUL : Neutro MARRÓN : Conductor de corriente Puesto que los colores de identificación del cable de alimentación del presente equipo pueden no corresponder con las señales de color que identifican su enchufe, proceda de la forma siguiente.
Ubicación - No coloque el monitor en lugares mal ventilados, polvorientos o con un alto grado de humedad o donde el monitor pueda entrar en contacto con aceite o vapor, ya que ello podría provocar un incendio. - Asegúrese de que el monitor no entre en contacto con agua u otros líquidos. Asegúrese de que no penetren en el monitor objetos tales como clips o alfileres ya que ello podría provocar un incendio o una descarga eléctrica. - No coloque el monitor sobre objetos inestables o en lugares inseguros.
Descripción del producto 1. Botón INPUT . . . . . . . . . . . . . . . Para conmutar entre los bornes de entrada de la señal. (Borne de entrada RGB analógica ↔ borne de entrada DVI-I) 2. Botón MENU . . . . . . . . . . . . . . . Este botón se utiliza para ampliar, seleccionar y cerrar el menú OSD (On Screen Display). 3. Botón SELECT . . . . . . . . . . . . . Este botón se utiliza para seleccionar opciones de menú cuando se visualiza el menú OSD. 4. botones . . . . . . . . . . . . . . .
Español English 8. Borne de entrada DVI-I . . . . . . . El borne de salida RGB digital o el borde de salida RGB analógica del ordenador se puede conectar aquí. - El monitor se puede conectar a los ordenadores siguientes que tengan un borne de salida estándar DVI (contacto DVI-D24 o contacto DVI-I29) para hacer la conexión digital. (Tenga en cuenta que, dependiendo del ordenador conectado, la visualización puede que no aparezca correctamente.
Conexión del monitor y encendido / apagado del mismo Precaución: - Antes de realizar la conexión, asegúrese de que tanto el monitor como el ordenador están apagados. - Tenga cuidado de no doblar excesivamente el cable ni utilizar cables de prolongación ya que ello podría llevar a un funcionamiento anómalo. Para guardar el cable En caso de ser necesario, el exceso de cable podrá guardarse en la base. - No fuerce la cubierta si resulta complicado colocarla. Compruebe si han quedado cables atrapados.
1.Después de conectar el cable de alimentación, conmute el interruptor primario del monitor. 2.Pulse los botones y al mismo tiempo y, mientras lo hace, pulse el botón de encendido/ apagado (es decir, encienda el monitor). Conexión utilizando el cable de pantalla vendido separadamente El cable de pantalla vendido separadamente permite hacer la conexión entre el borne de entrada DVI-I de la pantalla y el borne de salida RGB digital o analógica del ordenador.
Conexión del monitor y encendido/apagado del mismo Conexión de auriculares (de venta en Encendido el comercio) 1.Conmute el interruptor primario del monitor. Se pueden conectar auriculares (de venta en el comercio). Borne de auriculares Auriculares Interruptor primario Notas: - Cuando están conectados los auriculares, no se oye ningún sonido por los altavoces del monitor.
Conexión del monitor y encendido/apagado del mismo English Alternar entre bornes de entrada Utilizar el botón de ENTRADA (INPUT) para conmutar entre bornes de entrada de señal. Deutsch Borne de entrada RGB analógica Français INPUT-1 INPUT Borne de entrada DVI-I (digital) INPUT-2 Italiano INPUT-2 Borne de entrada DVI-I (analógica) Español Apagado Apague el ordenador English 1. Apague el ordenador. 2. Pulse el botón de encendido/apagado del monitor.
Ajuste de la pantalla y volumen del altavoz Para la señal analógica 1. En primer lugar, lleve a cabo un ajuste automático. (p. 138) 2.En caso necesario, realice un ajuste manual. (p. 139) Para la señal digital Normalmente no es necesario ajustar el monitor antes de utilizarlo. En caso necesario, realice un ajuste manual. (p. 142) Función de bloqueo de ajustes Si deshabilita los botones de control (es decir, activa el bloqueo) no podrá cambiar los valores configurados. 1. Apague el monitor. 2.
Realice los ajustes sin que el menú Máscara en pantalla (OSD) se vea en la pantalla. Si ve el menú OSD en la pantalla, pulse el botón MENU (varias veces si fuera necesario) y empiece cuando el menú OSD haya desaparecido. 1. Sin el menú OSD a la vista, pulse el botón o . VOLUME BRIGHT 11 31 SELECT [ SELECT ] Français 2. Compruebe que esté seleccionado "VOLUME". Si no está seleccionado "VOLUME", pulse el botón SELECT y selecciónelo. 3.
Ajuste de la pantalla (cuando se utiliza una señal analógica) Cómo realizar el ajuste Ajuste automático de la pantalla 1. Pulse el botón MENU. Aparecerá el menú ADJUSTMENT. Las opciones del Menú ADJUSTMENT (CLOCK, PHASE, H-POS V-POS) se pueden ajustar automáticamente. ADJUSTMENT MANUAL Nota: - Al configurar por primera vez el monitor o tras cambiar cualquier aspecto del sistema actual, lleve a cabo un ajuste automático de la pantalla antes de su uso.
Si está utilizando Windows, abra la Carta de ajuste incluida en el Disquete de utilidades. (p. 138) Si su sistema no es Windows, no podrá utilizar la Carta de ajuste. En tal caso, haga que aparezca una imagen que aclare toda la pantalla y ajústela comprobando visualmente su tono real. En este capítulo se describe cómo ajustar la pantalla utilizando la Carta de ajuste (para Windows) Cómo realizar el ajuste 1. Pulse el botón MENU. Aparecerá el menú ADJUSTMENT.
Ajuste de la pantalla (cuando se utiliza una señal analógica) Menú GAIN CONTROL Menú COLOR CONTROL GAIN CONTROL COLOR CONTROL MANUAL AUTO BLACK LEVEL CONTRAST INPUT-1 1024 x 768 COLOR MODE WHITE BALANCE HUE SATURATION 50 18 ANALOG V : 60Hz INPUT-1 1024 x 768 H : 48.4kHz MANUAL: Las diferentes opciones del menú se ajustan manualmente. AUTO: Cada opción del menú se ajusta automáticamente con la función Control Automático de la Ganancia*. Notas: - Pulse el botón para seleccionar [AUTO].
Ajuste de la pantalla (cuando se utiliza una señal analógica) HUE La tonalidad se puede ajustar. (botones ) SATURATION La saturación del color se puede ajustar. (botones ) Con el valor mínimo, la pantalla aparece en blanco y negro. ANALOG V : 60Hz H : 48.4kHz Notas: - Según sea la resolución de la señal de entrada, la pantalla puede no cambiar incluso si pueden seleccionarse las opciones del menú.
Ajuste de la pantalla (cuando se utiliza una señal digital) Los ajustes se pueden realizar a través del menú Máscara en pantalla (OSD). Menú COLOR CONTROL COLOR CONTROL COLOR MODE WHITE BALANCE HUE SATURATION Máscara en pantalla para el ajuste Si está utilizando Windows, abra la Carta de ajuste incluida en el Disquete de utilidades. (p. 138) Si su sistema no es Windows, no podrá utilizar la Carta de ajuste.
Ajuste de la pantalla (cuando se utiliza una señal digital) HUE La tonalidad se puede ajustar. (botones ) SATURATION La saturación del color se puede ajustar. (botones ) Con el valor mínimo, la pantalla aparece en blanco y negro. DIGITAL V : 60Hz English H : 48.4kHz Notas: - Según sea la resolución de la señal de entrada, la pantalla puede no cambiar incluso si pueden seleccionarse las opciones del menú.
Conservación y reparación del monitor Conservación del monitor Los tubos fluorescentes del monitor tienen una vida útil limitada. - Si la pantalla se oscurece, reverbera persistentemente o no se enciende, puede que sea necesario cambiar el tubo fluorescente. Consulte a su proveedor o al servicio autorizado de asistencia técnica de Sharp más cercano. (No intente jamás hacer usted mismo este cambio.
Especificaciones LL-T1520 LL-T1620 Diagonal 38 cm Advanced Super-V y módulo antirreververante de baja reflexión TFT LCD XGA 1.024 x 768 píxels Colores reproducibles (máx.) 16,77 millones de colores aproximadamente (8 bits) SXGA 1.280 x 1.024 píxels Luminosidad (máx.
Especificaciones Sincronizaciones de las señales correspondientes Modo display 640 x 480 VESA 800 x 600 1024 x 768 1152 x 864 1280 x 960 1280 x 1024 US text Series Power Macintosh 720 x 400 640 x 480 832 x 624 1024 x 768 1152 x 870 1280 x 1024 Series Sun Ultra 1024 x 768 1152 x 900 1280 x 1024 Hsync Vsync Frecuencia 31.5kHz 37.9kHz 37.5kHz 35.1kHz 37.9kHz 48.1kHz 46.9kHz 48.4kHz 56.5kHz 60.0kHz 67.5kHz 60.0kHz 64.0kHz 80.0kHz 31.5kHz 35.0kHz 49.7kHz 60.2kHz 68.7kHz 64.0kHz 80.0kHz 48.3kHz 53.
Especificaciones 16 Detección de clavija en caliente 2 Datos TMDS 2+ 17 Datos TMDS 0- 3 Protector 2/4 de datos TMDS 18 Datos TMDS 0+ 4 N.C. 19 Protector 0/5 de datos TMDS 5 N.C. 20 N.C. 6 Reloj DDC 21 N.C.
Instalación de la información de configuración y del perfil ICC (Para Windows) Según sea el tipo de ordenador o de sistema operativo, puede que sea necesario utilizar el ordenador para llevar a cabo la instalación de la información de configuración del monitor, etc. Si así fuera, siga los pasos que se indican a continuación para instalar la información de configuración del monitor.
Instalación de la información de configuración y del perfil ICC (Para Windows) Si el "Add new Hardware Wizard" no apareció: 1. Introduzca el Disquete de utilidades en la unidad A del ordenador. 2. Haga clic sobre el botón [Start]. En [Settings], seleccione [Control Panel]. 3. Haga doble clic en [Display]. 4. Haga clic en [Settings], [Advanced] y [Monitor]. 5. En [Options], seleccione [Automatically detect Plug & Play monitors] y haga clic sobre [Change]. 6.
Instalación de la información de configuración y del perfil ICC (Para Windows) Para WindowsXP Instalación del perfil ICC Instalación de la información de configuración del monitor en WindowsXP y configuración del perfil ICC del monitor como valor predeterminado. Los mensajes de Windows mencionados a continuación se refieren a la versión inglesa. En la explicación se da por supuesto que la unidad de disquetes es la "A". 1. Introduzca el Disquete de utilidades en la unidad A del ordenador. 2.
Información acerca del perfil ColorSync (Para MacOS) Español Notas: - Debe tener una unidad de disquetes. También debe tener PC Exchange o File Exchange instalados en el sistema. - Dependiendo del tipo de ordenador o de sistema operativo, los nombres de los comandos y los procedimientos a seguir podrían ser diferentes. Siga el manual de uso propio del ordenador mientras lee esto.
Instrucciones para acoplar un brazo de compatibilidad VESA Puede acoplar al monitor un brazo o una base (de venta en el comercio) conforme al estándar VESA. La adquisición del brazo o la base queda a discreción del cliente.
SHARP CORPORATION © 2002 SHARP CORPORATION 02E DSC2 TINSM1035MPZZ (2)