MODEL: MX-M623U MX-M753U DIGITAL MULTIFUNCTIONAL SYSTEM START GUIDE Keep this manual close at hand for reference whenever needed.
Caution! For complete electrical disconnection, pull out the main plug. The socket-outlet shall be installed near the equipment and shall be easily accessible. Shielded interface cables must be used with this equipment to maintain compliance with EMC regulations. ➢➣➢➣➢➣➢➣➢➣➢➣➢➣➢➣➢➣➢➣➢➣➢➣➢➣➢➣➢➣➢➣➢➣➢➣➢➣➢➣➢➣➢➣➢➣➢➣➢➣➢➣➢ The equipment should be installed near an accessible socket outlet for easy disconnection.
For the users of the fax function FAX interface cable and Line cable: These special accessories must be used with the device. The Declaration of Conformity can be viewed at the following URL address. http://www.sharp.de/doc/MX-FXX2.pdf SOFTWARE LICENCE The SOFTWARE LICENCE will appear when you install the software from the CD-ROM. By using all or any portion of the software on the CD-ROM or in the machine, you are agreeing to be bound by the terms of the SOFTWARE LICENCE.
Contents CAUTIONS . . . . . . . . . . . . . . . . . . . . . . . . . . . . . . . . 4 Symbols in this manual . . . . . . . . . . . . . . . . . . . . . 4 Power notes . . . . . . . . . . . . . . . . . . . . . . . . . . . . . . 4 Installation notes . . . . . . . . . . . . . . . . . . . . . . . . . . 5 About consumables . . . . . . . . . . . . . . . . . . . . . . . . 6 Handling precautions . . . . . . . . . . . . . . . . . . . . . . . 7 Laser information . . . . . . . . . . . . . . . . . . . . . . . . . .
Warranty While every effort has been made to make this document as accurate and helpful as possible, SHARP Corporation makes no warranty of any kind with regard to its content. All information included herein is subject to change without notice. SHARP is not responsible for any loss or damages, direct or indirect, arising from or related to the use of this operation manual. © Copyright SHARP Corporation 2010. All rights reserved.
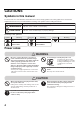
CAUTIONS Symbols in this manual To ensure safe use of the machine, this manual uses various safety symbols. The safety symbols are classified as explained below. Be sure you understand the meaning of the symbols when reading the manual. Symbol Meaning WARNING Indicates a risk of death or serious injury. CAUTION Indicates a risk of human injury or property damage.
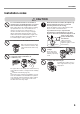
CAUTIONS Installation notes CAUTION Do not install the machine on an unstable or slanted surface. Install the machine on a surface that can withstand the weight of the machine. When the machine is installed, the adjusters (4) must be lowered to the floor to secure the machine (prevent it from moving). Risk of injury due to the machine falling or toppling. If peripheral devices are to be installed, do not install on an uneven floor, slanted surface, or otherwise unstable surface.
CAUTIONS Installation notes (continued) CAUTION Do not install the machine in a location with poor ventilation. Install so that exhaust from the machine does not directly contact people. A small amount of ozone is produced within the printer during operation. The emission level is insufficient to cause any health hazard. The present recommended long term exposure limit for ozone is 0.1 ppm (0.2 mg/m3) calculated as an 8 hr. time-weighted average concentration.
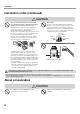
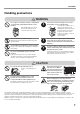
CAUTIONS Handling precautions WARNING Do not place a container of water or other liquid, or a metal object that might fall inside, on the machine. If you notice smoke, a strange odor, or other abnormality, do not use the machine. If used in this condition, fire or electrical shock may result. Immediately switch off the main power and remove the power plug from the power outlet. Contact your dealer or nearest authorised service representative.
CAUTIONS Laser information Wave length 790 nm ± 10 nm Pulse times (North America and Europe) MX-M623U: 3.3 µs ± 6.4 ns /7 mm MX-M753U (Heavy paper mode): 3.3 µs ± 6.4 ns /7 mm MX-M753U (Standard mode): 2.8 µs ± 5.4 ns /7 mm Output power Max 0.5 mW (LD1+ LD2) Caution Use of controls or adjustments or performance of procedures other than those specified herein may result in hazardous radiation exposure. This Digital Equipment is CLASS 1 LASER PRODUCT (IEC 60825-1 Edition 1.
OPERATION MANUALS AND HOW TO USE THEM Printed manuals and a manual in PDF format are provided with the machine. Printed manuals This section explains precautions to ensure safe usage, part names and functions, basic software installation, how to resolve paper jams, and daily maintenance procedures. Refer to the PDF instruction manual for instructions on how to use the machine.
DIGITAL MULTIFUNCTIONAL SYSTEM FUNCTIONS This machine provides four major areas of functionality. Refer to the Operation Guide for details on using the various functions within each area. Copy Facsimile Printer Scanner Model name Function MX-M623U/MX-M753U Copy, Printer*1, Facsimile*2, Scanner*3 *1 The printer expansion kit is required. *2 The facsimile expansion kit is required. *3 The network scanner expansion kit is required.
ACCESSING THE WEB SERVER IN THE MACHINE When the machine is connected to a network, the machine's built-in Web server can be accessed from a Web browser on your computer. Opening the Web pages 1 Access the Web server in the machine to open the Web pages. Start a Web browser on a computer that is connected to the same network as the machine and enter the IP address of the machine. Recommended Web browsers Internet Explorer: 6.0 or higher (Windows®) Netscape Navigator: 9 (Windows®) Firefox: 2.
CHECKING THE IP ADDRESS To check the IP address of the machine, print out the all custom setting list in the system settings. 1 2 Press the [SYSTEM SETTINGS] key. SYSTEM SETTINGS System Settings Admin Password Total Count Default Settings List Print (User) Paper Tray Settings Address Control Fax Data Receive/Forward Printer Condition Settings Document Filing Control USB-Device Check Exit (1) (1) Touch the [List Print (User)] key.
PART NAMES AND FUNCTIONS EXTERIOR (1) (2) (3) (4) (5) (6) (7) (8) (9) (10) (11) (15) (1) Saddle stitch finisher (MX-FN16)* Output device that enables the use of the staple function and offset function. Finisher (MX-FN15)* Output device that enables use of the staple function, offset function and pamphlet copy function. Finisher (3 trays) (MX-FN14)* Output device that enables use of the staple function for up to 100 sheets (8-1/2" x 11" size paper).
PART NAMES AND FUNCTIONS AUTOMATIC DOCUMENT FEEDER AND DOCUMENT GLASS (1) (2) (3) (4) (5) (6) (7) (1) Document feeding area cover (5) Open this cover to remove an original misfeed or clean the paper feed roller. (2) Original guides (6) These help ensure that the original is scanned correctly. Adjust the guides to the width of the original. (3) Document feeder tray Place originals in this tray. 1-sided originals must be placed face up.
PART NAMES AND FUNCTIONS SIDE AND BACK (1) (2) (3) (4) (5) (1) USB connector (A type) Supports USB 2.0 (Hi-Speed). This is used to connect a USB device such as USB memory to the machine. (2) LAN connector Connect the LAN cable to this connector when the machine is used on a network. For the LAN cable, use a shielded type cable. (3) USB connector (B type) Supports USB 2.0 (Hi-Speed). A computer can be connected to this connector to use the machine as a printer. For the USB cable, use a shielded cable.
OPERATION PANEL Image send indicators LINE indicator This lights up during transmission or reception in fax mode. The indicator also lights up during transmission in scan mode. DATA indicator When a received fax cannot be printed because of a problem such as out of paper, the indicator blinks. The indicator lights steadily when there is data that is waiting to be transmitted. Touch panel [JOB STATUS] key Print mode indicators Messages and keys appear in the LCD display.
OPERATION PANEL Numeric keys [CLEAR] key These are used to enter the number of copies, fax numbers, and other numbers. Press this key to return settings such as the number of copies to "0". [LOGOUT] key ( ) When user authentication is enabled, press this key to log out after using the machine. When using the fax function, this key can be pressed to send tone signals on a pulse dial line. [#/P] key ( ) Press this key to use a job program when using the copier function.
TURNING THE POWER ON AND OFF The machine has two power switches. The main power switch is at the top right after the front cover is opened. The other power switch is the [POWER] key ( ) on the operation panel at the top right. Main power switch When the main power switch is switched on, the main power indicator on the operation panel lights up.
PLACING ORIGINALS The automatic document feeder can be used to automatically scan many originals at once. This saves you the trouble of manually feeding each original. For originals that cannot be scanned using the automatic document feeder, such as a book or a document with notes attached, use the document glass. Using the automatic document feeder When using the automatic document feeder, place the originals in the document feeder tray. Make sure an original has not been placed on the document glass.
PLACING ORIGINALS USEABLE PAPER Various types of paper are sold. This section explains what plain paper and what special media can be used with the machine. For detailed information on the sizes and types of paper that can be loaded in each tray of the machine, see the specifications in this manual and "Paper Tray Settings" (page 7-13) in "7. SYSTEM SETTINGS" of the Operation Guide. Plain paper, special media Plain paper that can be used • SHARP standard plain paper (80 g/m2 (21 lbs.)).
PLACING ORIGINALS Print side face up or face down Paper is loaded with the print side face up or face down depending on the paper type and tray. Trays 1 to 4 Load the paper with the print side face up. However, if the paper type is "Letter Head" or "Pre-Printed", load the paper with the print side face down*. Bypass tray and tray 5 Load the paper with the print side face up. However, if the paper type is "Letter Head" or "Pre-Printed", load the paper with the print side face down*.
LOADING PAPER IN A TRAY Names of the trays The names of the trays are shown below. For the number of sheets of paper that can be loaded in each tray, see the following manuals: • Operation Guide, "Paper Tray Settings" in "7.
LOADING PAPER IN A TRAY Loading paper in paper tray 1 - tray 2 A4 or 8-1/2" x 11" size paper can be loaded in tray 1 and tray 2. If you wish to change the paper size of tray 1 or tray 2, see "CHANGING THE PAPER SIZE IN PAPER TRAY 1 - TRAY 2" in the Operation Guide. Gently pull out the paper tray. Indicator line Load paper in the left and right trays. Indicator line Insert the paper with the print side face up. Fan the paper well before inserting it.
LOADING PAPER IN A TRAY Changing the tray settings When you change the paper in a tray, the tray settings in the system settings must also be changed. 1 2 Press the [SYSTEM SETTINGS] key. SYSTEM SETTINGS System Settings Admin Password Total Count Default Settings Paper Tray Settings Address Control Fax Data Receive/Forward Document Filing Control USB-Device Check (1) Printer Condition Settings Exit List Print (User) Configure the tray settings in the touch panel.
LOADING PAPER IN A TRAY Loading paper in other trays Bypass tray The side to be copied on must be face up! When loading A3 or B4 size paper, pull out the tray extension. The maximum number of sheets that can be loaded in the bypass tray is approximately 100 for plain paper. Place paper that is A5 (7-1/4" x 10-1/2") or smaller in the horizontal orientation. Special types of paper that cannot be loaded in other trays can be loaded in the bypass tray.
LOADING PAPER IN A TRAY A4 large capacity tray The paper size of tray 5 can only be changed by a service technician. Gently pull out the paper tray. Insert the paper with the print side face up. Fan the paper well before inserting it. Otherwise, multiple sheets may feed at once and cause a misfeed. Insert the paper and then gently push the tray into the machine. Do not load as shown below. 26 Indicator line The indicator line indicates the maximum height of the paper that can be loaded in the tray.
LOADING PAPER IN A TRAY A3 large capacity tray To change the paper size of tray 5, see "TRAY SETTINGS OF TRAY 5 (A4 LARGE CAPACITY TRAY)" in the Operation Guide. Press the operation button and wait until the operation button indicator turns off. Gently pull out the paper tray. Insert the paper with the print side face up. Fan the paper well before inserting it. Otherwise, multiple sheets may feed at once and cause a misfeed. Insert the paper and then gently push the tray into the machine.
BEFORE INSTALLING THE SOFTWARE This chapter describes the software programs that allow you to use the printer and scanner functions of the machine, the CD-ROMs that contain the software, and the pages where the basic installation procedures can be found. For details on installation procedures, refer to Chapter 1 of the Operation Guide. CD-ROMS AND SOFTWARE The software that can be used with the machine is on the CD-ROMs that accompany the machine and the expansion kits.
BEFORE INSTALLING THE SOFTWARE Disc 2 Software for Windows • PC-Fax driver This enables you to send a file from your computer as a fax using the same procedure as when printing the file. (When the fax option is installed.) Even if the fax function is not installed, the PC-Fax driver can be updated using the CD-ROM in the Internet fax expansion kit to enable you to send a file from your computer as an Internet fax in the same way as you print a file.
BEFORE INSTALLING THE SOFTWARE VERIFYING SYSTEM REQUIREMENTS SYSTEM REQUIREMENTS Before installing the software described in this manual, make sure that your computer satisfies the following requirements. Windows*1 Macintosh*6 Operating system Windows 2000 Professional, Windows XP Professional*2, Windows XP Home Edition, Windows 2000 Server, Windows Server 2003*2, Windows Vista*2, Windows Server 2008*2, WIndows 7*2*3 Mac OS 9.0 to 9.2.2, Mac OS X v10.2.8, Mac OS X v10.3.9, Mac OS X v10.4.
BEFORE INSTALLING THE SOFTWARE SOFTWARE REQUIREMENTS The following requirements must be met to use the software described in this manual.
BEFORE INSTALLING THE SOFTWARE CONNECTING THE MACHINE CONNECTING TO A NETWORK To connect the machine to a network, connect the LAN cable to the machine's network connector. Use a shielded LAN cable. After connecting the machine to a network, be sure to configure the IP address and other network settings before installing the software. (The factory default setting for the IP address is to receive the IP address automatically when the machine is used in a DHCP environment.
SETUP IN A WINDOWS ENVIRONMENT This section explains how to install the software on a Windows computer. For more details regarding installation procedures and instructions for installation in Macintosh environments, see Chapter 1 of the Operation Guide. OPENING THE SOFTWARE SELECTION SCREEN (FOR ALL SOFTWARE) 1 Insert the "Software CD-ROM" into your computer's CD-ROM drive.
SETUP IN A WINDOWS ENVIRONMENT INSTALLING THE PRINTER DRIVER / PC-FAX DRIVER To install the printer driver or the PC-Fax driver, follow the appropriate procedure in this section depending on whether the machine is connected to a network or connected by USB cable.
SETUP IN A WINDOWS ENVIRONMENT 2 Click the [Standard installation] button. • If the machine is not found, make sure that the machine is powered on and that the machine is connected to the network, and then click the [Re-search] button. • You can also click the [Specify condition] button and search for the machine by entering the machine's name (host name) or IP address. ☞ Checking the IP address of the machine (page 32) When [Custom installation] is selected, you can change any of the items below.
SETUP IN A WINDOWS ENVIRONMENT 6 When you are asked whether or not you want the printer to be your default printer, make a selection and click the [Next] button. If you are installing multiple drivers, select the printer driver to be used as the default printer. If you do not wish to set one of the printer drivers as the default printer, select [No]. If you clicked the [Custom installation] button in step 2, the following windows will appear.
MAINTENANCE This section explains how to clean the machine and replace the toner cartridges. REGULAR MAINTENANCE To ensure that the machine continues to provide top quality performance, periodically clean the machine. Warning Do not use a flammable spray to clean the machine. If gas from the spray comes in contact with hot electrical components or the fusing unit inside the machine, fire or electrical shock may result.
MAINTENANCE 1 Open the automatic document feeder and remove the glass cleaner. 2 Clean the document scanning area on the document glass with the glass cleaner. One scanning area is on the document glass and the other is inside the automatic document feeder. 3 Clean the document scanning area in the automatic document feeder with the glass cleaner. (1) Open the scanning area cover on the automatic document feeder. Push in the release switch to release the cover.
MAINTENANCE CLEANING THE BYPASS FEED ROLLER If paper misfeeds frequently occur when feeding or heavy paper through the bypass tray, wipe the surface of the feed roller with a clean soft cloth moistened with water or a neutral detergent.
MAINTENANCE REPLACING THE TONER CARTRIDGES Be sure to replace the toner cartridge when the message "Change the toner cartridge." appears. In copy mode Ready to scan for copy. (Toner supply is low.) Ready to scan for copy. (Change the toner cartridge.) If you continue to use the machine without replacing the cartridge, the following message will appear when the toner runs out. When the message appears in the message display, replace the toner cartridge. Change the toner cartridge.
MAINTENANCE 1 Open the front cover. 2 Remove the toner cartridge gently. Hold the toner cartridge with both hands as shown in the illustration, and pull it out of the machine. 3 Remove the new toner cartridge from the box and shake it five or six times horizontally. 5-6 Shake the toner cartridge horizontally. Do not rotate it as shown at left. It is important to thoroughly shake the supply cartridge for 10 seconds as shown in the diagram in order to ensure proper operation of toner supply system.
MAINTENANCE 4 Insert the new toner cartridge. Align the toner cartridge with the insert hole and push it in as shown. Do not rotate the cartridge. 5 Push the cartridge in until it locks securely in place. 6 Close the front cover. Caution • Do not throw a toner cartridge into a fire. Toner may fly and cause burns. • Store toner cartridges out of the reach of small children. • If a toner cartridge is stored on end, the toner may harden and become unusable.
REMOVING MISFEEDS When a paper misfeed occurs, the message "A misfeed has occurred." will appear in the touch panel and printing and scanning will stop. In this event, touch the [Information] key in the touch panel. When the key is touched, instructions for removing the misfeed will appear. Follow the instructions. When the misfeed is cleared, the message will automatically clear. The blinking mark in the image at left indicates the approximate position of the misfeed.
SUPPLIES Standard supplies for this product that can replaced by the user include paper, toner cartridges, and staple cartridges for the finisher. Be sure to use only SHARP-specified products for the toner cartridges, finisher staple cartridge, saddle stitch finisher staple cartridge, and transparency film. For best copying results, be sure to use only Sharp Genuine Supplies which are designed, engineered, and tested to maximize the life and performance of Sharp products.
SPECIFICATIONS Machine specifications / copier specifications Name Digital Multifunctional System MX-M623U/MX-M753U Type Console Photoconductive type OPC drum Printing method Electrophotographic system (laser) Developer system Dry-type two-component magnetic brush development Fusing system Heat rollers Scanning resolution Document glass 600 x 300 dpi (factory default values), 600 x 400 dpi, 600 x 600 dpi Automatic document feeder 600 x 300 dpi (factory default values), 600 x 400 dpi, 600 x 6
SPECIFICATIONS Machine specifications / copier specifications (Continued) Paper sizes: Tray 4 A3, B4, A4, A4R, B5, B5R, 11" x 17", 8-1/2" x 14", 8-1/2" x 13-1/2", 8-1/2" x 13-2/5", 8-1/2" x 13", 8-1/2" x 11", 8-1/2" x 11"R, 7-1/4" x 10-1/2"R, 8K, 16K, 16KR (Includes automatic paper size detection function.) Paper weight: Plain paper (60 g/m2 to 105 g/m2 (16 lbs. to 28 lbs.)), heavy paper (106 g/m2 to 209 g/m2 (28 lbs. bond to 110 lbs. index) Paper capacity: Plain paper (80 g/m2 (21 lbs.
SPECIFICATIONS Continuous copying speeds* Model MX-M623U Copy ratio MX-M753U 100% / Reduce / Enlarged A3, 11" x 17", 8K 34 copies/min. 39 copies/min. B4, 8-1/2" x 14", 8-1/2" x 13-1/2", 8-1/2" x 13-2/5", 8-1/2" x 13" 39 copies/min. 45 copies/min. A4, B5, 8-1/2" x 11", 16K 62 copies/min. 75 copies/min. A4R, B5R, A5R, 8-1/2" x 11"R, 7-1/4" x 10-1/2"R, 5-1/2" x 8-1/2"R, 16KR 45 copies/min. 48 copies/min.
SPECIFICATIONS Acoustic noise emission (measurement according to ISO7779) MX-M623U MX-M753U Printing mode (continuous printing) 7.15 B 7.21 B Standby mode 5.2 B 5.
INFORMATION ON DISPOSAL A. Information on Disposal for Users (private households) 1. In the European Union Attention: If you want to dispose of this equipment, please do not use the ordinary dust bin! Used electrical and electronic equipment must be treated separately and in accordance with legislation that requires proper treatment, recovery and recycling of used electrical and electronic equipment.
50
✂ Administrator Name: Contact at: Information that the administrator of the machine requires is printed on the back of this page. (Separate this page from the manual and keep it in a safe place. In addition, fill in the name of the administrator and the administrator's contact information in the left hand margin.
TO THE ADMINISTRATOR OF THE MACHINE (Separate this page from the manual and keep it in a safe place.) Factory default passwords When accessing the system settings, the administrator password is required to log in with administrator rights. The system settings can be configured in the Web pages as well as on the operation panel. To access the system settings using the Web pages, a password is also required.
TO THE ADMINISTRATOR OF THE MACHINE For the users of the fax function Important safety instructions • If any of your telephone equipment is not operating properly, you should immediately remove it from your telephone line, as it may cause harm to the telephone network. • The AC power outlet shall be installed near the equipment and shall be easily accessible. • Never install telephone wiring during a lightning storm.
TO THE ADMINISTRATOR OF THE MACHINE Trademark acknowledgments The following trademarks and registered trademarks are used in conjunction with the machine and its peripheral devices and accessories. • Microsoft®, Windows®, Windows® 98, Windows® Me, Windows NT® 4.0, Windows® 2000, Windows® XP, Windows Server® 2003, Windows Vista®, Windows Server® 2008, Windows® 7 and Internet Explorer® are registered trademarks or trademarks of Microsoft Corporation in the U.S.A. and other countries.
SHARP ELECTRONICS (Europe) GmbH Sonninstraße 3, D-20097 Hamburg
MX-M623U/MX-M753U START GUIDE PRINTED IN FRANCE TINSE4654GHZZ