
Instruction manual


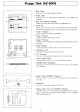

(Back
of
MZ-80B)
MZ-80B
I
I/O
Card
Fix
with
screws.
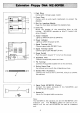
(Back
of
MZ-80FB)
Fix
with
screws.
~-~===----------======
=-----==------=---~-=
c_=
=-=--------=--_---=--=-=
=---=-::.-----==---==
=-=--==-~---======
MZ-80FB
Braided Wire
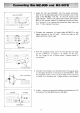
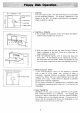
I nsert the
I/O
card MZ-80F I
into
the lowest connector
(No. 6) on the right-hand side
of
the extension
unit
on the
back
of
the MZ-80B. The Fig. on the
left
shows a
I/O
card inserted. Refer
to
the instruction manual
for
the MZ-
80B
for
the correct method
of
inserting the card and then
do
it
properly. First remove the screws and then insert the
card.
Finally replace the screws.
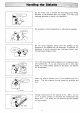
2
Connect the connector
of
signal cable MZ-80FC
to
the
signal terminal
of
the
I/O
card. Either the right
or
left
cable connector
can
be
used.
3 With the supplied screws,
firmly
fix
the right
and
left
sides
of
the connector
to
fasten
it
as
shown on· the left.
Do
not
forget
to
put in these screws. (Fasten
screws
in
two
places.)
4 Connect the connector on the other
end
of
the signal cable
to
the signal terminal in the back
of
the MZ-80FB. With
the
supplied screws,
firmly
fix
both
sides
of
the connector
to
fasten
it
in the
same
way. (Fasten screws in
two
places.)
5 Finally, connect the supplied braided wire between the
FG
terminals
of
the MZ-80FB and the MZ-80B.
3