This equipment generates and uses radio frequency energy and if not manufacturer’s instructions, may cause interference to radio and television reception. It has been type feted and found to comply with the limits for a Class B computing device in accordance with the specifications in Subpart [ of Part 15 of FCC Rules, which are designed to provide reasonable protection against such. interference. in. a residential installation.
Table of Contents PAGE Accessories Included . Keyboard Cover Part Names and Functions . Part Functions Keyboard At-A-Glance 2. GETTING STARTED -~ ;AW Switching On... Correction Tape .13 Priestliness! .15 Ribbon Cartridge Inserting Paper 3. SETTING PAGE FORMATS Selecting Pitch Line Spacing Setting Margins and Tabs Hot Zone 4. TIME-SAVING FEATURES Automatic Corrections Manual Corrections Centering Underlining . . MICRO BACKSPACE G4 5. SPECIAL FEATURES Special and Foreign Characters Dead Keys .
Table of Contents PAGE 7. PROBLEM SOLVING Diagnostic Tests When There’s a Problem .. APPENDIX Keyboard Layout e 52 INDEX ..
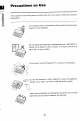
introduction | 1 Precautions on Use Your typewriter will provide years of problem-free use If you observe these few important Donor splash, spray, or drip water or other liquids (including spray cleaner) on the typewriter. Do not expose the typewriter to temperatures over 140°F It should not be placed in direct sunlight, in a closed vehicle on a warm day, or near a heater. ‘. Do not use or store the typewriter in a dusty or humid place. @ Do not use solver its or harsh cleaners to clean the typewriter.
. \ INTRODUCTION Congratulations on buying the PA-3100 Electronic Typewriter, another high-quality product from Sharp. Thanks to microchip technology, the PA-3100is a "smart” typewriter capable of things you probably never expected of even the most expensive manual or electric typewriter.
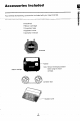
Accessories Included You will find the following accessories included with your new PA-3100 1 Print wheel 1 Ribbon cartridge 1 Correction tape 1 Keyboard cover 1 Operation manual Print wheal Fastener Note: Remove the shipping fastener before using the ribbon can ridge. Ribbon cartridge Correction tape.
! INTRODUCTION Keyboard Cover The keyboard cover protects the keyboard and should always be replaced when you finish typing. To conveniently remove the cover: 1. Held the cover by the tabs on the sides as shown. 2. Press down on the top with-both thumbs while simultaneously pulling the side tabs out and fighting up.
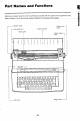
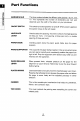
Part Names and Functions Before you begin, take the time to familiarize yourself with the parts of the typewriter and metatheses referred to throughout this guide.
1 i INTRODUCTION Part Functions MARGIN SCALE ON/OFF SWITCH LINE SPACE LEVER PAPER GUIDE PAPER SUPPORTER PAPER RELEASE LEVER PLATEN KNOBS CARRIER TOP COVER The three scales indicate the different print pitches~15, 12, and 10. This represents the number of characters per inch and depends upon the width of the letters on your print wheel. This switch turns the typewriter on and off. When power is applied, the carrier moves to the left margin. Used to select line spacing.
Keyboard At-A-Glance ¢ WAk LEFT MARGIN Sets left margin RIGHT MARGIN Sets fight margin TAB SET Sets normal tab stops TAB CLEAR Clears tabs SPANISH MODE Used in conjunction with the optional print wheel for Spanish character printing CODE Used in conjunction with certain keys to activate special functions or to print the green characters on the keyboard. Like the shift key, the CODE key must be held down while the other key is pressed to have the proper effect.
Keyboard At-A-Glance UNDERLINE MARGIN RELEASE Allows carrier to move beyond margin settings AUTOMATING CASHIER RETURNEE . Precancels automatic racier return mode r TAB Moves carrier to tab stops SHIFT LOCK Locks shift in upper case (for capital letters and alternate characters) Sets/cancels CENT REIGN ) [ Centers.a typed ling. / AUTOMATIC CORRECTION For automatically correcting typing errors on the current line RELOCATE Returns carrier 1o next printing position SPACE BAR Moves carrier right one space.
RETURN cardholder left margin and moves the paperhanger, two lines SHIFT (one key on either side) = Shifts to upper case Note: The keyboard [layout is shown in the Appendix.
Switching On The ONION switch is located on the lower [eft side. With the typewriter plugged in, when you tum the switch ON, the print whee\ spins momentarily and the carrier roves to this left margin. To remove the cord cover, lift the cover from the slot near the bottom, and pull the caver toward you. To replace the cover, place the cord in the slot as shown in the illustration, hook the top into the body of the typewriter, and then press the bot torn back until you hear a click.
Correction Tape . __To Install the Correction Tape: The correction tape is used to “lift” mistakes right off the paper which allows you to produce flawlessly typed pages. Perform these steps to install the correction tape. 1. Lift the top cover. 2, If the ribbon cartridge s installed, remove it. (Refer tithe ribbon cartridge procedures in this section.} 3. If the printers! is in place, remove it. (Refer to the print wheel procedures in this section.} 4. The correction tape has two spools.
GETTING STARTED Correction Tape 6. Place the supply spool on the right spool holder. 7. Thread the tape from the tap of the supply spool through the white rollers on ths right and left sides of the carrier. 8. Place the take-up spool on the left spoil holder, Feds the tape onto the top of the take-up spool. 9: Tums the take-up spool In the direction of the arrows to remove the slack in the tape, 10. Replace the print wheel and ribbon cartridge to complete installation of the correction tape.
Print wheel The PA-3100 print wheels are not interchangeable with the print wheels of other brands of — ———typewriters or printers. e To Check the Print wheel Position: Before installing the print wheel, first check to see that iris properly positioned In its cassette casing. The printers! must be centered in the casing opening, with the rectangular hole exactly at the twelve o'clock position — that is, directly above the center hole. If not, it can be easily moved by fingertip to the correct position.
Print wheel To Install the Print wheel: 1. Pull the lever on the right of the printers! frérfie fo release the typing head from the platen, 2. Hold the cassette so that the characters face the platen. 3. Tilt the top of the cassette toward you and slide it into the guide way. You should be able to gently rock the cassette back and forth when it is all the way down.
4. To complete installation, push the lever pack toward the platen __to return the print wheel frame to the typing position. To Remove the Print wheel: 1. Pull the lever on the right of the print wheel frame to release the typing head from the platen. 2. Grasp the right or left edge of the cartridge and pull the print whee! out.
Ribbon Cartridge To Install the Ribbon Cartridge: To Remove the Lift the top cover. Remove the shipping fastener from the new cartridge. 3. Take up any slacking the ribbon by muting the colored dial in the direction of the arrow. 4. Holding the cartridge at an angle, place the two "feet” into the slots on the front of the carrier. n 5. Pull the cartridge back slightly and press it down until it sits flat on the carrier assembly. You should hear a lick indicating the drive shaft is engaged. 6.
Inserting Paper Move the paper guide to the proper position show on the paper holder. Insert the paper so the left edge rests evenly against the paper wide and the back of the Supersaturate-Lat— the paper drop into the platen until it stops. Turn the platen knob to move the paper forward. Point to Remember ¢ Once the paper is partially inserted, you can use the RETURN key.
Selecting Pitch The PA-3100. offers three typing pitches — 10 (pica), 12 (elite), and 15 {micro). When the power Is turned on, the typewriter assumes a pitch of 10. Changing it to one of the other Pities 18 easy, To type in 10 pitch, press and hold the CODE key & type 1. To type in 12 pitch, press and hold the CODE key & type 2. To type in 15 pith, press and hold the CODE key & type 3.
Line Spacing The PA-3100 offers three line spacing selections you can change at will: single (1), one and-a-half and double (2) To Select the Line Spacing: Move the line space lever away from you for single, to the middies mark for space-and-a-half, and toward you for double spacing. Points to Remember ® Single spacing corresponds to a 1/6" paper feed (6 lines per Inch). « One-and-a-half spacing corresponds to a 114" paper feed (4 lines per inch).
= |SETTING PAGE FORMATS Setting Margins and Tabs The steps you follow to set margins and tabs are essentially the same as on Conventional typewriters. Use the carrier indicator/margin scale on the front fifth typewriter misguide— To Set the Left Margin: L Ker 1. Space or () Backspace the carrier to the desired left margin. 2. Press the L MAR key 10 set the view left margin. To Set the Right Margin: To Release the To Set Tabs: T8 ! SET ! 1. Angel A-CR mode. 2. Space or Backspace to the desired right margin.
To Clear a Tab: 1. TAB to the desired location, a 4 2. Hold down the CODE key and press the TAB SET key (TAB " CLR) to clear the tab. 3. Repeat steps 1 and 2 fo clear additional tabs. To Clear All Tabs: 1. Hold down the CODE key and press the TAB SET key (TAB L m CLEAR. !! 2. Press the REPEAT key. Points to Remember # Poinsettias beyond the left margin and right margin, use the MAR REL key to move the carrier outside of the margins. ® When you clear all tabs, tabs outside the margins are also cleared.
Hot Zone The “hot zone" is the area eight spaces to the loft of the currently set right margin. Your PA-3100 is preset to alert you with a beep when you have entered this zone. Point to Remember ® If you move the right margin, the hot zones moves along with it Automatic Carrier Return When this feature is active, the first space o hyphen you type when you are in the hot zone provides an automatic carrier return. You do not have to hit the RETURN key in order to proceed to the beginning of the next line.
Points to Remember « When the feature is on, continue typing as the carrier re fums. The PA-31 00 wil remember the characters you type and autocratically print them on the next fine, # You need lo press the RETURN key only when you type short lines (such as names and addresses, salutations or closings) or at the end of a paragraph.
Hot Zone To Type a Required Space: | SETTING PAGE FORMATS 1. When you hear the hot zone beep, finish typing the word, dawn-the CODE key:and press the SPACE bar. H Note: You may also need to press MAR REL to finish the line. + 3. Type the next word. 4. Repeat steps 2 and 3 if there are. additional words you want to -B keep on the line. 5. Press the SPACE bar to rectum the carrier automatically. To Type a Required Hyphen: 1. When you hear the hot zone beep, finish typing the word or phrase. 2.
Automatic Corrections The remembers the last 65 characters you typed on this line. Using the AUTO CORRECTION key, you can quickly erase one or more of the: e characters RELOCATE will then take you back to where you left off, instantly, To Correct the Character Just Typed: a' 1. Press the AUTO CORRECTION key. The carrier will Lg‘ backspace and erase the error. 2. Type the correct character. 3. Continue typing. To Correct an Error Earlier on the Line: 1. Backspace until the carrier is on the error. 2.
Manual Corrections When the error is on a previous ling, or more than 65 characters before the current position, the manual correction feature is used. This is a quick and easy meter of erasing characters. To Correct an Error on a Prior Line: 1 o Press RETURN or EXP then tum the platen carefully to the correct line. (2 clicks per line for single spaced lines, 3 clicks for 1-1/2 space, and 4 for double-spaced lines) . Position the carrier on the error.
TRUES TIME-SAVING FEA Centering This function can be used when you want to center a page number, date, title or other text on the page. The line can characters or spaces long. To Center Tex: 1. Position the carrier at the left roaring. Hold down the CODE key and press the number 8 (CENT) e e | The Cartier will move to the point midway between the margins. 3. Type the text to be centered. 4.
Underlining Words can be simultaneously typed and underlined using the automatic underlining e feat Re Underline as You Type: . . 1, Hold down the CODE key and press the number 7 (xxx) key. u ‘ 2. Type the text to be underlined. Spaces will be underlined as well. 3 . Hold down the CODE key and press the number 7 (x0x) key to cancel underlining. Points to Remember e The AUTO CORRECTION key erases both the character and the underline. o When using underlining, spaces between words will also be undefined.
Micro Backspace The feature is used for fine adjustment of the carrier position for manual corrections. It moves the carrier 1/60 inch to the left. To Use Micro Backspace: .! " .. Hold down the CODE key and press the Backspace key. For example: The hick brown fox . Position carrier on & . Erase k,c,i . Press Micro . Type . Press Micro Type i . Press Micro Type o . Press Micro .
Special and Foreign Characters Spanish Print wheel If you look at the keyboard, you will notice that many of the keys have multiple characters on them, Some keys have characters on both the front and the top. Characters located on the left side of the keys are accessed from the standard keyboard with. the standard newsprint. Characters on the right side are accessed using the Spanish printers! (SPAN P/W) key with the optional Spanish print wheel, Standard characters—J \—Spanish characters To Use the Spanish
Dead Keys Some foreign characters are accented. For example: & ambient. The accent keys are called “dead” keys because the career does not move and nothing Is printed until a second character is typed. Dead keys save you time by eliminating the need to backspace to” accent characters, To Use the Accent Keys: 1. Type the accent. The carrier does not move and nothing is printed. 2, Type the character to be accented.
RES SPECIAL FEAT! b Calculator Function Here is something you probably never exacted a typewriter to do. If you want 1o, you can turn the typewriter into a calculator that will dither print out only your answer o the.entire—— calculation process. You danseuse this feature for addition, subtraction, multiplication, and division of numbers up to 12 digits in size, e To Perform Calculations: ' . 1. Hold:down the CODE key and type'Q (GAL). u H A slight sound will indicate that calculator mode has zen selected.
Printed Position The carrier position after the miscalculation is interdependent upon which key you use to print the result. The new carrier position then becomes the new decimal point. Or you can have the carrier move to other positions. Here are the possible positions.
GENERAL INFO Cleaning and Maintenance To Clean the Typewriter: The PA-3100 case and keyboard are made of very strange, resilient plastic components. These surfaces may be cleaned with a damp cloth. Make sure the cloth is only damp so that no moisture can drip into any part of the typewriter.
GENERAL INFORMATION E Specifications POWER REQUIREMENTS Approx. 38 watts, 120 AC 60 Hz Operating temperature | 4110 104°F (5t040°C) Storage temperature — 1310 +140°F (—20th +60°C) Ambient humidity 2010 80% RH, W/O condensation DIMENSIONS 16,97 (W) x X 4.7 (H) 210{W) x 360(D) X 120 (H) mm WEIGHT Approx. 13.2bs. (6.0kg) Specifications are subject to change without notice.
Specifications Self-repeat keys PRINTING Print speed 12¢cps o . Print wheel 96 characters, removable cassette Print pitch 10,12,0r15 WIDTHS . Paper cinches Typing cinches RIBBON TYPE Correctable carbon film, approx. 50,000 characters (ZX-3C81) CORRECTION TAPE Lift-off for correctable carbon film, approx.
Diagnostic Tests If you feel that your typewriter needs repair or adjustment, you can check by performing some simple tests. The PA-3100 has built-in diagnostic test functions to show tart each ~ character types correctly and that the carrier, print wheel, and platen all operate correctly. i the tests reveal problems, contact your authorized Sharp dealer. To Test the Character Set: 1. Make sure that the typewriter is not In the CAL or automatic return mage, and the carrier is at the left margin. 2.
When There’s a Problem Given below are some operational problems which you may encounter and their solutions. This typewriter has been carefully manufactured and most of the problems result from invalid procedures and are not finely to be & machine failure. The sections below will help you correct a problem or determine if a service technician should tie called for help.
PROBLEM Solving -] 1 When There’s a Problem Line Format Problems Will not set left margin ¢ Right margin may be set to.the.left of tha theft margin position. Will not set right margin & The PA-3100 may be in the automatic carrier return mode. Press CODE + MAR REL keys to turn it off, Will not set tabs * You may have exceeded the maximum of 15 tabs per line.
Carrier Problems Carrier automatically returns too close to or too far from the right margin' & Auto carrier return mode should be muted off if not required.
. APPENDIX Keyboard Layout MAR ¥ e i TAB W 28 ek seal LOT s co Be t SHIFT z wreathe
Index AGE: PAGE A . manual Accented characters . Correction tape Accessories All-tab clear . D Automatic carrier return mode . . Daisy wheel (See Printers) Autocratic correction key Dead keys 37 B E Backspace, micro 34 Erase key (See Correction key) Erase tape (See Correction taps) C Error(See Correction) Calculating L, clearing data . G Green charters, showplaces 36 Carrier testing .. Cartridge, ribbon . .18 H Centering .32 Character set testing , .46 Cleaning .42 Coded functions .7 K Code keys ..