
Specifications
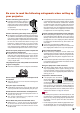


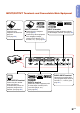
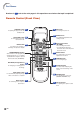

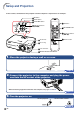
Table Of Contents
- Introduction
- Basic Operation
- Projection
- Functions
- Using the Menu
- Menu Items
- Using the Menu Screen
- Picture Adjustment
- Computer Image Adjustment
- Using the “Options” Menu
- Lamp Timer (Life) (Checking the Lamp Life Status)
- OSD Display (Setting On-screen Display)
- Video System (Setting the Video System)
- Background (Selecting a Startup and Background Image)
- Eco Mode (Setting the Eco Mode)
- Auto Power Off (Auto Power Off Function)
- Menu Position (Selecting the Menu Screen Position)
- Menu Color (Selecting the Menu Color)
- Password (Setting a Password)
- If You Forget Your Password
- Anti-Theft (Setting the Anti-Theft)
- Using the “Language” Menu
- Using the “PRJ Mode” Menu
- Connections
- Screen Setup
- Appendix

-15
Introduction
Using the Remote Control
Inserting the Batteries
The batteries (two R-6 batteries (“AA” size,
UM/SUM-3, HP-7 or similar)) are supplied in
the package.
1 Press the ▲ mark on the cover
and slide it in the direction of the
arrow.
2 Insert the batteries.
• Insert the batteries making sure the po-
larities correctly match the
and
marks inside the battery compartment.
3 Attach the cover and slide it un-
til it clicks into place.
Incorrect use of the batteries may cause them to leak or explode. Please follow the precautions below.
Caution
• Insert the batteries making sure the polarities correctly match the and marks inside the battery compart-
ment.
• Batteries of different types have different properties, therefore do not mix batteries of different types.
• Do not mix new and old batteries.
This may shorten the life of new batteries or may cause old batteries to leak.
• Remove the batteries from the remote control once they have run out, as leaving them in can cause them to leak.
Battery fluid from leaked batteries is harmful to skin, therefore be sure to first wipe them and then remove them
using a cloth.
• The batteries included with this projector may run down in a short period, depending on how they are kept. Be
sure to replace them as soon as possible with new batteries.
• Remove the batteries from the remote control if you will not be using the remote control for a long time.
Usable Range
The remote control can be used to control
the projector within the ranges shown in the
illustration.
Note
• The signal from the remote control can be re-
flected off a screen for easy operation. How-
ever, the effective distance of the signal may
differ depending on the screen material.
When using the remote control:
• Be sure not to drop, expose to moisture or high
temperature.
• The remote control may malfunction under a
fluorescent lamp. In this case, move the pro-
jector away from the fluorescent lamp.
23' (7 m)
30°
30°
30°
Remote control
Remote control sensor
Remote
control
signal
transmitters