
Specifications
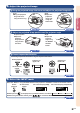

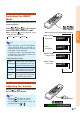
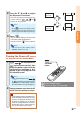
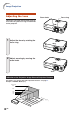
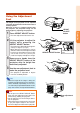
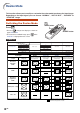
Table Of Contents
- Introduction
- Basic Operation
- Projection
- Functions
- Using the Menu
- Menu Items
- Using the Menu Screen
- Picture Adjustment
- Computer Image Adjustment
- Using the “Options” Menu
- Lamp Timer (Life) (Checking the Lamp Life Status)
- OSD Display (Setting On-screen Display)
- Video System (Setting the Video System)
- Background (Selecting a Startup and Background Image)
- Eco Mode (Setting the Eco Mode)
- Auto Power Off (Auto Power Off Function)
- Menu Position (Selecting the Menu Screen Position)
- Menu Color (Selecting the Menu Color)
- Password (Setting a Password)
- If You Forget Your Password
- Anti-Theft (Setting the Anti-Theft)
- Using the “Language” Menu
- Using the “PRJ Mode” Menu
- Connections
- Screen Setup
- Appendix

-22
Adjusting the Lens
The image is focused and adjusted to the de-
sired size using the focus ring or zoom knob
on the projector.
1 Adjust the focus by rotating the
focus ring.
2 Adjust zooming by moving the
zoom knob.
Image Projection
Zoom in
Z
o
o
m
o
ut
Focus ringZoom knob
300"
200"
100"
84"
60"
240"
×180"
Projection Distance
160"
×
120"
80"
×
60"
67"
×
50"
48"
×
36"
2
9
'6
"
–
3
7
'
1
"
(9
.0 m
–
11.3 m
)
1
9
'8
"–
2
4
'7
"
(6.0 m
–
7.5 m
)
9
'1
0
"–
1
2
'2
"
(3.0
m
–
3.7 m
)
8
'2
"–
1
0
'2
"
(2
.5 m
–
3.1 m
)
5
'1
1
"–
7
'3
"
(1.8 m
– 2.2 m
)
Picture Size
Indication of the Projection Image Size and Projection Distance
For details, see “Screen Size and Projection Distance” on page 57.
Example : NORMAL Mode (4:3)