
Installation Manual


INSTALLATION INSTRUCTIONS
PAGE 3
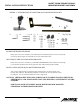
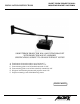
FIGURE 1. ILLUSTRATION OF PARTS FOR WALL MOUNTING BRACKET
INVERT THE PROJECTOR IMAGE
Please refer to the owners manual for your LCD Projector for detailed instructions of how to electrically
invert the projected image to accommodate its use in the wall mounted mode.
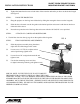
LOCATION OF THE WALL MOUNTING BRACKET
Please refer to the owner’s manual for your SHARP LCD PROJECTOR for information which will help
you to determine the best location for the placement of the wall mounting bracket assembly.
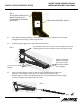
INSTALLATION OF THE WALL MOUNTING BRACKET
After you have determined the appropriate location for the bracket, you must locate the exact
location of the wall studs. Most standard residential construction uses 16 inches between centers
for wall studs. You can mount the bracket in line with a single beam.
CAUTION: THE BRACKET MOUNTING SCREWS MUST GO DIRECTLY INTO THE STUDS.
SHEETROCK, LATH AND PLASTER, WILL NOT PROVIDE A SUFFICIENTLY SECURE
SUPPORT.
FOR WALLS MADE OF CEMENT BLOCK, BRICK OR SOLID MASONRY,
EXPANSION ANCHORS SHOULD BE USED.
C.
D.
F.
J
I.
B. A.
G.
H.
L.
K.
D.
N.
SHORT THROW PROJECTOR WALL
MOUNTING BRACKET AN-STWM20
E.
M