
User Manual


29
E
Network
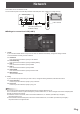
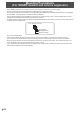
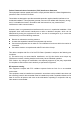
This monitor can be connected to a LAN.
The connection requires a commercially available LAN cable (UTP cable, Category 5, straight through).
LAN 2 terminal
LAN cable (commercially
available, straight)
Hub
Network (LAN)
n
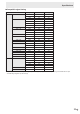
Settings to connect to a LAN (LAN 2)
1. TCP/IP
If your LAN has a DHCP server and you wish to obtain an address automatically, change this setting to DHCP.
To set the address manually, set this to Manual.
1.1 IP Address
If the TCP/IP is set to Manual, specify an IP address.
1.2 Default Gateway
If the TCP/IP is set to Manual, specify a default gateway.
1.3 DNS 1
If the TCP/IP is set to Manual, specify a DNS.
1.4 DNS 2
If the TCP/IP is set to Manual, specify a DNS.
1.5 Subnet Mask
If the TCP/IP is set to Manual, specify a subnet mask.
1.6 MAC Address
Show the MAC Address.
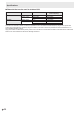
2. Proxy
If your LAN has a proxy server and you wish to use it, change this setting to Manual, otherwise set to None.
2.1 Proxy Hostname
If the Proxy is set to Manual, specify a proxy hostname.
2.2 Proxy Port
If the Proxy is set to Manual, specify a proxy port.
TIPS
• ThismonitorsupportsapplicationsoftwareRoomViewfromCrestronElectronics,Inc.
This is a function to connect a system developed by Crestron Electronics, Inc. which manages and controls multiple system
devices connected to the network.
For details of Crestron Connected, refer to the Crestron Electronics, Inc. website. (Provided only In English.)
http://www.crestron.com/
For the download of RoomView Express, refer to the Crestron Electronics, Inc. website. (Provided only In English.)
http://www.crestron.com/getroomview