
User Manual

36
E
• Wheninstalling,removingormovingthemonitor,ensurethatthisiscarriedoutbyatleast4people.
• Besuretouseawall-mountbracketdesignedordesignatedformountingthemonitor.
• Thismonitorisdesignedtobeinstalledonaconcretewallorpillar.Reinforcedworkmightbenecessaryforsomematerials
such as plaster / thin plastic board / wood before starting installation.
This monitor and bracket must be installed on a wall which can endure at least 4 times or more the weight of the monitor.
Install by the most suitable method for the material and the structure.
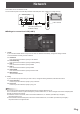
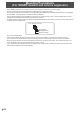
• ToattachaVESA-compliantmountingbracket,useM6screwsthatare5/16inch(8mm)to3/8inch(10mm)longerthanthe
thickness of the mounting bracket.
Screws (M6)
Mounting bracket
Monitor mounting
5/16 - 3/8 inch (8-10 mm)
• Donotuseanimpactdriver.
• Aftermounting,pleasecarefullyensurethemonitorissecure,andnotabletocomeloosefromthewallormount.
• Donotuseanyscrewholesotherthanthoseformountingbrackets,locatedontherearofthemonitor,forinstallation.
• Whenmovingthismonitor,besuretoholditwiththehandles,theunitsidesortheunittop.Donotgraspthescreen,unit
corner or speaker. This may cause product damage, failure, or injury.
• Ifyouneedtotemporarilyplacethemonitoronatableorothersurfaceduringinstallation,spreadathicksoftclothonthe
table to prevent damage to the screen and table.
Mounting Precautions
(For SHARP dealers and service engineers)