
Installation Guide

6
INSTALLATION INSTRUCTIONS
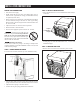
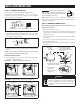
STEP 4: INSTALL POWER CORD
Skip this step if dishwasher will be direct wired. Use power cord
kit WX09X70910 available for purchase from an authorized Sharp
parts dealer. The power cord and connections must comply with
local codes and ordinances.
• Recommended power cord length is 54" minimum and 64"
maximum.
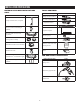
Green Wire to
Green Wire (Ground)
Black Wire to
Black Wire (Hot)
White Wire to
White Wire (Neutral)
Remove
Junction Box
Cover
• Connect incoming power cords: white (or ribbed) to dishwasher
white, black (or smooth) to black and ground to dishwasher green
wire. Use cUL/UL listed wire nuts of appropriate size.
• Replace junction box cover. Be sure wires are not pinched under
the cover.
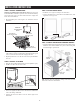
STEP 5: INSTALL 90˚ ELBOW
• Wrap 90˚ elbow with thread seal tape. Do not use plumber's putty.
• Install a 90˚ elbow onto the water valve.
• Do not over tighten 90° elbow; water valve bracket could bend or
water valve tting could break.
• Position the end of the elbow to face the bottom right of the
dishwasher.
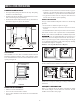
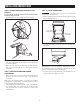
STEP 6: INSTALL DRAIN HOSE
• Install the screw type hose clamps to the drain hose.
• Connect the drain hose to the drain hose installation hose, then
tighten the screw type hose.
The Drain Hose
Installation Hole
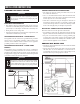
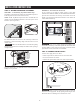
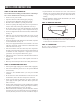
STEP 7: INSERT DRAIN HOSE THROUGH CABINET
• Upright the dishwasher and position in front of the opening. Insert
drain hose into cabinet wall hole. If a power cord is used, guide
the end through a separate hole.
Power Cord
(if used)
House
Wiring
Drain
Hose
Water
Line
Insulation
Blanket
Maximum
Drain Hose
Length 10'
TIP: Position water line and house wiring on the oor to avoid
interference with base of dishwasher.