
Installation Guide

8
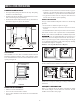
STEP 11: SECURE DISHWASHER TO CABINET
METHOD 1 - To install using Top Mount Cabinet Clips:
Depending on the depth of the cabinet, the Top Mount Clips have a
break-off point that can be removed if necessary.
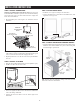
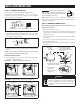
NOTE: Install Top Mount Clips before unit is installed into the
cabinet. Insert the installation brackets to the front top slots of the
dishwater. (See image below.)
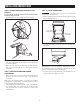
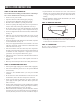
The dishwasher must be secured to the countertop. Position the
dishwasher so that the tub ange aligns with the front face of the
cabinet frame.
IMPORTANT
Make sure the dishwasher is centered in the opening
and there is no interference with adjacent cabinets when opening or
closing the door.
Align Tub
Flange
to Front
Face of
Cabinet
Frame
Fasten the dishwasher to the underside of the countertop with the 2
Phillips screws provided.
INSTALLATION INSTRUCTIONS
METHOD 2 – To install on the side boards:
In case counter tops are made of marble, granite, or other hard
materials that could not be drilled, use the installation method below.
Open the door and remove the tub caps on both sides of the tub.
Install screws through the dishwasher side holes to the wall of the
cabinet. Reinstall tub caps.
IMPORTANT
Drive screws straight and ush. Protruding screw
heads will scratch the top of the control panel and can interfere with
the door's ability to close. If the gap is less than
3
/8" between control
panel and the screws, method 2 is recommended.
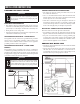
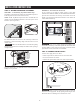
STEP 12: CONNECT WATER SUPPLY
Connect water supply line to 90° elbow.
• Slide compression nut, then ferrule over end of water line.
• Insert water line into 90° elbow.
• Slide ferrule against elbow and secure with compression nut.
90° Elbow
Hot Water
Supply Line
Compression
Nut
Ferrule
IMPORTANT
Make sure the door spring does not rub or contact the
ll hose or water supply line. Test by opening and closing the door.
Reroute the lines if a rubbing noise or interference occurs.