OPERATION MANUAL DISHWASHER MODEL : SDW6757ES Dishwasher: Model SDW6757ES CUSTOMER ASSISTANCE.................................... 2 GETTING STARTED..........................................11 CONSUMER LIMITED WARRANTY........................... 3 DISHWASHER CYCLE OPTIONS............................14 IMPORTANT SAFETY INSTRUCTIONS.......................... 4 CARE AND CLEANING.......................................16 APPEARANCE OVERVIEW.................................... 5 TROUBLESHOOTING..........
CUSTOMER ASSISTANCE UNITED STATES ONLY REGISTER YOUR PRODUCT Registering your new product is easy and offers benefits that help you get the most out of your Sharp product including: 9 Convenience: If you ever need warranty support, your product information is already on file. 9 Communication: Stay up to date with important notifications and special offers from SHARP. 9 Support: Quickly access support content including Owner’s Manuals, FAQ’s, How-to Videos, and much more.
CONSUMER LIMITED WARRANTY SHARP ELECTRONICS CORPORATION (“Sharp”) warrants to the first consumer purchaser (“Purchaserˮ) that this SHARP brand SHARP ELECTRONICS CORPORATION warrants to the first consumer purchaser that this Sharp brand product (the “Product”), when shipped in its original container, will be free from defective workmanship and materials, and agrees that it will, at its option, either repair the defect or replace the defective Product or part thereof with a new or remanufactured equivalent at
IMPORTANT SAFETY INSTRUCTIONS 5 If the dishwasher drains into a food disposer, make sure WARNING For your safety, please follow the information disposer is completely empty before running dishwasher. in this manual to minimize the risk of fire, explosion, electric shock, and to help prevent property damage or personal injury. 6 Do not tamper with controls. 7 Do not operate your dishwasher unless all enclosure panels are in the proper place.
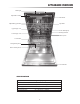
APPEARANCE OVERVIEW LED Light Adjustable 3rd Rack Tub Gasket Adjustable Upper Rack Cup Shelf Upper Spray Arm Power Wash Spray Heating Element Lower Spray Arm Filter System Lower Rack Detergent Dispenser Rinse Aid Dispenser Control Panel SPECIFICATION Capacity 14 place settings Weight Unpacked 94 lb (42.
CONTROL PANEL 1 2 3 4 5 6 7 WASH CYCLE SELECTIONS 8 9 10 11 12 13 OPTIONS 1 Auto 7 Half Load This cycle detects the turbidity degree and loading level of the washing items and automatically selects an optimal wash cycle for best performance. For lightly soiled or pre-rinsed dishes and silverware. This option will save water consumption. 8 Power Wash 2 Heavy Duty Use this option to wash pots, pans, durable serving bowls and other large, heavily soiled or hard-to-clean dishes.
CONTROL PANEL 17 18 19 14 15 16 cycle begins. dishwater fresh. 14 Delay 17 Rinse Aid Indicator Light To delay the start of a selected cycle, press the DELAY pad until the desired delay time shows in the LED display screen. This allows you to automatically start your dishwasher with 1 to 24 hours delay. To cancel the delay start option and begin the cycle before the delay period is over, press the START/CANCEL pad. Illuminates when the dishwasher requires additional rinse aid.
CONTROL PANEL CYCLE PROGRESS INDICATOR STATUS WINDOW The cycle progress lights indicate the progress of the cycle while the dishwasher is running. They are located on the front of the dishwasher panel on the right side. DELAY TIME If the DELAY option is selected, the number of delay start hours will display in the Status Window. If the dishwasher is working and the remaining cycle time is more than 1 hour, number of hours and minutes left will be shown alternately in the Status Window.
CONVENIENT FEATURES LED LIGHTS ADJUSTABLE UPPER RACK Your dishwasher has two LED lights on the top of the tub, which automatically turn on while the door is open. The Upper Rack height can be raised or lowered to accommodate loading taller dishes in either rack. The Upper Rack clearance height H1 goes from 8" to 10". The Lower Rack clearance height H2 is 11" to 13".
CONVENIENT FEATURES FOLDABLE TINES POWER WASH SPRAY The upper and lower racks include flexible tines that can be folded down to create more space for dishes. The tines may be left in the up position for normal use, or folded down for more flexible loading. Your dishwasher is equipped with Power Wash spray in addition to the upper spray arm and the lower spray arm. It is located in the back left corner, and effectively washes heavy soiled pots and pans.
GETTING STARTED HOW YOUR DISHWASHER CLEANS LOADING THE UPPER RACK Your dishwasher cleans by spraying a mixture of hot water and detergent through the spray arms against soiled surfaces. The Upper Rack is designed for cups, glasses, small plates, bowls and plastic items marked dishwasher safe. The dishwasher fills with water, covering the filter area. Water is then pumped through the multiple filter system and spray arms.
GETTING STARTED The three separated modules of the silverware basket can be used in both Upper and Lower Racks.. LOADING THE THIRD RACK The Third Rack can be used to load cutlery or other accessories such as spatulas or cooking spoons. Silverware, knives and utensils should be loaded in the third rack separate from each other in the appropriate positions so they do not nest together.
GETTING STARTED 4 Replace the dispenser cap. FILLING THE RINSE AID Rinse aid greatly improves drying and reduces water spots and filming. Without rinse aid, your dishes and dishwasher interior will have excessive moisture. The Heat Dry option will not perform as well without rinse aid. The Rinse Aid Dispenser, located next to the detergent dispenser, automatically releases a measured amount of rinse aid during the final rinse.
DISHWASHER CYCLE OPTIONS CYCLE CHART PROGRAM DESCRIPTION OF CYCLE DETERGENT - OZ (G) (PRE-WASH/MAIN WASH) WATER - GAL (L) CYCLE TIME (MIN.) CU : 0.5/0.5 (1.5/1.5) Others : 0/0.3 (0/9.9) 3.0 - 5.9 (11.4 - 22.5 ) 90 - 121 0 / 0.7 (0/19.8) 6.9 (26.2) 134 AHM, NSF : 0.7 (19.8) CU : 0.5/0.5 (15/15) DOE : 0/0.3 (0/9.9) 3.0 - 5.9 (11.4 - 22.5) 96 - 116 0/0.7 (0/19.8) 5.9 (22.5) 111 0/0.7 (0/19.8) 4.0 (15.5) 60 0 2.0 (7.
DISHWASHER CYCLE OPTIONS CYCLE TIME WITH OPTIONS PROGRAM DESCRIPTION OF CYCLE CYCLE TIME W/O OPTIONS HALF LOAD POWER WASH HI TEMP WASH SANITIZE HEAT DRY MINUTES Pre-Wash AUTO Wash 118 - 126˚F (48 - 52°C) Rinse 136˚F (58°C) 90 - 121 N.A. N.A. 116 - 148 123 - 158 108 - 145 134 153 158 163 166 158 90 - 116 118 140 120 140 126 - 142 134 - 148 120 - 140 111 126 135 N.A. N.A. 135 60 59 60 N.A. 75 95 20 N.A. N.A. N.A. N.A. N.A.
CARE AND CLEANING CLEANING THE EXTERIOR DOOR AND PANEL CLEAN THE FINE FILTER Take out the Cylinder Filter and remove the Fine Filter from the dishwasher tub bottom. To remove the Fine Filter, you must first remove the bottom spray arm as shown below. 1 Stainless steel panel - Clean the stainless steel door and handle regularly to remove any debris with a soft cleaning cloth. Flush the Fine Filter by holding it under running water and place it back into position.
CARE AND CLEANING AIR GAP CLEAN THE DOOR GASKET If there is an air gap installed with your dishwasher, make sure it is clean, so the dishwasher will drain properly. Clean the door gasket with a damp cloth regularly to remove food particles. Air gap is not part of your dishwasher. Before cleaning the air gap, first turn off the dishwasher, then lift off the cover. Remove the plastic cap and clean with a toothpick.
TROUBLESHOOTING BEFORE CALLING FOR SERVICE PROBLEM Dishwasher won't start POSSIBLE CAUSE SOLUTION Door may not be closed properly Ensure the door is properly closed Power supply or power line is not connected Ensure power supply is correctly connected Delay Start option has been selected Refer to delay start section in this manual to reset Child lock activated (selected models) Refer to child lock section in this manual to deactivate the child lock Dishwasher beeps at the end of the cycle Indic
TROUBLESHOOTING PROBLEM POSSIBLE CAUSE SOLUTION Water remains in the Previous cycle has not finished or has been dishwasher interrupted Select the proper cycle as indicated by the manual Drain is clogged Check the air gap if it is installed Make sure the disposer is empty if the dishwasher is connected to the disposer Drain hose is kinked Be sure the drain hose is properly connected to the sink Improper detergent is used Be sure to use only the automatic dishwasher detergent Excessive suds caused
ERROR CODES When some malfunctions occur, the appliance will display error codes to warn you: CODES MEANINGS POSSIBLE CAUSES E1 Longer inlet time Faucet is not opened, or water intake is restricted, or water pressure is too low E4 Overflow Some element of dishwasher leaks E8 Failure of orientation of distributary valve Open circuit or break of distributary valve E9 Holding a button for longer than 30 seconds Water or some other material on the button WARNING • If overflow occurs, turn off th