OVER THE RANGE MICROWAVE OVEN OPERATION MANUAL MODEL SMO1652DS CONTENTS • For Customer Assistance ..... 2 • Precautions to Avoid Possible Exposure to Excessive Microwave Energy .................... 3 • Consumer Limited Warranty........................ 4 • Important Safety Instructions...................... 5 • Federal Communication Commission Radio Frequency Interference Statement ............ 6 • Grounding Instructions ................................ 6 • Installation Guide ......................
CUSTOMER F O R C U S T O MASSISTANCE E R A S S I S TA N C E UNITED STATES ONLY REGISTER YOUR PRODUCT Registering your new product is easy and offers benefits that help you get the most out of your Sharp product including: 9 Convenience: 9 Communication: 9 Support: If you ever need warranty support, your product information is already on file. Stay up to date with important notifications and special offers from SHARP.
PRECAUTIONS TO AVOID POSSIBLE EXPOSURE TO EXCESSIVE MICROWAVE ENERGY (a) Do not attempt to operate this oven with the door open since open-door operation can result in harmful exposure to microwave energy. It is important not to defeat or tamper with the safety interlocks. (b) Do not place any object between the oven front face and the door or allow soil or cleaner residue to accumulate on sealing surfaces. (c) Do not operate the oven if it is damaged.
CONSUMER LIMITED WARRANTY SHARP ELECTRONICS CORPORATION warrants to the first consumer purchaser that this Sharp brand product (the “Product”), when shipped in its original container, will be free from defective workmanship and materials, and agrees that it will, at its option, either repair the defect or replace the defective Product or part thereof with a new or remanufactured equivalent at no charge to the purchaser for parts or labor for the period(s) set forth below.
I M P O RTA N T S A F E T Y I N S T R U C T I O N S When using electrical appliances, basic safety precautions should be followed, including the following: WARNING-To reduce the risk of burns, electric shock, fire, injury to persons or exposure to excessive microwave energy: 1. Read all instructions before using the appliance. cord, or shut off power at the fuse or circuit breaker panel. d) Do not use the cavity for storage purposes.
F E D E R A L C O M M U N I C AT I O N S C O M M I S S I O N R A D I O F R E Q U E N C Y I N T E R F E R E N C E S TAT E M E N T WARNING: This equipment generates and uses ISM frequency energy and if not installed and used properly, that is in strict accordance with the manufacturer's instructions, may cause interference to radio and television reception.
I N S TA L L AT I O N G U I D E 1. Examine the oven after unpacking. Unpack the oven, remove all packaging material and examine the oven for any damage such as dents on the interior or exterior of the oven, broken door latches, cracks in the door, or a door that is not lined up correctly. If there is any damage, do not operate the oven and notify your dealer immediately. 2. Checking the parts Carefully unpack your microwave oven, and make sure you’ve received all the parts shown below.
INSTALLATION GUIDE • Check power cord and outlet - Remove all foreign substances such as dust or water from the power plug terminals and contact points using a dry cloth on a regular basis. - Unplug the power plug and clean it with a dry cloth. - Plug the power cord into a properly grounded 3 pronged outlet. Your oven should be the only appliance connected to this circuit. - Sharing a wall socket with other appliances, using a power strip, or extending the power cord may result in electric shock or fire.
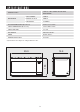
S P E C I F I C AT I O N S 120V AC, 60Hz SINGLE PHASE WITH GROUNDING POWER SUPPLY MICROWAVE INPUT POWER 1600 W ENERGY OUTPUT 1000 W FREQUENCY 2,450MHz OUTSIDE DIMENSIONS (W x H x D) 29.9 x 16.3 x 15.9 in CAVITY DIMENSIONS (W x H x D) 19.8 x 10.0 x 14.9 in CAVITY VOLUME 1.6 cu.ft NET WEIGHT APPROX. 50.5 lbs TIMER 99 min. 99 sec. POWER SELECTIONS 10 Levels * Specifications are subject to change without notice. 15.9 16.3 29.
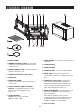
F E AT U R E S D I A G R A M 1 2 3 4 12 11 5 6 7 15 13 10 9 8 14 16 1 DOOR LATCHES 9 DOOR BUTTON - To open the door push the door open button. 2 WINDOW with METAL SHIELD - Screen allows cooking to be viewed while keeping microwaves confined in oven. 0 COOKTOP LIGHT q GREASE FILTERS 3 MODEL NUMBER PLATE - Located on the front wall of the microwave oven. w HANDLE FILTERS - Use to insert Grease Filters.
FEATURES DIAGRAM The Touch Control Panel allows you to set the oven controls with the press of a finger. It’s designed to be easy to use and understand. 1 2 3 6 4 5 7 8 9 0 w q e r y t u i o p a d s ◆ Each time a pad is pressed, a BEEP will sound. ◆ When STOP/CLEAR Pad is pressed during oven operation, the oven will stop, however, all programmed information is retained. To clear all information, press the STOP/CLEAR Pad again.
FEATURES DIAGRAM 1 DISPLAY - Displays time of day, time or power level being used, cooking mode and instructions. r POWER LEVEL - Press this pad if you want to change from automatic Power Level 10 (High) for cooking. 2 FROZEN ENTREE - Press this pad to cook Frozen Entree. The microwave oven sensor will automatically adjust the cooking time to the type and amount of food. t NUMBER PADS - Press these pads to enter cooking time, defrosting time or weight, time of day, power level.
O P E R AT I O N P R O C E D U R E This section includes useful information about oven operation. 1 Plug power supply cord into a standard 3-pronged 15 Amps 120V AC 60Hz power outlet. ime clock returns to the present time when the 19 Tcooking time ends. 2 After placing the food in a suitable container, open the oven door and put it on the glass tray. The glass tray and roller guide must always be in place during cooking.
CONTROLS SETTING THE CLOCK When the oven is first plugged in, the display will show " : 0" and a tone will sound. If the AC power ever goes off, the display show “ : 0” when the power comes back on. 1. Press the CLOCK pad. This is a 12 hour clock system. The ENTER, TIME indicators blink and "12H" is displayed. 2. Press the CLOCK pad once more. This is a 24 hour clock system. NOTE : This oven has multiple clock systems. If you want 12 hour clock system, omit this step. 3.
CONTROLS KITCHEN TIMER MODE (CONTINUED) HOW TO USE TO DELAY THE START OF COOKING 1. Press KITCHEN TIMER pad. The ENTER, TIME indicators blink and “ : 0” is displayed. 2. Press the amount of time you want to delay. The display will show what you pressed. 3. Press TIME COOK pad to program the desired cooking time for food to be cooked. 4. Press START pad. When you press START pad, the TIME indicator starts blinking and the display counts down the time remaining in KITCHEN TIMER mode.
CONTROLS TIME DEFROSTING When TIME DEFROST is selected, the automatic cycle divides the defrosting time into periods of alternating defrost and stand times by cycling on and off. 1. Press DEFROST pad once. The DEF indicator lights and ENTER, TIME indicators blink, “ : 0” is displayed. 2. Press number pads for the desired defrosting time. The display will show what you pressed. NOTE : Your oven can be programmed for 99 minutes 99 seconds. (99:99) 3. Press START pad.
CONTROLS MELT/SOFTEN The melt/soften feature can be used to melt or soften butter, chocolate, ice cream and cheese. See the chart for specific settings to use. 1. Press MELT/SOFTEN pad once for butter, twice for chocolate, three times for ice cream, four times for cheese. The display will show what you pressed. 2. Press START pad. MELT/SOFTEN ITEM CHART PRESS PAD D I S P L AY SOFTEN ITEM WEIGHT once S--1 Butter 1/2 cup twice S--2 Chocolate 8 oz.
CONTROLS TIME COOK 1. Press TIME COOK pad. The COOK indicator lights and ENTER, TIME indicators blink., “ : 0” is displayed. 2. Press number pads for the cooking time. The display will show what you pressed. 3. Press POWER LEVEL pad. The display will show PL10 for 100% power. 4. Press number pads for power level (0~10). The display will show PL-0 ~ PL10. 5. Press START pad. If you skip 3 and 4 step, 100% power is automatic. NOTE : Your oven can be programmed for 99 minutes 99 seconds.
CONTROLS COOKING IN TWO STAGES This feature lets you program two sequential operations such as defrosting and cooking or cooking using two different power levels. It automatically changes power settings and cooking time. Defrosting + Cooking 1. Press Defrost pad once. The DEF indicator lights and ENTER, TIME indicators blink, “ : 0” is displayed. 2. Press number pads for the defrosting time you want. The display will show what you pressed. 3. Press TIME COOK pad.
CONTROLS COOKING IN TWO STAGES (CONTINUED) Cooking + Cooking 1. Press TIME COOK pad. COOK indicator lights and ENTER, TIME indicators blink. “ : 0” is displayed. 2. Press number pads for the cooking time. The display will show what you pressed. 3. Press TIME COOK pad. The COOK indicator lights and ENTER, TIME indicators blink., “ : 0” is displayed. 4. Press number pads for the cooking time. The display will show what you pressed. 5. Press POWER LEVEL pad.
CONTROLS +30 SEC +30 sec allows you to reheat for 30 seconds at 100% (full power) by simply pressing the +30 sec pad. By repeatedly pressing the +30 sec pad, you can also extend reheating time to 99 minutes 99 seconds by 30 second increments. 1. Press the +30 sec pad. When you press the +30 sec pad, “:30” is displayed and the oven starts reheating.
CONTROLS ONE TOUCH COOK(PRESET) One touch cooking allows you to cook or reheat many of your favorite foods by pressing just one pad. To increase quantity, press the chosen pad until the number in the display is same as desired quantity to cook. 1. Press POPCORN pad once for 3.5 oz bag, twice for 3.0 oz bag or three times for 1.75 oz bag. When you press POPCORN pad once, “ 3.5 ” is displayed. 2. Press START pad. NOTE : 1. Use prepackaged room-temperature microwave popcorn. 2.
CONTROLS SENSOR OPERATIONS The Sensor Cook categories are designed to detect the increasing humidity released by the food during the cooking process. The microwave oven sensor will automatically adjust the cooking time to the type and amount of food. Using Sensor Settings 1. After the oven is plugged in, wait 2 minutes before using Sensor Cook. When the sensor detects the vapor emitted from the food, the remainder of cooking time will appear.
CONTROLS SENSOR COOK Sensor is semi-conductor device that detects the vapor emitted from the food as it heats. The sensor adjusts the cooking time and power level for various food and quantities and you don't need to enter the weight or quantity of the food. 1. Press POTATO pad. When you press POTATO pad, "SCPO" is displayed. When the sensor detects the vapor emitted from the food, the remainder of cooking time will appear. 2. Press START pad. 1. Press FROZEN ENTREE pad.
CONTROLS TURNTABLE ON-OFF For best cooking result, the turntable should be on. However the turntable can be turned off so that it does not rotate when extra large dishes are used. 1. TURNTABLE On-Off pad. The options are displayed for 2 seconds. NOTE : 1. This option is not available in sensor cook, one touch cook, defrost and melt/soften modes. 2. Sometimes the turntable can become too hot to touch. Be careful touching the turntable during and after cooking. 3. Do not run the oven empty.
CONTROLS MUTE Audible signals are available to guide you when setting and using your oven. To mute, press KITCHEN TIMER pad for 3 seconds. The MUTE indicator lights. To sound on, press KITCHEN TIMER pad for 3 seconds. A beep sounds and the MUTE indicator will be turned off. FILTER RESET If your oven is vented to the inside, the charcoal filter should be replaced approximately every 6 months. The charcoal filter can not be cleaned.
CONTROLS TO STOP THE OVEN WHILE THE OVEN IS OPERATING 1. Press the STOP/CLEAR pad. • You can restart the oven by pressing the START pad. • Press the STOP/CLEAR pad once more to erase all instructions. • You must enter in new instructions. 2. Open the door. • You can restart the oven by closing the door and pressing the START pad. NOTE : Oven stops operating when door is opened. METAL RACK The metal rack gives you extra space when cooking in more than one container at the same time.
CARE AND CLEANING WARNING: The oven should be cleaned regularly and any food deposits removed. Failure to maintain the oven in a clean condition could lead to deterioration of the surface that could adversely affect the life of the appliance and possibly result in a hazardous situation. MICROWAVE OVEN INTERIOR Disconnect the power cord before cleaning or leave the door open to inactivate the oven during cleaning.
CARE AND CLEANING THE EXHAUST FEATURE The exhaust hood feature on your microwave oven is equipped with two metal filters which collect grease. When the fan is being operated, air is drawn up through the filters and is then discharged through the venting to the outside or through the charcoal filters if not vented to the outside. METAL GREASE COOKTOP METAL GREASE FILTER LIGHT FILTER REUSABLE GREASE FILTERS The reusable grease filters should be cleaned at least once a month.
CARE AND CLEANING LIGHT REPLACEMENT Cooktop Light When replacing the cooktop light, make sure that you are wearing gloves to avoid injury from the heat of the lamp. 1. Unplug the oven or turn off the power at the main power supply. 2. Remove the screw from the light cover and lower the cover until it stops. 3. Remove the screw on center of the LED Light secured to the Cover and pull out terminal. 4. Replace with 1.0-watt LED light available from your authorized dealer and secure with screw.
CARE AND CLEANING INSTALL/REPLACE CHARCOAL FILTER Charcoal Filter If your oven is vented to the inside, the charcoal filter should be replaced if it is used for approximately 6 months. You can purchase Charcoal Filter from 1-800-BE-SHARP. 1. Unplug the oven or turn off the power at the main power supply. 2. Remove the grille air mounting 3 screws and open the door. 3. Slide the grille air to the left, then pull it straight out. 4. Push the charcoal filter backwards and remove it. 5.
BEFORE YOU CALL Check the following to be sure a service call is necessary: If noting on the oven operates: • check for a blown circuit fuse or a tripped main circuit breaker. • check if oven is properly connected to electric circuit in house. • check that controls are set properly. • check that the cooking time is set. If the interior of oven collects moisture: • this is normal. Food gives off moisture when cooking and the steam collects on the door and the oven surface.
QUESTIONS AND ANSWERS * Q : I accidentally ran my microwave oven without any food in it. Is it damaged? * A : Running the oven empty for a short time will not d a m a g e t h e o v e n . H o w e v e r, i t i s n o t recommended. * Q : What does “standing time” mean? * A : “ Standing time” means that food should be removed from the oven and covered for additional time to allow it to finish cooking. This frees the oven for other cooking.
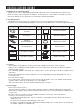
COOKING INSTRUCTIONS UTENSIL GUIDE Only use utensils that are suitable for use in microwave ovens. To cook food in the microwave oven, the microwaves must be able to penetrate the food, without being reflected or absorbed by the dish used. Care must therefore be taken choosing the utensil. If the utensil is marked microwave-safe, you do not need to worry. The following table lists various utensil and indicates whether and how they should be used in a microwave oven.
COOKING INSTRUCTIONS USE YOUR MICROWAVE OVEN SAFELY General Use Do not attempt to defeat or tamper with safety interlocks. Do not place any object between the oven front frame and the door or allow residue to build up on sealing surfaces. Wipe with a mild detergent, rinse and dry. Never use abrasive powders or pads. Do not subject the oven door to strain or weight such as a child hanging on an open door. This could cause the oven to fall forward resulting in injury to you and damage to the oven.
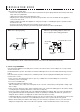
COOKING INSTRUCTIONS MICROWAVING PRINCIPLES Microwave energy has been used in this country to cook and reheat food since early experiments with RADAR in World War ll. Microwaves are present in the atmosphere all the time, both naturally and manmade sources. Manmade sources include radar, radio, television, telecommunication links and car phones. HOW MICROWAVES COOK FOOD Oven Cavity Turntable Magnetron TRANSMISSION In a microwave oven, electricity is converted into microwave by the MAGNETRON.
COOKING INSTRUCTIONS COOKING TECHNIQUES STANDING TIME STARTING TEMPERATURE Dense foods e.g. meat, jacket potatoes and cakes, require standing time(inside or outside of the oven) after cooking, to allow heat to finish conducting to cook the center completely. Wrap meat joints and jacket potatoes in aluminium foil while standing. Meat joints need approx. 10-15 minutes, jacket potatoes 5 minutes. Other foods such as plated meal, vegetables, fish etc require 2-5 minutes standing.
COOKING INSTRUCTIONS DEFROSTING GUIDE ▶ Do not defrost covered meat. Covering might allow cooking to take place. Always remove outer wrap and tray. Use only containers that are microwave-safe. ▶ Begin defrosting whole poultry breast-side-down. Begin defrosting roasts fat-side-down. ▶ The shape of the package alters the defrosting time. Shallow rectangular shapes defrost more quickly than a deep block. ▶ After 1/3 of the defrost time has elapsed, check the food.
COOKING INSTRUCTIONS COOKING & REHEATING CHART Cooking chart ITEM POWER LEVEL COOKING TIME PER LB./450G SPECIAL INSTRUCTION MEAT Beef joint - Rare - Medium - well done PL-8 6-8 min. PL-8 7-10 min. - Chilled meat and poultry should be removed from the refrigerator at least 30 minutes before cooking. PL-8 9-11 min. Pork Joint PL10 9-12 min. Bacon joint PL10 5-7 min. Whole chicken PL10 4-9 min. Portions chicken PL-8 5-7 min. Breast (boned) PL-8 6-8 min. Fish Fillets PL10 3-5 min.
COOKING INSTRUCTIONS COOKING & REHEATING CHART Reheating chart • Baby food particularly needs to be checked carefully before serving to prevent burns. • When heating pre-packaged ready-cooked foods, always follow the pack instructions carefully. • If you freeze foods which were bought from the fresh or chilled counters, remember that they should be thoroughly thawed before following the heating instructions on the packed.
COOKING INSTRUCTIONS VEGETABLE CHART Use a suitable glass pyrex bowl with lid. Add 30-45ml cold water(2-3 tbsp.) for every 250g unless another water quantity is recommended - see table. Cook covered for the minimum time - see table. Continue cooking to get the result you prefer. Stir once during and once after cooking. Add salt, herbs or butter after cooking. Cover during a standing time of 3 minutes. Hint : cut the fresh vegetables into even sized pieces.
COOKING INSTRUCTIONS RECIPES TOMATO & ORANGE SOUP 1 oz.(25g) butter 1 medium onion, chopped 1 large carrot & 1 large potato, chopped 13/4lb(800g) canned, chopped tomatoes juice and grated rind of 1 small orange 11/2pints(900ml) hot vegetable stock salt and pepper to taste 1. Melt the butter in a large bowl on PL10 for 30 seconds. 2. Add the onion, carrot and potato and cook on PL10 for 4 minutes. stir halfway through cooking. 3. Add the tomatoes, orange juice, orange rind and stock. Mix thoroughly.
COOKING INSTRUCTIONS BLUE CHEESE & CHIVE JACKETS 2 baking potatoes, (approx.9 oz.(250g) each) 2 oz.(50g) butter 4 oz.(100g) blue cheese, chopped 1 tbsp(15ml) fresh chives, chopped 2 oz.(50g) mushrooms, sliced salt and pepper to taste 1. Prick each potato in several places. Cook on PL10 for 7-9 minutes. Halve and scoop the flesh into a bowl, add the butter, cheese, chives, mushrooms, salt and pepper, mix thoroughly. 2. Pile mixture into the potato skins and place in a flan dish. 3.
COOKING INSTRUCTIONS SCRAMBLED EGG 1/2 oz.(15g) butter 2 eggs 2 tbsp(30ml) milk salt & pepper 1. Melt the butter in a bowl on PL10 for 30 seconds. 2. Add the eggs, milk and seasoning and mix well. 3. Cook on PL10 for 3 minutes, stirring every 30 seconds. SAVORY MINCE 1 small onion, diced 1 clove garlic, crushed 1 tsp(5ml) oil 7 oz.(200g) can chopped tomatoes 1 tbsp(15ml) tomato puree 1 tsp(5ml) mixed herbs 8 oz.(225g) minced beef salt and pepper 1.
SHARP ELECTRONICS CORPORATION 100 Paragon Drive, Montvale, NJ 07645 MAR.